Quantcast
Channel: Telerik Blogs
Viewing all 4176 articles
Browse latest View live

Webinar Recap: Modern Apps with Xamarin.Forms and Telerik UI

$
0
0

Learn how to build beautiful native cross-platform apps from a single C# codebase, as we recap our Xamarin.Forms and UI for Xamarin webinar.

Native iOS/Android/Windows apps from a single shared C# codebase? Nope, not a dream but a reality with Xamarin.Forms. You can now use your .NET skills to build modern X-Platform mobile apps and share not just business logic, but UI code as well. You get complete native API access on each platform and modern productive tools to build your dream Xamarin apps.

The out-of-the-box experience is a good place to start, but your professional Xamarin.Forms apps will soon be calling out for polished and well-engineered UI. Who wants to rediscover the wheel on complex UI controls that leverage corresponding platform integrations?

Enter Telerik UI for Xamarin—beautiful, polished and elegant UI controls for your Xamarin apps. You get complex Charts, amazing ListViews and handy SideDrawers—all out of the box. Want hard-hitting performant controls? We’ve got you covered. Need productivity? Our professional Xamarin.Forms UI controls deliver.

Relive the Content

On Jul 20th 2016, we hosted a webinar that dived into Xamarin.Forms and Telerik UI for Xamarin. Your hosts were: James Montemagno (Principal Program Manager of Xamarin @ Microsoft), Nikolay Diyanov (Product Manager of Telerik UI for Xamarin @ Progress) and your truly, Sam Basu (Developer Advocate @ Progress).

It was an awesome hour. We went as in-depth as possible and showed off some cool demos. We had a huge audience who asked a LOT of questions—understandable given how important the Xamarin toolset has become for .NET developers. If you could not make it for the live webinar, you can relive the webinar in its entirety. High definition recording available now!

 Webinar Recording

Prize Winners

What’s a Progress webinar without some awesome prizes? Our gadget pick this time was the ICE Portable Wireless Floating Bluetooth Speaker—because what else could be cooler that levitating speakers!

 ICEBTSpeaker

We picked three random winners (tentative until accepted) among webinar attendees. You win just for showing up!

  1. Jason Coughenour, US, NY
  2. Michael Vogel, US, TX
  3. Chris Hawkins, US, WA

Congrats winners. Hope you enjoy your prizes!

Additional Question/Answers

One of the most enjoyable aspects of our webinars is the Q&A at the end. We appreciate developers bringing up real-world questions and concerns on the latest technologies.

While we tried to answer as many questions as we could on air, here’s an excerpt of some short Q&A topics that were important to resurface:

Q: Can I use Telerik UI for Xamarin UI controls from both Windows and OSX?
A: Yes, absolutely! You can use the Telerik Xamarin UI controls both from Visual Studio on Windows and Xamarin Studio on a Mac.

Q: What platforms can you target with Xamarin?
A: In short: almost everything, including iOS, Android, Mac and Windows. This is not limited to phones, tablets and desktop only—you could target smart watches and corresponding TV platforms as well.

Q: Do I have to have a Mac when building apps with Xamarin?
A: Only if you are targeting iOS and can be a remote Mac. It is an Apple restriction and the Mac running XCode will only serve up builds for your native iOS app.

Q: How is my Xamarin app packaged up?
A: The end result is a native app on every platform—so APK for Android and IPA for iOS.

Q: How can I incorporate the Telerik UI for Xamarin controls into an existing project?
A: There are three ways. You can download from the Telerik website, use the Telerik Dashboard or simply leverage the NuGet server to pull in the bits. All you need are the right references in your project.

Q: How much code sharing do I get when using Telerik UI for Xamarin.Forms?
A: 100%. The Xamarin.Forms Telerik UI controls render through XAML/C# abstractions and become native UI components on each platform.

Q: How often is Telerik UI for Xamarin updated?
A: UI for Xamarin is actually a part of Telerik DevCraft—so it gets three major updates a year, and smaller patches throughout. Your IDE will prompt you when updates are available.

Q: Is UWP support coming for Telerik UI for Xamarin?
A: Yep, in R3 of 2016 slated for September. Also coming are some brand new controls. For more, please check out the product roadmap.

Resources

That’s a Wrap

This may be one of the best times to be a .NET developer. Thanks to the new .NET Core and toolsets like Xamarin, your .NET apps can go places that were hitherto impossible. With C#, you can truly target any device or platform.

And when your apps crave a polished UI, look no further than Telerik DevCraft—the richest complete .NET UI toolkit and frameworks for all applications, including web, desktop & mobile. Adios and have fun coding! 


Living Dangerously Without mBaaS: Why Reinvent the Wheel?

$
0
0

Are you working in the mobile world without mobile backend services? That's a dangerous choice. Learn how mBaaS can help you build more scalable, reliable and engaging apps.

Living Dangerously Without mBaaS Why Reinvent the Wheel

As a developer, your mission is to build world-changing products, focus on development and deliver great user experiences. Should you really have to worry about coding all the low-level features/APIs for ensuring scalability, performance and higher customer engagement? We think developers should spend their quality time building and delivering end-user experiences.

Leverage mBaaS with Telerik Platform

iStock_27182971_LARGE

Telerik Platform by Progress provides a robust set of mobile backend-as-a-service (mBaaS) capabilities for taking your mobile app to the next level. With Telerik Platform mBaaS, developers get out-of-the-box integration with a variety of data connectors for existing enterprise data sources. Also, Telerik Platform handles scalability, managed reliability and better application performance through highly optimized backend services. Now, developers can focus on the important parts of the application, and leave the utility work of providing a stable backend to us.

Benefits of Telerik Platform mBaaS

Drive Connectivity and Scalability

iStock_000075750321_Large

Developers can reuse and leverage backend functionality in multiple apps (for mobile, IoT, wearables and others) with Telerik Platform mBaaS. It uses our industry-leading Progress DataDirect drivers behind the scenes, through which you can even connect to legacy data sources. It’s that good.

Every mobile app needs an authentication mechanism. With Telerik Platform mBaaS, you can authenticate against social media platforms and leverage existing Active Directory solutions.

To make your app business workflow-friendly, you can also trigger custom business logic on specific events with our mBaaS.

Drive Better Performance

iStock_62798956_LARGE

Apps need to be robust enough to deal with unforeseen situations, such as bad data network coverage at remote areas or in buildings. Telerik Platform mBaaS uses data caching and offline synchronization to provide responsive and fluid user experiences, even when they’re offline.

Each mobile device uses a different mobile screen size; you want to ensure your app’s images are rendered correctly and sized appropriately, to avoid rendering delays. Our mobile backend services will automatically scale images to maintain the great experience your users deserve.

The solution also provides cloud storage, so you can store all your essential application assets, including images and files, making your application as lightweight as possible.

Drive Retention and User Engagement

iStock_88169203_LARGE

One way of keeping application usage high and audiences informed is to send notifications. Telerik Platform mBaaS provides Push notification, SMS notification (via Twilio) and email notification capabilities, so you can use the correct delivery standard to drive excellent user engagement. It’s easy to monetize your app with your captive audience by sending timely promotions and offers.

Full Control & Flexibility to Call APIs Directly via SDKs

iStock_85257561_LARGE

Sometimes, all you want to do is call a specific functionality from your app. For this, you can leverage SDKs covering all the abovementioned functionalities on each platform/technology. For hybrid, you can use the JavaScript SDK, for iOS you can use the Objective C SDK, and for Android you can use the Java SDK, and so on. You always stay in control.

For example, say you want to list some data from an enterprise data store. Our REST APIs in the SDKs can be invoked to load the data stored inside the app’s content types or from an external connector. Taking another scenario, if you want to specifically login a user by authenticating against Microsoft ADFS, you can do that via our REST APIs as well.

Use Cases of Telerik Platform mBaaS

iStock_92435411_LARGE

Say you want your sales force to track orders for your customers by retrieving information from internal data sources, while authenticating sales team members against Active Directory or social media platforms. Or, when a special order for a high revenue generating product comes in, you want to alert key departments like manufacturing, shipping and operations to prioritize its delivery. Both of these needs can be met through data connectors and custom business workflow.

Let’s consider another scenario. Imagine you provide professional services, and your workforce travels door-to-door collecting crucial information via forms. Sometimes, the data coverage may not be great on the mobile device, but with data caching and offline synchronization, you can ensure seamless business operations without losing data.

If you are an ecommerce shop, you can deliver an optimal user experience of product catalog images on end devices for browsing, using both cloud storage and responsive image features. Your users will really appreciate the thoughtfulness in making the app light and fast at the same time.

Lastly, imagine you are a flowers boutique and want to send special discount promotions to your mobile customers from time to time. If you have their cell numbers, you can send SMS notifications. Otherwise, you can notify them via push notifications within the app. Either way, you help your business continue to grow.

Take a Test Drive Today and Start Benefiting

iStock_69293393_LARGE

If you are already using Telerik Platform, take advantage of our generous free tier of mobile backend services. You get 100 MB of database storage, 1 GB file storage, 5 GB of bandwidth and 1 million push notifications! Need more? Check out our other plans.

If you are developing mobile apps and haven’t tried Telerik Platform yet, get started today! We love hearing from developers and empowering them to build outstanding user experiences.

Meet Osei Fortune, Developer Expert for NativeScript

$
0
0
Osei Fortune, Telerik Developer Expert for NativeScript, talks about building NativeScript mobile apps, working in software and more.

Osei Fortune (pronounced "Oh-See"), famous as "Triniwiz" in the NativeScript Slack Channel, is a Telerik Developer Expert for NativeScript hailing from sunny Trinidad.

This post is the fifth in a series featuring our Telerik Developer Experts, community members who represent the best of our products. Read about our first four featured experts here and meet more TDEs here.


Osei Fortune

What’s your background, professionally?

I ventured into software development about two years ago after changing from computer technician to system administrator. My job, basically, is to build software that makes working easier. I support our corporate internet, coordinate code authoring, testing and deployment, help update our systems, install new software, and pretty much do anything that needs to be done in-house.

Where are you based and why?

I'm based in Siparia, a town in southern Trinidad, in Trinidad and Tobago. It's my home town and I haven't decided to move just yet.

trinidad

With whom are you working?

I work at TOSL Engineering Limited (TOSL), a multi-faceted Engineering Services and Sales organization.

What project are you working on now?

I'm always working on multiple projects. Most are open source software; you can check out my GitHub repositories to see what i'm working on. My current works in progress are a message app, a document management system, bringing iOS support to my NativeScript plugins as I just got access to a Mac, and more.

What’s the most interesting project you’ve done recently?

My most interesting project I've done recently was the weather app that was one of the finalists in this summer's NativeScript weather app challenge. Although I changed the design a couple times before making up my mind, I was able to build that app in about three days with a custom api running with nginx + express. You can download this app for Android here.

Which of our products do you use and why?

I love NativeScript! NativeScript is my go-to product for building mobile apps. I'm also evaluating Telerik Platform and Telerik UI for NativeScript to add extra features to my awesome NativeScript apps and plugins.

Webinar Follow-up: New Testing Battlefields

$
0
0

Four testing experts recently explored testing beyond the "traditional" desktop and web, including the new battlefields of Mobile and IoT. Read on for a recap or to watch a webinar replay.

The testing domain has always included work outside the "traditional" UI applications in web and desktop—it's just never been as well publicized. That's changing rapidly with the explosion of mobile and embedded systems. In addition, the devices making up the Internet of Things, automobile systems, and similar systems all need testing too.

On June 15th we hosted an hourlong webinar where I, Jim Holmes, and three other testing experts discussed areas in technology outside "traditional" web and desktop. I was joined in the webinar by:

  • Richard Bradshaw, AKA the "Friendly Tester." Richard's an independent tester, consultant, trainer and speaker.
  • Daniel Knott, who is a senior tester working on Android projects at Xing.
  • Iliyan Panchev, Program Manager for Test Studio at Progress.

You can find the deck hosted at SpeakerDeck.com, and a recording of the webinar is available on YouTube (or you can watch it at the bottom of this post).

You can also find related posts from Iliyan at the Telerik blogs, Richard at his blog, and Daniel at his blog.

Discussion Highlights

Panelists covered topics from embedded systems in household appliances to understanding modeling in mobile applications.

Mobility Isn't New, or Is It?

Much of the discussion centered around mobility. Mobility's certainly not new, but it's definitely seeing an acceleration of interest!

One aspect that makes testing in the mobile domain so interesting is how personal users view their devices. People expect startup delays in desktop applications, and they're used to web pages taking time to load. That's far from the case with mobile apps. Users want to quickly access suspended apps and quickly interact with them.

This mindset brings lots of complexity in to the testing space: how do you interact with apps in this manner? How do you handle creating or simulating interactions between apps, or interruptions due to notifications, incoming calls, etc.?

A number of approaches for these situations were discussed, including use of third party services to trigger texts, calls, or other notifications. The importance of proxies (discussed below) was also highlighted.

Modeling for Value

System modeling is the practice of breaking apart a system into its subcomponets to identify critical responsibilities, data flows, actions, etc. Taking the time to discuss modeling with the rest of the team helps testers focus in on effective, efficient testing. Modeling ensures testers understand where to focus on API testing, where to flesh out automated unit checks, where to invest in exploratory testing, etc.

Modeling doesn't have to be complex. It's more important to get a conversation going with the proper folks on your team—and often a simple whiteboard diagram is all that's needed!

Tooling

Tooling for testing mobile apps took up a fair amount of time. The webinar's audience had several questions in addition to the panelists' own thoughts on tooling.

Tooling in IoT and embedded has a long way to go to catch up with that in desktop or web. There's not much for testing frameworks, unit or otherwise, in either space, nor is there anything close to the smooth delivery pipeline tools. Embedded can be particularly difficult, especially the time and effort involved in pushing to the final device, whether it's a refrigerator or automobile!

Mobile tooling has come quite a long ways, although it's still behind desktop and web.

  • Android Debugger Bridge is critical for anyone doing work on the Android platform. It's a command line tool for communicating with the simulator.

Driving the UI for automated tests is critical. The following three toolsets were mentioned in one form or another.

  • Appium is an open source framework for native, hybrid, and web apps on mobile devices. It uses the WebDriver open source browser driver.
  • Applitools is a commercial product that supports automated visual checks of UIs. It supports Windows 8, Android, and iOS.
  • Test Studio is a commercial product that supports native, hybrid, and web automation on iOS and Android.

Proxies

Proxies are a tool that sit in the middle of two communicating systems, say a mobile app and a server, and allow you to interact with traffic as it moves through. This allows you to monitor and change communication between the app and server—critical if you're troubleshooting or trying to cause errors in data or transmissions.

  • Fiddler is undoubtedly the best-known proxy/web debugging tool.
  • Charles is another well-known proxy for OSx.
  • Browserstack is another well-used proxy available for Windows, OSx, and Linux.

    Vastly Different Risks

Vastly Different Risks

All the panelists agreed "risk" is a very different notion, especially in the embedded space. Errors in embedded systems can have a much more dramatic impact. Some of the concerns discussed include:

  • Difficulty of Bugfixes. Few embedded systems are designed for easy updates. Many give no path for updating firmware, ever. This means what you ship has to be solid—there's little or no chance for shipping a service pack.
  • Death. Mistakes in some embedded systems (automobiles, medical devices, avionics, etc.) can outright cause a loss of life. Bugs don't get riskier than that.

Selected Audience Questions

Audience members had a great many questions during the hour-long session. A few selected questions are discussed below.

Q: I have had trouble with Android and requests not going through the proxy I set up.

A: Proxy settings for Android devices are set two ways: first, in your development environment, and secondly in the device's network settings. Unfortunately, there's no common way across environments or devices.

For Android Studio, read this article. For Visual Studio 15 RC2 check this StackOverflow post.

On-device proxy settings are generally through the device's wifi network settings. Here's one example on StackOverflow—but keep in mind this will vary between devices and OS versions...

Q: We have found that our firewall blocks the use of some proxy tools. Any advice?

A: Unfortunately you'll need to work with your organization's firewall staff. Ask about setting up a specific rule to support your development needs. This may take some time for coordination. Be sure to lay out a solid business case so they'll understand it's not just some geeky testers and developers trying to game the system—you're trying to solve concrete business needs!

Q: What are best practices for Android Testing?

A: First, there is no such thing as "Best Practices!" There are only starting points which vary for each situation. Sorry, that's a pet peeve of mine.

Testing Android is very much the same as other mobile devices: Focus on risk and business value first. Ensure you're using modeling to break the system into sensible components you can write appropriate automated checks for, then focus on the harder parts you can't automate.

Some of those areas we discussed during the session included:

  • Interactions. Think notifications, calls, texts, etc.
  • Power and resource usage. How does the app behave when other high-usage activities are occurring?
  • Suspended mode. Does the app behave well when coming out of suspensions?
  • Dropping/intermittent connectivity. Real users travel on trains, planes, elevators, and through regions where coverage might not be so great. 

Q: What is more beneficial—just the mobile app automation or an end-to-end automation with backend systems?

A:  Automating end-to-end checks rarely makes sense for mobile device apps. Instead, automate everything you can on the device and on the back end systems separately. That includes service testing to and from both the device and backend. That way you've got solid coverage in and out of the client and server. Then focus on great exploratory testing around the components (see modeling above) and the communications too.

Q: Are there tools to extract data from complex JSON formats to excel or csv to verify or visualize the data correctness/quality?

A:  Yes! All platforms (.NET, Java, Ruby, etc.) have great libraries that will let you do this programatically or live. Some quick suggestions:

Q: What tools do you suggest to generate test data?

A:  Each major language platform has various data generation libraries. Some commercial tools exist as well. The Faker library is available for all major languages and provides a great way to generate many types of data such as internationalized phone numbers, postal codes, company names, etc.

Watch the Webinar

Missed the webinar or just want to see it again? You can watch the entire webinar below:

Expect New List Controls and More in Telerik ASP.NET AJAX

$
0
0

Learn what's coming in the latest release of UI for ASP.NET AJAX. New components and themes, plus improved tools to help you design beautiful apps.

Curious to learn what's cooking for the third major release of UI for ASP.NET AJAX for 2016? Then check out the information below, which will reveal two new components along with some of the planned improvements in the existing tools.

New CheckBoxList and RadioButtonList Controls

The fresh CheckBoxList and RadioButtonList components will help you to easily build single or multi-selection lists for sign up forms, surveys and many more scenarios. They'll offer nice design through the 21 available themes, Lightweight rendering, rich client and server-side API, databinding and accessibility capabilities.

RadCheckBoxList
Figure 1: The useful CheckBoxList and RadioButtonList tools will be a nice addition to the RadButton group of form controls

New Silk and Glow Base Themes in the ThemeBuilder

The increased usage of the Lightweight rendering made the ThemeBuilder the preferred choice for every front-end developer and designer who wants to create and/or modify the skins meant for the Lightweight rendering of the controls. In addition, the appearance of the UI components is important for everybody, so we decided to add two additional base skins to the currently available ones: Silk and Glow.

The next theme to be added is the Metro Touch one, but if you want to see another one added let us know in the feedback portal or the comments section below. You can also submit your vote for a new skin.

Theme Builder Silk Glow
Figure 2: Choose one of the provided base skins as a base to create your own theme suitable for your project design and requirements

Chart (HTML 5)

Two new Bullet Chart and Vertical Box Plot types will be added to the portfolio of RadHtmlChart.

The bullet chart is variation of a bar chart. You can use it as a replacement for dashboard gauges and meters.

The vertical box plot is similar to the standard box plot. It is useful for comparing distributions between different sets of numerical data.

Vertical Box Plot Chart

Figure 3: A Vertical Box Plot chart at a glance

Gantt

Two nice additions will be added to the gantt:
  • You will be granted precise control (enable or disable) over options like: create, update (reorder, resize, move, editors), destroy, move, resize, reorder, dependencyCreate and dependencyDestroy
  • You will be able to specify a range or selected date in the Timeline view of the control

Spreadsheet

Three new features will be included into the component:
  • Hyperlink support for cell contents
  • Multi-line editing
  • The ability to show/hide the sheet grid lines, which is very nice for printing and exporting scenarios

Hyperlink Support for Cells

Stay tuned for the official R3 2016 release to land with these features in mid-September.

Of course, the above features are only part of everything that we do behind the scenes. We continue to reduce the amount of open bugs and help with useful suggestions and code examples in the Code Libraries, Forums and last but not least the Feedback Portal.

The creation of useful how-to resources is our top goal for the whole year too, so if you have nice ideas for interesting how-to resources do not hesitate to share them. Your feedback, suggestions, features requests and votes in the feedback portal are very important for us and we do appreciate them greatly.

Meet the New Create Project Wizard for UI for ASP.NET AJAX

$
0
0
Telerik UI for ASP.NET AJAX is a powerful UI framework with more than 90 components to help you develop beautiful web projects quickly and easily. Today we unveil our latest addition, the redesigned Create Project Wizard.

One of the latest benefits for you in UI for ASP.NET AJAX is the modernized Create New Project Wizard for Visual Studio. The redesigned wizard is part of the Visual Studio Extensions for Telerik UI for ASP.NET AJAX, and aims to help you create and configure new web projects with the Telerik ASP.NET AJAX components even faster, easier and more reliably.

The wizard's UI and UX are simplified, easy to use and now feature only the really needed settings to start a new project, i.e. switchers for the preferred language (C# or VB.NET) and the project types (App or Site), the version number as well as the available project templates (Blank, Responsive and Outlook-inspired):

Create New Project Main
Figure 1: Create New Project Wizard

The Finish button will create a new project based on your choices. If you need to go to the more advanced options such as used Assemblies, Skins and Web Settings, you can locate them in the Project Configuration Wizard through the Telerik -> UI for ASP.NET AJAX -> Configure Project menu:

The first wizard step allows you to select which assemblies are to be referenced by your project:

Configure Project
Figure 2: Project Configuration Wizard - Select Assemblies

The second step allows you to choose the desired theme:

Select Theme
Figure 3: Project Configuration Wizard - Select Theme (Skin)

The third wizard step applies to web setting such as CDN, project Ajaxification, jQuery usage and MaxRequestLength:

Web Settings
Figure 4: Project Configuration Wizard - Web Settings

And that's not all, you can also insert predefined custom scenarios for some of the most popular components in the Telerik ASP.NET AJAX suite through the wizard:

Add Telerik Scenarios
Figure 5: Telerik menu - Add Telerik Scenario...

This is shown in more detail below:

Add Scenario for RadGrid
Figure 6: Scenario Wizard - Add a scenario for RadGrid

We hope that you'll find the changes useful, and enjoy working with the refreshed VS Create New Project and Configure Project wizards that we've developed for UI for ASP.NET AJAX. The next suite that will get a revamped New Create Project and Project Configuration Wizards will be UI for ASP.NET MVC.

We'd like to hear your feedback and ideas for improvements in the comments section below. You can also post your ideas for new components, features and bug reports in our Feedback portal.

Kendo UI R2'16 Release Webinar Wrap Up

$
0
0

We wrap up another webinar for our latest Kendo UI release, packed with new developer toys and updates about React and Angular 2.

On Wednesday June 22, we hosted the Kendo UI R2'16 Release Webinar, packed with new developer toys and updates about our React and Angular 2 components.Three of our developer advocates, Cody Lindley, Todd Motto and John Bristowe, demonstrated some of the latest features and what we’ve been working on. Let’s summarize the event with all the demos and awesome questions and answers.

Huge thanks for taking the time out your days to join us for another of our live events, we hope you enjoyed it and we’ll see you soon for the next one. Let’s dive into what we covered in the webinar, our resources used and some next steps for you!

Demos and Resources

If you wanted to catch up on some of the content we used during the webinar, here are some resources that you may find helpful. Each of our experts have shared their most important resources below.

Cody Lindley

Cody demoed some brand new boilerplates he’s been cooking up for getting started with Kendo UI, you have a whole host of different boilerplates to choose from in the resource links below to kickstart your next app with. Boilerplates are essentially pre-built starter kits for you that give you some bare essentials and setup defaults to get your project running in just a few seconds. They can include HTML, CSS and JavaScript—as well as library code (such as Kendo UI of course!) and some tooling to get your project running on a local web server.

The Kendo UI boilerplates Cody has put together do exactly this, and offer you a nudge in the right direction for creating your next project. For more, take a dig through some of the code for some further insight and different setups and tooling they provide.

We also presented the new support for our codebase with CommonJS formats and semantic versioning on npm and GitHub.

Cody went on to demo some of the Kendo UI React components the team have been building out, and how to integrate them into a React application.

Catch Cody’s resources, some of which he demoed in the webinar, here:

Todd Motto

I took us through some of the sweet new features of the Kendo UI HTML Editor, using markdown parsers, full control over your serialization/deserialization of content, new paste formatting options and the new auto-URL detection.

We then discussed what’s happening in the Angular 2 world and our progress on supporting Angular 2 components, as well as links to useful articles detailing the roadmap and GitHub projects for keeping track of movement.

Grab my resources and links here:

Prize Winners

A Kendo UI webinar wouldn’t be complete without some epic swag to give away. We’re pleased to announce our two winners!

Selected at random, our attendee winner: Frank Kim

Frank, enjoy the BB-8 droid from Star Wars!

a.jpg

Best question, our attendee winner: Les Baker

Les, you’ll be shortly enjoying a Myo Gesture Control armband!

arm.jpeg

Q&A

A huge thanks to everyone who participated in our Q&A. Here are some highlights with corresponding answers:

What percentage of your 70+ components have been converted to React?

Right now it's most of the form components—like textbox, button, dropdown, multiselect. We're starting with what's in Kendo UI Core and moving up from there.

Seems really low level and a lot of tech we don't use, what's the high-level overview of the boilerplates or did i miss something?

Boilerplates are definitely lower level and are tools for kickstarting new projects. The JavaScript ecosystem is a little more complicated than it used to be, so we’re aiming to cater for all the types of setups/build tools by creating a base for developers. We are moving on to some higher level concepts here shortly.

Has the dependency on jQuery been removed for new Kendo React and Angular components?

React and Angular 2 components will not use any jQuery, they’re native component implementations.

What is the timeline for similar components in Angular 2?

The Angular team is still working on the release candidates for Angular 2. Once the team has launched, we’ll be launching shortly after so I’d recommend keeping an eye on the team's activity and updates for what’s happening.

Do you have to write markdown in the view source window?

Nope, you can write in HTML or plain text, or even paste from Word or Google Docs!

Now that Kendo works with CommonJS, will Kendo still work with RequireJS without modifying the Kendo JavaScript or RequireJS config files?

Great question! All the components still work with RequireJS.

When will the Angular 2 versions will be available?

We are working on them now—updates coming shortly, but for now check out the links provided in Todd’s demo for our roadmap repository on GitHub, where you’ll see activity from what we’re working on.

Is the Kendo roadmap more focused on adding support for newer libraries (react, angular) or adding new widgets to kendo itself, or both?

All of the above.

Hello, I'm new to Kendo. What are boilerplates?

Hi Brittany! Welcome to Kendo UI. Boilerplates are just empty projects that have all the dependencies already included so that you don't have to set all this up yourself. If you're new to Kendo UI, you should check out this resource.

Webinar Recording

You can relive the Kendo UI R2'16 Release Webinar, or just catch up if you missed it, below or over on our YouTube channel.

Thank You

Thanks everyone again for joining, we’ll see you next time! If you have any feedback, please feel free to leave it in the comments section below.

Kendo UI for Angular 2 R3 Roadmap

$
0
0

Petyo Ivanov, Kendo UI Product Manager, takes a look at the future of Kendo UI for Angular 2.

Yes, that’s correct; it looks like we have a name for the product. With our React and Angular 2 suites moving forward, our communication became quite complex, and we needed to find formal names for the three code bases. Right now, we call the current suite Kendo UI or Kendo UI for jQuery. We refer to the new suites as Kendo UI for React and Kendo UI for Angular 2, respectively. These are not final names, and they may be changed, but they bring certain clarity for now.

Beta.0 Release Due In September;
11 Components Will Be Included

Our plans for September include seven discrete component packages, which include a total of 11 components, such as:

  • Buttons (including Button and a ButtonGroup)
  • Dialog
  • Layout (TabStrip and PanelBar)
  • Inputs (Slider, Switch)
  • DropDowns (ComboBox, DropDownList)
  • DataViz (preview, contents are subject to further research)
  • Grid (Preview)

With this release, our goal is to give you a usable set of components and to validate several key concepts like data binding, rendering and virtualization behavior. The beta label is there for a reason: your feedback is critical for us. Based on your suggestions, we will tweak and break things before we stamp version 1.0.0.

The roadmap is effectively a reschedule of the plans we announced in January. As with all things new, the changes between the Angular releases were more substantial than what we expected, and that pushed the timeline back a bit. On top of that, we wanted to focus on having a fuller set of widgets available with the upcoming beta, so we decided to hold until the September release to give you something that makes sense in real-life scenarios.

The beta release will be freely available for all Telerik accounts—you won’t need an active subscription to try it. The components will be distributed as NPM packages.

For further details, live progress and feature discussions, you may bookmark the kendo-angular2 GitHub repository. Notice that this is a “meta” repository—we won’t publish the actual source code in it. Feel free to ask questions and open issues in case something is not clear!


Programmatic Access to LiveSync in Telerik Platform

$
0
0

Learn all about LiveSync and how it lets you see the results of changes to your code in real time.

LiveSync is a feature of Telerik AppBuilder (part of Telerik Platform) that allows you to instantly experience changes to your code on devices and simulators. We were among the first to bring this type of functionality to the masses, yet most people don't know about the programmatic API that exists to directly interact with LiveSync!

LiveSync and Telerik AppBuilder

Usually you don't think twice about how you use LiveSync, right? It's enabled by default for all debugging situations and you can leverage it in a variety of ways:

LiveSync instantly updates all of the code in your app (HTML/XML, JavaScript and CSS) without you having to rebuild and redeploy the app!

livesync in action

LiveSync is cross-platform (works on iOS, Android and Windows Phone). And while we've had LiveSync enabled for Apache Cordova hybrid mobile apps for ages, we also recently introduced LiveSync for NativeScript apps as well!

A little known fact is that LiveSync has a JavaScript API. What does that mean and how can it help you? Read on:

Enabling and Disabling LiveSync

Note that while LiveSync works with NativeScript, the public JavaScript API does not exist yet.

Why would someone want to disable LiveSync? When you are using LiveSync with our Companion Apps, you initiate a LiveSync action via a three-finger press. What if your device uses a three-finger press for something else? Hello conflict! Luckily there is a window.livesync object for you to interact with. For instance:

To disable LiveSync on an app use livesync.disable(). Likewise, to enable LiveSync you use livesync.enable(). Easy enough!

Now that's convenient to have, but the cool part of the LiveSync API is initiating a LiveSync via code:

Initiating a LiveSync

Even if the three-finger gesture is disabled, you can still initiate a LiveSync in code. In fact, you can initiate a LiveSync whenever and wherever you want!

To do so, simply use the livesync.sync() method. When this code is executed, your app fetches all of the latest changes from the cloud (be they HTML, JavaScript, or CSS) and updates your app in no time.

This means you can truly execute the livesync.sync() method whenever you like. Do you want to add an "update" button to your app that more clearly initiates a LiveSync for your testers? Go ahead! Do you want to initiate a LiveSync update when a user performs a certain action? Knock yourself out.

If you are using an offline Telerik AppBuilder client like our extension for Visual Studio, you need to make sure your apps are connected to the cloud for LiveSync to work correctly.

When Can I Use LiveSync?

Just to be clear, LiveSync is only available while debugging your app. This means you have to be using our simulators, Companion Apps or have deployed a build of an app in debug mode. If you create an app store-ready build, LiveSync is disabled. But, what if you want to use LiveSync-like functionality to "hot patch" your app in production?

LiveSync in Production?

Yes, we have an answer for that! By leveraging a similar feature called AppManager LiveSync, you can dynamically update apps that have already been published via the app stores! Click here to learn more about AppManager LiveSync.

appmanager livesync

AppManager LiveSync is available for hybrid apps today and NativeScript apps very soon!

Happy LiveSyncing!

The New .NET Core 1.0 Is Here

$
0
0

After nearly two years in the making, .NET Core 1.0 is here! Read on to find out what this announcement means for developers and how we're working to support it.

Microsoft has just shipped the RTM of .NET Core 1.0, which represents a significant milestone in the evolution of .NET.

Scott Guthrie announced the open-sourcing of the .NET Core runtime and framework back in November 2014. Approximately 19 months later, .NET developers now have a new runtime and set of libraries available to them that are open source and supported across Windows, OS X and variants of Linux. Richard Lander describes the motivation for .NET Core in his announcement blog post, stating:

"About two years ago, we started receiving requests from some ASP.NET customers for '.NET on Linux.' Around the same time, we were talking to the Windows Server Team about Windows Nano, their future, much smaller server product. As a result, we started a new .NET project, which we codenamed 'Project K,' to target these new platforms. We changed the name, shape and experience of the product a few times along the way, at every turn trying to make it better and applicable to more scenarios and a broader base of developers. It's great to see this project finally available as .NET Core and ASP.NET Core 1.0."

The RTM release includes the following items:

As is the Microsoft tradition, a bunch of teams working on related products shipped updates to coincide with today's release:

What is .NET Core?

In this video, Richard Lander does a great job of providing an overview of .NET Core—what it is, how it works and why you should care about it:

Representing a significant change from the .NET Framework you've worked with previously, .NET Core was designed to address the challenges expressed by developers when building .NET applications. For a detailed summary of the historical context behind .NET Core, I would recommend reading this article by Immo Landwerth, "Introducing .NET Core."

The development platform includes workloads for targeting Universal Windows Platform (UWP) and ASP.NET Core—both are underpinned by a set of foundational libraries called CoreFX:

dotnet-today

Currently, .NET Core 1.0 ships with the ASP.NET Core app model, which provides a new implementation of ASP.NET MVC. It does not include ASP.NET Web Forms or ASP.NET AJAX.

These libraries contain common building blocks used across applications, including classes for collections, file system access, console I/O, XML processing and more. Additionally, .NET Core includes the ability to build native executables that operate across Windows, OS X, and Linux.

What .NET Core Means to Our Customers

So, where does this leave us for customers wanting to use .NET Core 1.0 with Telerik UI for ASP.NET MVC?

Recently, we added support for ASP.NET Core 1.0 RC2 in the latest release of Telerik UI for ASP.NET MVC. However, the changes introduced in .NET Core 1.0 means that we'll have to update it to ensure compatibility. At the time of blog post, there are a few breaking changes that remain open for ASP.NET Core that we're following closely.

Our plan is to deliver Telerik UI for ASP.NET MVC R2 2016 SP2 with official support for ASP.NET Core 1.0.0 RTM by mid-July 2016. We also plan to launch the latest internal build of UI for ASP.NET MVC this week, which you can test under ASP.NET Core. Feel free to share any feedback on the latest build.

As a reminder, there's a lot to look forward to in the next release. For example, we included a set of tag helpers for widgets like the NumericTextBox, Button, Window, DatePicker and TimePicker. Tag Helpers provide an HTML-like development experience for server-side code, all while preserving tooling features like IntelliSense.

Here's an example using the DateTimePicker:

<kendo-datetimepicker
  name="dateTimePicker"
  value="DateTime.Today"
  min="DateTime.Today"
  on-change="onChange">
</kendo-datetimepicker>

By way of comparison, here's the same control using our HTML Helpers within a Razor view:

@(Html.Kendo().DateTimePicker()
  .Name("dateTimePicker")
  .Value(DateTime.Today)
  .Min(DateTime.Today)
  .Events(e =>
  {
    e.Change("onChange");
  })
)

Both code snippets will create a date-time picker widget on the page:

telerik-ui-for-aspnet-mvc-tag-helper

Making Telerik UI for ASP.NET MVC available as a service is done through the ConfigureServices() method of the startup class. This method is used to load all of the services you may wish to use through ASP.NET Core via dependency injection (DI):

publicvoidConfigureServices(IServiceCollection services) {
  services.AddMvc();
  services.AddKendo();
}

The final step is to register the Tag Helpers for Telerik UI for ASP.NET MVC via _ViewImports.cshtml:

@usingHelloAspNetCore
@addTagHelper *, Microsoft.AspNetCore.Mvc.TagHelpers
@addTagHelper *, Kendo.Mvc

We have detailed instructions on how to use these Tag Helpers in our documentation.

Wrapping Up

It's an incredibly exciting time to be a .NET developer. The release of .NET Core 1.0 brings with it a whole bunch of changes that will transform the way we build cross-platform apps for web, mobile and desktop.

Starting now, you can build full production applications that target .NET Core 1.0, ASP.NET Core 1.0 and Entity Framework Core 1.0. It is our commitment to have an update out by mid-July so you can also start using it. In the meantime, I'd encourage you to check out a few of the following resources, which will help you get ready to use .NET Core 1.0:

Be an API Testing Hero with the New Test Studio

$
0
0

The new Test Studio release is here, featuring GIT integration, MS Edge Support, provisioning for Android devices and the Test Studio for APIs Beta.

Yes, that’s right—the new Test Studio release is here and it promises to help even non-technical testers easily verify the integrity and reliability of their APIs. Before we dive deeper into the new testing type we added, let's take a quick look at some of the new features the Test Studio product team added to the core product:

  • GIT integration: delivering on a promise we gave to our customers, Test Studio now can be integrated with the popular Git source control system to help testers check-in their tests next to the production code.

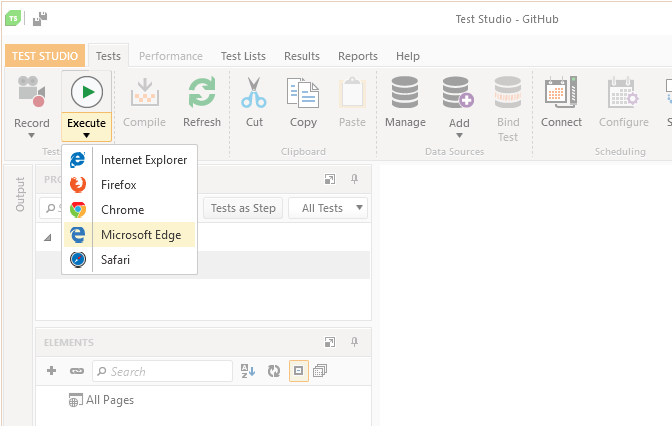
  • MS Edge support: Test Studio has always been among the first to provide reliable support for testing against the newest browsers and browser versions. We just added the ability to execute tests against MS Edge, enjoy!

  • MSEdge


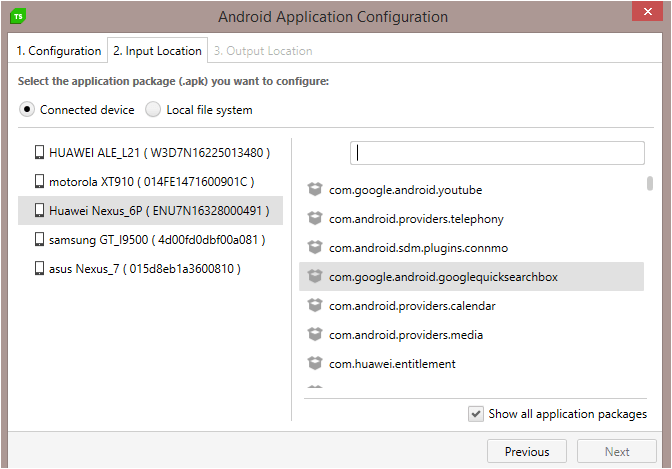
  • As for Test Studio Mobile, we are adding a big time and resource saver there—provisioning for Android devices. You only need to follow the built-in Test Studio wizard to instrument your apps instead of waiting for developers to do that for you. Later on this year we’ll be also adding support for iOS devices.

  • Android

    Along with Web, Desktop, Mobile, Load and Performance testing with this new release users can leverage Test Studio to verify the integrity and reliability of their APIs. Now you can expand your quality assurance effort beyond functional and load testing to ensure better product quality and faster time to market.

    So who’ll be able to use this new tool? Our motto has always been ease of use. We aim at enabling non-technical testers to leverage Test Studio for APIs too. This way your team’s development resources can be spared from writing API tests and focused on new feature development instead.

    Some of Test Studio for APIs highlights:

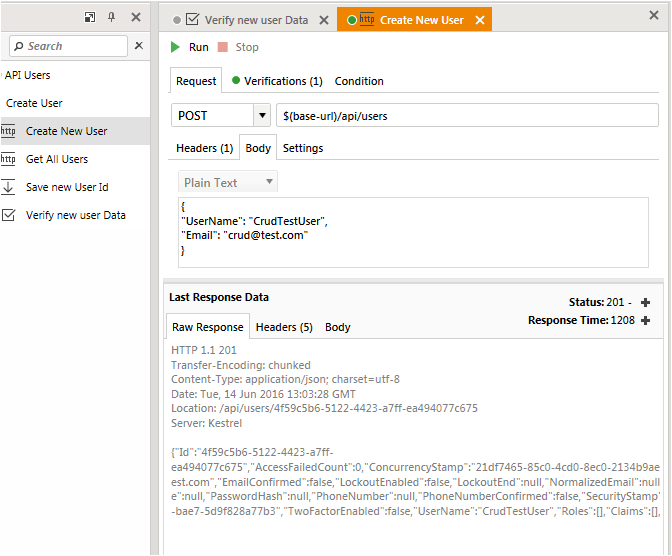
  • Testing the logic tier of your application doesn’t need to be rocket science. Test Studio for APIs lets you create verifications against all common API requests using just point-and-clicks. If you are unsure how to get started, there’s a built-in demo application that can provide useful cues on how to build meaningful verifications.

  • Demo Application


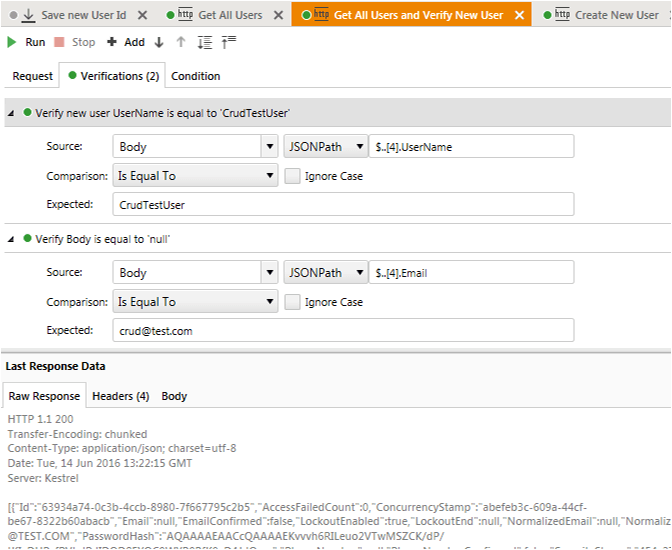
  • With Test Studio for APIs you can verify that the format and content of your API calls is what you expected it to be. You can use conditions to craft flexible verifications and build non-brittle tests: for example, you can have a test executed even if a step fails or you can automatically go back to executing the previous step upon failure of a test step.

  • Test Studio for APIs will help you create smart tests for your APIs: use variables to extract values that can be easily added as a step later in the test. You can set variables for dynamic values to test a wider range of conditions and truly simulate real life user scenarios.

  • You can also test if API calls get completed within a certain response time to ensure the API layer meets your business requirements.

  • Response Time


  • Finally, you can hook your API tests to your build system and leverage the built-in API test runner. This way you can get your test lists scheduled to start running whenever you want. Basically, execute API tests as part of your build process and CI environment.

  • If you are a Test Studio customer you can get the new tool from your account. If not, head to www.telerik.com/teststudio-apis to download the Beta.

    And if you’d like to help us build Test Studio for APIs to your liking, please use our dedicated feedback portal to share your thoughts and experience.

    And finally, don’t forget to save your seat for our R2 2016 release webinar coming up on Thursday July 14th, 11 am EDT.

    Reserve a seat

    Happy testing!

    How Kendo UI is Used on the Collab365 SharePoint Platform

    $
    0
    0

    Learn how Collab365 built a large chunk of their conference UI with Kendo UI in this "behind the scenes" post designed for developers.

    Collab365 are online event and community providers for SharePoint, Azure and Office 365 who have already delivered seven online conferences. To achieve their goals of getting involved in the community and bringing top quality training to those who need it, they’ve had to keep costs to a minimum, which is why they’ve built their own virtual conference platform.

    Collab365 and Kendo UI

    This post is part of the Collab365 "Behind the Scenes" series and is aimed at developers who are interested in how they used Kendo UI to build a large chunk of their conference user interface.

    Written by Collab365 co-founder Mark Jones, this article was originally published on the Collab365 blog.

    We’ve used Kendo UI in lots of places, but this post will concentrate on the following three:

    • Conference Agenda and Timeline—built with Kendo UI Scheduler
    • Session Room—built using several Kendo UI controls as well as an awesome usage of MVVM
    • ‘Which room are people in’ control—built using Kendo UI Chart

    A word about our data...

    Before we get into how we put the Collab365 Agenda control together, I just wanted to let you in on a secret. When requesting data about our conference (such as speakers, track or session information), we never go directly to our SharePoint lists. You may think this is a strange thing to do, but if you consider that we’re limited by platform size and have to scale to thousands of users (with a burst at any time), we had to think seriously about how we scaled SharePoint.

    We also cache as much as possible by using a CDN. This means that JavaScript & CSS files as well as images are all cached outside of SharePoint saving potentially 10,000s of requests per second at peak!

    If you use SharePoint for internal needs and have a version above Foundation, you will get the benefits of object caching, page output caching and can easily scale to your maximum estimated load as you know how many staff you have!

    Note! As SharePoint lists all support returning data using REST, it’s also very simple to bind them to all of the Kendo UI controls. 

    Conference Agenda

    When running either a physical or virtual conference, one of the key features you need is for attendees to be able to view the agenda before it actually begins (to allow them to build their own agenda), and also during the conference, so they can work out which virtual room to go to.

    Agenda Requirements

    • We wanted something that could be filtered by parameters such as skill level, track, speaker, audience, etc.
    • It needed to render nicely on mobile devices
    • The ability for attendees to visualize tracks across a time slot
    • Easy to put on both our conference platform and also WordPress site
    • Ability to control what’s displayed in the event section
    • Something that can work easily with our data, which is in JSON format

    How did we build it?

    To build the agenda we used the Kendo UI Scheduler control, which is a purpose-built control that allows you to display data in a calendar format. It has two views:

    ‘Agenda View’

    This view is the traditional view that allows you to see what’s happening hour by hour (there are a few more views supported by the scheduler, but we hid them as they weren’t needed).

    How Kendo UI is used on the Collab365 SharePoint Platform-1

    ‘Timeline view’

    The Timeline view is most useful for our management team as it easily lets us see where we may have conflicts (such as a similar sessions being broadcast at the same time).

    How Kendo UI is used on the Collab365 SharePoint Platform-2

    Databinding

    One of the other cool things about using the scheduler is that it supports JSON and the OData protocol out of the box, meaning that all we need to do is give it our list of cached ‘Sessions’ in JSON format. You also tell the control about the relevant metadata and then let it take away all of the pain of rendering the grid.

    dataSource: {
    filter: mySessionFilters,
    data: data,
    schema: {
    model: {
    id: “ID”,
    status: function () {
    returngetClbSessionStatus(this);
    },
    hashtag: function () {
    returnthis.clbSessionHashtag.substring(1);
    },
    sessionRoomId: function () {
    returnthis.clbSessionHashtag.substring(1).replace(‘#’, ‘’);
    },
    speakerPhoto: function () {
    returntenantUrl + this.Session_x0020_Speaker_x003A_Smal;
    },
    conferenceName: function () {
    returnconferenceTitle;
    },
    tenantUrl: function () {
    returntenantUrl;
    },
    status: function () {
    if(!this.sessionStatus) {
    setClbSessionStatus(this);
    }
    returnthis.sessionStatus;
    },
    statusHtml: function () {
    if(!this.sessionStatusHtml) {
    setClbSessionStatusHtml(this);
    }
    returnthis.sessionStatusHtml
    },
    fields: {
    taskId: { from: “ID”, type: “number” },
    title: { from: “Title”, defaultValue: “No title”, validation: { required: true} },
    start: { type: “date”, from: “clbSessionStartTime”, parse: function (value) { if(value != null) returnnewDate(parseInt(value.substr(6))); elsereturnconferenceStartDate } },
    end: { type: “date”, from: “clbSessionEndTime”, parse: function (value) { if(value != null) returnnewDate(parseInt(value.substr(6))); elsereturnconferenceStartDate } },
    level: { from: “clbSessionLevel” },
    track: { from: “clbSessionTrack” },
    topic: { from: “clbSessionTopic” },
    language: { from: “clbSessionLanguage” },
    speaker: { from: “clbSessionSpeaker” },
    audience: { from: ‘clbSessionSuitableFor’ },
    speakerId: { from: ‘Session_x0020_Speaker_x003A_ID’
    }
    }
    }
    },
    },
    }

    The “data” as passed in via a “data:data” statement happens to be an array JSON object that defines each session.

    initFilters = function(data) {
    var filterValues = getFilterValues(data);
    container.find(“.levelsFilter”).kendoMultiSelect({
    placeholder: “Select skill levels...”,
    dataSource: {
    data: filterValues.levels
    }
    });
    container.find(“.tracksFilter”).kendoMultiSelect({
    placeholder: “Select tracks...”,
    dataSource: {
    data: filterValues.tracks
    }
    });
    container.find(“.speakersFilter”).kendoMultiSelect({
    placeholder: “Select speakers...”,
    dataSource: {
    data: filterValues.speakers
    }
    });
    container.find(“.audiencesFilter”).kendoMultiSelect({
    placeholder: “Select audiences...”,
    dataSource: {
    data: filterValues.audiences
    }
    });
    container.find(“.topicsFilter”).kendoMultiSelect({
    placeholder: “Select topics...”,
    dataSource: {
    data: filterValues.topics
    }
    });
    container.find(“.statusFilter”).kendoMultiSelect({
    placeholder: “Select status...”,
    dataSource: {
    data: [“Scheduled”, “Live”, “Finished”, “Cancelled”]
    }
    });
    container.find(“.agendaFilters select.agendaFilter”).change(applyFilters);
    }

    Filters

    The filters you see to select subsets of the agenda were also pretty easy to implement once we’d populated the pull down lists (called DropDownLists within Kendo UI) with all of the possible values. The great thing is that, as all of our JSON is downloaded to the browser as a file, we don’t need to go back to the server to filter.

    Responsive

    How Kendo UI is used on the Collab365 SharePoint Platform-3

    17% of our conference attendees access the site via a phone or tablet. That’s nearly 1 in every 5 attendees accessing the pages on a small display. It’s often hard to show lots of data nicely onto a small screen, but with some media queries, the scheduler does a good job.

    Portable to WordPress

    One other major requirement we have is that we need to publish the agenda long before we open the conference platform. This helps us to tell attendees what sessions are available. However, we didn’t want to duplicate data.

    Luckily, as Kendo UI is purely a client-side library (with no server requirements), and also because we don’t go directly to SharePoint lists, it’s very easy to include and reuse it in any web platform.

    We built the control to be portable and with very little JavaScript and with a few includes plus some initialization code we were able to get it rendering inside of WordPress with very little effort.

    Here’s how it looks on an iPhone 5

    How Kendo UI is used on the Collab365 SharePoint Platform-4

    Here’s the code to bring it in:

    initFilters = function(data) {
    var filterValues = getFilterValues(data);
    container.find(“.levelsFilter”).kendoMultiSelect({
    placeholder: “Select skill levels...”,
    dataSource: {
    data: filterValues.levels
    }
    });
    container.find(“.tracksFilter”).kendoMultiSelect({
    placeholder: “Select tracks...”,
    dataSource: {
    data: filterValues.tracks
    }
    });
    container.find(“.speakersFilter”).kendoMultiSelect({
    placeholder: “Select speakers...”,
    dataSource: {
    data: filterValues.speakers
    }
    });
    container.find(“.audiencesFilter”).kendoMultiSelect({
    placeholder: “Select audiences...”,
    dataSource: {
    data: filterValues.audiences
    }
    });
    container.find(“.topicsFilter”).kendoMultiSelect({
    placeholder: “Select topics...”,
    dataSource: {
    data: filterValues.topics
    }
    });
    container.find(“.statusFilter”).kendoMultiSelect({
    placeholder: “Select status...”,
    dataSource: {
    data: [“Scheduled”, “Live”, “Finished”, “Cancelled”]
    }
    });
    container.find(“.agendaFilters select.agendaFilter”).change(applyFilters);
    }

    And here’s how it looks:

    How Kendo UI is used on the Collab365 SharePoint Platform-5

    The anatomy of a virtual session room

    Each session is delivered and presented in its own virtual session room. The session room has the following aspects:

    How Kendo UI is used on the Collab365 SharePoint Platform-6

    As with nearly all of the platform, it’s very lightweight when accessing SharePoint. We feed in the same browser cached JSON files for session, speaker and sponsor.  This means most of the UI rendering is done on the client-side rather than the server. To make our UI as clean and maintainable as possible we take advantage of the Kendo UI in-built MVVM framework. This allows us to bind our data (the “model”) to the page (the “view”) without having to write any of that plumbing code that you normally have to.

    Take a look at the code below, you will notice ‘data-bind’ statements which don’t pollute the HTML. Those statements are used by the Kendo UI binding framework and they tell Kendo UI what object to extract from the view and replace at the time that it’s rendered.

    <SharePoint:SPSecurityTrimmedControl ID=”SPSecurityTrimmedControlPlayer1” runat=”server” AuthenticationRestrictions=”AnonymousUsersOnly”>
    <div class=”main-box clearfix”>
    <header class=”main-box-header clearfix”>
    <h2 data-bind=”text: Title”></h2>
    <div class=”cf”></div>
    </header>
    <div class=”main-box-body clearfix”>
    <div id=”playerHeading”>
    <div id=”playerTitle” data-bind=”text: clbSubTitle”></div>
    <div id=”onAir” data-bind=”style: {color: clbRoomStatusColor}, text: clbRoomStatus” class=”offAirStatus”></div>
    </div>
    <div class=”iframe-container” id=”playerContainer”>
    <div id=”noMessage”>
    <div class=”alert alert-block fade in” style=”text-align:left;”>
    <i class=”fa fa-info-circle fa-fw fa-lg” style=”padding-bottom:10px”></i><strong>Not logged In!</strong>
    <p>In order to take advantage of the features and also view the sessions, you need to register fora free account, or login.</p>
    <p>
    <asp:literal runat=”server” Text=”<a class=’btn btn-primary collreg’ href=’/sitepages/Summit2016.aspx?Source=” />
    <SharePoint:ProjectProperty Property=”Url” runat=”server” />
    <asp:literal runat=”server” Text=”’ > Register </a>” />
    <asp:literal runat=”server” Text=”<a class=’btn btn-primary’ href=’/_layouts/15/Authenticate.aspx?Source=” />
    <SharePoint:ProjectProperty Property=”Url” runat=”server” />
    <asp:literal runat=”server” Text=”’ > Sign In </a>” />
    </p>
    </div>
    </div>
    <div id=”playerTools”>
    <div id=”clockLogo”>
    <img alt=”Collab365” class=”playerImage” data-bind=”attr: { src: clbPlayerLogo }” />
    <div id=”playerClock”>
    </div>
    </div>
    <div id=”muteBtn” class=’plybtn mute’></div>
    <div id=”fullScrBrn” class=”plybtn fullscreen”></div>
    </div>
    </div>
    </div>
    </div>
    </SharePoint:SPSecurityTrimmedControl>

    The code snippet below illustrates how we create an “observable” object and bind it into “<BODY>” tag in the HTML. The cool thing here is that as the object is ‘observable’ this means that the Kendo UI MVVM framework will keep watching for changes. So if, for example, some user action causes our ObservableRoom to update then the UI also updates automatically. The binding is also two-way meaning that if you had bound “title” to text box, for example, and a user typed in a new title, the backend object would also be updated.

    observableRoom = kendo.observable(session);
    observableRoom.set(“clbTwitterHref”, “https://twitter.com/search?q=” + session.clbSessionHashtag);
    observableRoom.set(“clbTwitterTitle”, “Tweet using“ + session.clbSessionHashtag);
    observableRoom.set(“clbTwitterTxtLink”, “Tweets about "#Collab365 Conference"”);
    observableRoom.set(“clbDerivedTitle”, session.clbSessionHashtag + “ : “ + session.clbTimeSlot);
    observableRoom.set(“clbRoomStatus”, “Off Air”);
    observableRoom.set(“docReadHead”, “<a href=’#’>My Reading Tasks</a>”);
    observableRoom.set(“docReadStrap”, “Any recommended or required reading tasks that the Speaker, Anchor or Collab365 Team have assigned to you are listed below.”);
    observableRoom.set(“clbFlagUrl”, siteCollectionUrl + “/Style Library/Conference/Assets/img/flags/32/” + session.clbSessionLanguage + “.png”);
    observableRoom.set(“clbPlayerLogo”, siteCollectionUrl + “/SiteAssets/sessionlogo.png”);
    observableRoom.set(“clbProfilePictureUrlLarge”, “/SiteAssets/img_placeholder.png”);
    if(observableRoom.clbSessionYouWillLearn == null) {
    observableRoom.clbSessionYouWillLearn = ‘’;
    }
    observableRoom.clbSessionSuitableFor = clbRoom.cleanSPArray(observableRoom.clbSessionSuitableFor);
    observableRoom.clbSessionTopic = clbRoom.cleanSPArray(observableRoom.clbSessionTopic);
    kendo.bind($(‘body’), observableRoom);

    I am sure you will agree this saves a ton of boilerplate code and reduces the potential for bugs tremendously. If you do any form of complex JavaScript UI, always consider using an approach such as this.

    What about AngularJS?

    In many cases, you can also easily use AngularJS with Kendo UI. We chose not to as the Kendo UI binding framework was all we needed and didn’t want the extra page weight that Angular brings. However, your case may be different so it’s worth mentioning that you can use it.

    Тab Controls

    Our session room contains a lot of information and we needed something to organize it without having an endless vertical scroll. So we opted for Kendo UI TabStrip. It’s responsive out of the box and pretty easy to develop.

    Here’s an example of our Chat and Tweet tab:

    How Kendo UI is used on the Collab365 SharePoint Platform-7

    Here’s the mark-up for the Chat and Twitter control:

    <div id=”quick_post”>
    <div class=”main-box clearfix”>
    <header class=”main-box-header clearfix”>
    <h2>Get Social
    <span class=”chatSponsorContainer”>
    sponsored by
    <a href=”http://beezy.net/” target=”_blank”><img src=”/confs/Summit2016/SiteAssets/beezy-logo-S.png” alt=”Beezy” /></a>
    </span>
    </h2>
    </header>
    <div class=”main-box-body clearfix”>
    <div class=”k-widget k-header k-tabstrip” id=”tabstripChat” role=”tablist”>
    <ul class=”k-tabstrip-items k-reset”>
    <li role=”tab” class=”k-state-active k-item k-tab-on-top k-state-defaultk-first”>
    Chat
    </li>
    <li role=”tab”>
    Tweet
    </li>
    </ul>
    <div class=”chatContainer”>
    <div id=”chatApp”>
    <chat ng-controller=”chatCtrl”></chat>
    </div>
    </div>
    <div>
    <div class=”twitterContainer”>
    <p class=”heading”>Join the session conversation on Twitter...
    <span class=”pull-right twitBtn-container”></span>
    </p>
    <div class=”iframe-container”>
    <a data-bind=”attr: { href: clbTwitterHref, data-widget-id: clbTwitterDataId}” class=”twitter-timeline” href=”https://twitter.com/search?q=%23SPBiz” data-widget-id=”448566281650704385” data-chrome=”transparent noheader”>
    View Tweets about thissession.
    </a>
    </div>
    </div>
    </div>
    </div>
    </div>
    </div>
    </div>

    And here’s the magic that brings the two together:

    $(“#tabstripChat”).kendoTabStrip({
           activate: on-select,
           animation: {
                  open: {
                         effects: “fadein”
                  }
           }
    });

    ‘Which room are people in’ control

    The third use of Kendo UI that I wanted to bring to your attention is our really popular chart that sits on the home page. This chart comes into its own during conference hours. Its main purpose is to indicate to attendees how many people are in each session. The UI is built using the Kendo UI Chart control and this what it looks like and how we put it together:

    How Kendo UI is used on the Collab365 SharePoint Platform-8

    The markup is extremely simple, you just need to declare a “DIV” with an ID that can then be referenced in JavaScript.

    <div class=”main-box”>
           <header class=”main-box-header clearfix”>
                  <h2 class=”pull-left”></>
           </header>
           <div class=”main-box-body clearfix”>
                  <div id=”UsersByRoomChart” class=”cursorPointer”></>
           </div>
    </div>

    Finally, the code that brings it all together is as follows:

    $(“#UsersByRoomChart”).kendoChart({
    theme: “Bootstrap”,
    chartArea: {
    height: 250
    },
    legend: {
    visible: false
    },
    transitions: false,
    valueAxis: {
    //                         majorUnit:1,
    visible: false,
    labels: {
    visible: false
    },
    majorGridLines: {
    visible: false
    },
    line: {
    visible: false
    },
    axisCrossingValue: 0
    },
    seriesDefaults: {
    type: “column”
    },
    series: [{
    field: “Connections”,
    categoryField: “Speaker”,
    color: function(point) {
    var colors = [‘#DE3C01’, ‘#076EC4’, ‘#E9D404’, ‘#016E55’, ‘#08428C’, ‘#4F4F4F’, ‘#B6B6B6’];
    returncolors[point.index];
    }
    }],
    tooltip: {
    visible: true,
    format: “{0}%”,
    font: “1em Segoe UI”,
    template: “<img class=’sessionSpeakerPhoto hidden-xs’ src=’#= dataItem.SpeakerImage#’> Session: #= dataItem.HubTitle # - #= dataItem.Connections#”
    },
    seriesClick: func.onSeriesClick,
    dataSource: {
    data: json
    }

    Wrap up

    I hope you found this article useful. Please don’t hesitate to ask any questions. If you want to know more about Kendo UI, the trial is downloadable here.

    Announcing the Kendo UI R3 Roadmap

    $
    0
    0

    With the Kendo UI Q2 2016 release in the books, we take a look at the future of the Kendo UI toolset.

    The Kendo UI Q2 2016 release is now behind our back and in your production code base. Moving on, I am sure that you are eager to know what’s next for Kendo UI 2016 in the autumn release.

    Q3 or R3?

    For historical reasons, we called our official releases “Q”s. This originated from the RadControls times, when we had four releases per year. At some point, we decided that we can deliver more if the release periods were just a bit longer (I am sure that each and every developer will understand that) and we started making three releases per year. We kept the naming to avoid confusion.

    Time passed, and the Q notation made less sense to newcomers. On several occasions, we had to apologize to confused users who were looking for a Q4 release. Eventually, we started to call the releases “R”s internally. Old habits die hard, so you will see both notations for some time—please don’t let that confuse you.

    Data Entry Enhancements

    For this release, we took a long, hard look at several popular complex data entry scenarios that many of you requested and voted for. The Kendo UI editors and dropdown widgets are feature-rich and mature, but there is always more to be added. We believe that the additions from this QR will fully enable what you need—and much more.

    Dialog Widget

    The widget has many names and variants, such as message box, alert, prompt and confirm. What’s common is the interaction—a message of some sort that requests an action from the user. While similar to the Window, it has a few additional features like a footer with one or more buttons, and an optional title.

    Dialog Picker Demos

    The dialog widget enables a few additional data entry scenarios that were somewhat hard to achieve before—namely, a form with the field filled by selecting single/multiple choices from a grid, tree view or even a tree list.

    To follow the progress of the dialog picker demos (and for few more amazing gifs), you can subscribe to the following GitHub issue.

    Any sufficiently complex UI includes an entity form that prompts for picking a relationship to a lookup table (one to one or one to many), usually implemented with dropdown lists or combo boxes. There is a fairly common case here in which the user starts entering data for the record, only to figure out that the lookup data table is missing the value he needs. Support for adding a new lookup record in-place is the right UI choice. Otherwise, the user will be forced to abandon the current task and go to another screen where the lookup table entities are managed.

    This and several more features will be enabled with the dropdown improvements scheduled in Q3. The footer and no data template configuration options (available for the combobox, dropdownlist and the multiselect) will allow developers to implement user interface that suggests creating a new record if no existing one matches the user query.

    This, along with 21 more dropdown-related enhancements and bug fixes, is described in details in the following GitHub issue.

    Upload Improvements

    The upload widget is set to receive some API improvements that will enable the support of common use-case scenarios, the most notable being the Drag and Drop custom drop zone/additional callbacks. Further details are described in this issue.

    Spreadsheet Custom Editors

    The custom editors Spreadsheet feature spawned a healthy discussion in this issue. The good news—the development part is already done.

    Roadmap in GitHub

    The features listed above are just a few of the tasks we have put on the table. Most likely, you have already noticed that each feature highlight has a corresponding GitHub issue. From this release on, we are maintaining a live public roadmap in GitHub. To avoid complications, we decided to use the issues section of the Kendo UI Core repository for this purpose. Despite the name, we are maintaining issues for the commercial part of Kendo UI, too.

    The issues for this release are assigned to the 2016 Q3 milestone—the full list includes 83 issues, with 20 of them are already closed.

    UserVoice—Where the Next Roadmap is Born

    We are actively monitoring the feature suggestions in our UserVoice portal—the suggestions that are related to the current iteration are marked as “planned." Once we complete them, the votes will be “freed” up for re-casting.

    Angular Calendar and Chart in UI for NativeScript 1.2.0

    $
    0
    0

    Angular 2.0 support in UI for NativeScript is growing—in addition to ListView and SideDrawer, we've now extended support with Calendar and Chart components.

    We released Angular 2.0 support in UI for NativeScript a month ago, delivering the first components to Angular developers in the form of the completely free RadListView and RadSideDrawer components. We have been working hard since then and now we’re really excited about extending the suite with two more components—Chart and Calendar. The features at a glance in this release are:

    • Angular 2 Calendar
    • Angular 2 Chart (Beta)
    • Support for NativeScript 2.1.0
    • Support for Angular 2 RC3

    Calendar

    calendar-nativescript

    Calendar for Angular 2 exposes all of the functionality that you can find in its NativeScript UI counterpart. The following features are at your disposal:

    • Calendar view modes—switching between week, month and year view is a matter of setting a property
    • Inline events—RadCalendar can be fed with a source of events for a specific day
    • Events are displayed in the calendar cells in different ways depending on the event view mode
    • Selection—single, multiple or range selection modes are available
    • Transitions—when switching between weeks or months an animation is applied for a smoother user experience

    You can learn more about the the Angular 2 Calendar in our documentation.

    Chart

    chart-nativescript

    Chart for Angular (Beta) supports all popular chart and axes types already supported by the NativeScript UI counterpart. Here is a short list of the currently available features:

    • Chart types—Bar, Range Bar, Line, Spline, Area, Bubble, Scatter Bubble, Pie, Candlestick, OHLC
    • Axes types—Categorical, DateTimeCategorical, Linear 

    You can learn more about the the Angular 2 Calendar at our documentation.

    To make sure you can easily get started using the component we have extended our SDK Examples application by adding a bunch of new examples for RadCalendar. You can find the source of the application on GitHub here for more information on how to use each particular feature. 

    Get a free Trial of our Chart and Calendar components in the latest version of NativeScript UI Pro and start building your native Angular 2 mobile apps today!

    Roadmap

    So, what's ahead? We have a pretty aggressive release cycle, so in just about six weeks you can expect:

    • DataForm for NativeScript (Beta)—This control will allow you to easily create fill-in forms with fields of various types and corresponding editors
    • Chart for Angular 2 (official)

    Stay tuned for more!

    Updating Core Framework Components in Telerik Platform

    $
    0
    0

    Learn how to update NativeScript and Apache Cordova frameworks with Telerik Platform and Telerik AppBuilder.

    Whether you are creating a hybrid mobile app with Apache Cordova or a native mobile app with NativeScript, you always want to make sure you're on the ball with the latest framework updates. Luckily for you, Telerik Platform by Progress makes it easy by providing a clear UI to switch between versions of the frameworks—and even to update individual components as needed.

    Updating the NativeScript Framework

    In Telerik Platform, we strive to provide you the latest and greatest NativeScript framework versions. While NativeScript has stabilized, and is more than ready for your production-level app development, you still probably want to stay up to date with the most recent release. To do so, open up your NativeScript project's Properties window and, in the General tab, find the NativeScript Version dropdown:

    updating nativescript version

    Easy enough, right?

    You'll find the latest versions of NativeScript here along with occasionally finding bleeding-edge versions of NativeScript that are marked "experimental." What does "experimental" mean? It means that we haven't fully vetted that version of NativeScript to work with every part of the Telerik Platform, but do want to provide it for our users who need the very latest.

    Updating Core NativeScript Modules

    If for some reason you need to update one or more core NativeScript modules before a big framework release includes them (maybe there are bug fixes or updated functionality), it's an easy process:

    First, navigate to the package manager dialog by right-clicking on your project name and choosing Manage Packages. Next, make sure the npm tab is highlighted, and, if not already selected, search for "tns-core-modules." This will bring up the following:

    manage nativescript modules

    From the dropdown provided, choose the version of the core modules you need to use.

    Updating the Cordova Framework

    Developing a hybrid mobile app with Apache Cordova? No problem—it's just as easy to update to the latest Cordova bits. Just as you learned how to update to the latest version of NativeScript, you can do the same with Cordova. In your project's Properties window and General tab, choose the appropriate Cordova version from the dropdown provided:

    updating cordova version

    Again, you may sometimes find a version of Cordova labeled "experimental." Like with experimental NativeScript versions, it just means we haven't fully vetted this version of Cordova, but wanted to make it available as early as possible.

    Updating Core Cordova Plugins

    Now there do come times when you need to update one of the many core Cordova plugins you are using. Just as with updated NativeScript modules, if there are bug fixes or improvements that you rely on, you probably don't want to wait for the next big Cordova release!

    To update your core Cordova plugins, you have to upload them as custom plugins, which is super easy to do:

    1. Download the plugin zip archive from its GitHub repository (search the Apache org on GitHub to find them)
    2. Open up your project's Properties window
    3. Choose the Plugins tab
    4. In the Core Plugins section, uncheck the box for the plugin that you want to update
    5. In the Custom Plugins section at the top, click Import
    6. Drag and drop the plugin archive you downloaded in step 1 and click Upload
    7. When the upload is complete, make sure that the plugin files are nested in a folder in the Plugins node in your solution explorer

    And you're done!

    Bonus: Updating Third-Party Plugins and Kendo UI

    Another common activity is updating other custom NativeScript or Cordova plugins you've previously included in your app. If you need to update a previously uploaded custom plugin, you can update to a newer version by following the same instructions as provided to update core Cordova plugins in the previous section.

    If, however, you've added plugins from the Telerik Verified Plugins Marketplace, we make it even simpler. From the Manage Packages dialog, search for the plugin you would like to update:

    updating cordova marketplace plugins

    If an update is available, you'll see the update badge notification along with a change button that appears after you choose a new version of the plugin from the dropdown provided.

    Finally, if you'd like to do the same for an updated version of Kendo UI, you can do so by selecting the Kendo UI tab provided and walking through the same steps!

    Next Steps

    Set up a free trial of the Telerik Platform today. Once you start your trial, we provide you with an instantly-available development experience with numerous step-by-step quick start tutorials for both hybrid and native. Best of luck with your app development!


    Cross-Platform Native Apps with Xamarin.Forms & Telerik UI

    $
    0
    0

    In this webinar, learn how Xamarin.Forms and Telerik UI for Xamarin helps deliver you the dream of Native iOS/Android/Windows apps from a single shared C# codebase.

    Modern development demands complex UI controls. Telerik UI for Xamarin delivers a comprehensive suite of UI controls for Xamarin.iOS, Xamarin.Android and Xamarin.Forms. You get polished and performant UI controls out of the box—like Graphs, Charts, DataForms and SideDrawers. Not only that, but achieve the same scenarios and functions across platforms using a single code base. 

    In this webinar, taking place on July 20th at 11am ET, you'll learn how Xamarin.Forms and Telerik UI for Xamarin can help deliver you the dream of Native iOS/Android/Windows apps from a single shared C# codebase. Use your .NET skills and complete native API access to build modern X-Platform mobile apps.

    James will walk through latest and greatest with Xamarin.Forms. He'll explore the promise of Xamarin.Forms and take a peek into its latest features:

    • Xamarin.Forms in a nutshell
    • Platform native API access from shared C# code
    • Shared UI through C#/XAML
    • Built-in UI pages, layouts and controls
    • Real-time preview of UI markup inside IDE
    • Customizable themes

    The webinar also features Telerik UI for Xamarin by Progress UI controls & Getting Started experience. You get complex Charts, amazing ListViews and handy SideDrawers—out of the box. 

    Webinar Speakers:
    • Sam Basu—Developer Advocate at Progress
    • James Montemango—Developer Evangelist & Engineer, 
      Xamarin
    • Nikolay Diyanov—Product Manager at Progress

    Save Your Seat Today

    Register for the webinar today to reserve your seat.

    Meet Veronica Milcheva, Developer Expert for Sitefinity

    $
    0
    0
    Veronica Milcheva, Telerik Developer Expert for Sitefinity, talks about the potential in Sitefinity, doing things right the first time, and more.


    This post is the fourth in a series featuring our Telerik Developer Experts, community members who represent the best of our products. Read our first three here and meet more Experts here.


    veronicamilcheva-sm

    What’s your background, professionally?

    I've been part of the Sitefinity team for more than three years both in the Core Development and the Support and Documentation teams. Then I made a transition from product into services, thus participating in the creation of complex applications with the help of the Sitefinity CMS. Using my past experience as team-lead and senior Sitefinity developer, I constantly engage and advise both the community and client projects with practical insights and solutions.

    Where are you based and why?

    I am currently located in Sofia, Bulgaria (birthplace of Sitefinity and myself). 

    Bulgaria is already amongst the top outsourcing destinations in the world. My vision and wish is to help establish a good working environment for highly motivated young people who can learn and gain experience. This is not going to be the next digital agency with Sitefinity, but a top-notch incubator for quality applications and professionals.

    There is a tendency lately in Bulgaria to teach tech to people from all ages and professions that have a little or no IT background. The courses are free and everyone can participate. Students pass exams to continue the course and only the most motivated, skillful and hard-working succeed. This is the principle of many software academies, one of which is Telerik Academy. It successfully produces highly-educated graduates that are ready to start their career path.

    With whom are you working?

    Currently I am an independent consultant, developer and trainer, specialized in the Sitefinity CMS solution with strong ethics for best coding practices and application architecture. My main business partners are from the United Kingdom. I regularly provide training to clients on-site and online, consulting in Europe and the USA and actively participate in building solutions and/or projects with Sitefinity. 

    What project are you working on now?

    I am currently working on three different tasks in parallel for different end clients. I am preparing a specific-needs training for a partner who requires some new features in their website and wants to be able to do it on their own in future. On the other hand, I am a lead developer for a big website including enterprise features of Sitefinity. Last but not least, I am consulting with another client on laying down the foundation of their Master pages, Page Templates and Layout controls.

    What’s the most interesting project you’ve done recently? Tell us about it!

    The most interesting and most challenging project that I’ve done recently was for a large trading client in the UK. There were multiple challenges both in architecture, development and deployment aspects. The website supports more than 20 languages plus third-party integrations to custom APIs and Salesforce. The client has their own IT department with senior experience in .NET and ASP.NET.

    During the effective development stage, we had to work together to tackle issues and questions one by one in a way to enable the client to independently continue the support, upgrades and further implementations of the project. It was both development and training at the same time. 

    What are some challenges you are encountering now in your work?

    One of the strong advantages of the Sitefinity CMS is the ability to achieve one and the same thing in many ways. What is sometimes challenging however is finding the best way as this requires high proficiency in knowing the bigger picture in your mind.

    There are many resources where you can find information for the problem that you are searching for over the internet, such as Sitefinity forums, blogs, support tickets, knowledge base articles, etc. I have been developing my own blog to help consolidate this knowledge, and a checklist that I initially developed for myself was soon transformed into a PDF eBook with “60 tips and tricks for Quality Sitefinity Applications” that I published on my personal blog to help people improve the quality of their Sitefinity based applications.

    Which of our products do you use and why?

    Time is the most precious resource. Nowadays a programmer has so many responsibilities that losing time on something that is already there is highly inefficient. As a big fan of automation, I love Scott Hanselman’s quote: “Buy, Not Build.” We should all take full advantage of the platform, even if it only solves the 80% of the case. Many of the Telerik tools are created to simplify your work and save you time. Great examples of these time-saving tools include JustCode, JustDecompile, JustTrace and Sitefinity Thunder.

    Sitefinity is dogfooding some of the Telerik products as Kendo UI and RadControls for ASP.NET AJAX, so I am using them naturally as part of my applications. In addition, as part of the Sitefinity team, I’ve used TeamPulse, Fiddler, and Test Studio.

    Sitefinity remains my favorite Telerik product not only because I’ve been part of the implementation of the CMS (I will always feel sentimental about it), but because my experience showed me that this CMS has enormous capabilities in the right hands.

    What’s the biggest software pain point, in your opinion, in the mind of your partners or clients?

    I would summarize it with the wonderful quote by Hall of Fame basketball player John Wooden: “If you don’t have time to do it right, when will you have time to do it over?”

    I’ve seen some lack of understanding of the process of building up Sitefinity applications. Some clients think that putting HTML snippets into Sitefinity and then deploying is all that is needed. And that’s not all. I’ve been called to review already implemented projects by agencies as they are suffering either from bad performance, bad SEO or simply bad coding practices. In the end the impact is normally that the time, effort and financial cost to fix a badly developed website might cost twice as much as its initial value.

    I think that for a large and complex CMS as Sitefinity, mentoring is an essential part and must become a service that agencies should include when thinking of building Sitefinity websites. 

    Hybrid or Native Mobile App? Use the Right Tool for the Job

    $
    0
    0

    When should you use hybrid mobile apps and when should you go native? Learn about the difference and which is best for your mobile app development.

    The toolbox for the mobile app developer has grown larger and more diverse than anyone ever anticipated. From pure native solutions like Xcode and Android Studio, to native JavaScript options like Telerik NativeScript and React Native, to web-based frameworks like Kendo UI and Ionic, it's easier than ever to get started with app development. But with increased options comes a "paradox of choice"—we freeze and get frustrated when we have too many options to choose from. What we really want are fewer choices with clear guidance. In this article I hope to shed some light on your choices and provide a friction-free path towards mobile app success!

    When we talk about leveraging mobile app development tooling and services such as those provided with Telerik Platform by Progress, your choices become much more succinct:

    When you use the Telerik Platform, you don't need a Mac nor do you need to manage proprietary SDKs. You gain access to best-of-breed simulation, debugging, and mobile services like push notifications, LiveSync, app store publishing, and much more.

    hybrid native mobile web

    What Exactly Is a Hybrid Mobile App?

    My colleague John Bristowe nailed it with this blog post, which contains a full explanation of what a hybrid app is all about. To be clear, a hybrid mobile app is NOT a mobile website! It is an app that is natively installed on your device, but coded with web technologies (HTML5, CSS, JavaScript) and runs inside of what is called a WebView. A WebView is effectively a chromeless browser bundled with a mobile app.

    A hybrid mobile app looks, feels, and acts like a native app (most of the time... see below). It can also interact with native device functions like geolocation, camera, contacts, and so on. Any gaps in accessing native features can usually be filled with a variety of Cordova plugins.

    Sounds pretty good, right? Let's look at some more detailed strengths and weaknesses of hybrid:

    Hybrid Strengths

    • Fully cross-platform: You write code once and then build it for iOS, Android, and/or Windows Phone
    • Code reuse: You can take most of an existing web app code and transform it into a mobile app
    • Skill reuse with small learning curve: If you have JavaScript, HTML, and CSS knowledge, you can quickly develop an app with Cordova and a mobile JavaScript framework
    • Reduced development time and cost: Because of the above strengths, you can deliver a finished mobile app relatively quickly
    • Established ecosystem: Cordova is a mature open-source framework and Kendo UI includes a well known (and open source) mobile framework

    Hybrid Weaknesses

    • Perceived performance issues: Since your hybrid app runs in a WebView, you are limited to the performance of that WebView on the device (Android especially has known its share of troubles)
    • Differences in behavior across devices: Because WebViews differ from platform to platform (and even from version to version), you might need to apply additional tweaks and optimize your code to ensure that your app runs as expected on all devices
    • Performance issues with heavy graphics and transitions: WebViews definitely have issues when processing demanding graphics and transitions (typical of games and other UI-heavy apps)
    • Additional development required for platform-specific UI or features: To tap into unique platform features, you usually need to write additional code or use a plugin—in some cases, you might even need to create the plugin yourself
    • Slow adoption of new platform versions: When a new mobile platform version becomes available, you need to wait up to a few months before Cordova introduces verified support for the new version and its features

    And What Exactly Is a Native Mobile App?

    A native mobile app is an app that runs natively on your device with truly native UI elements. Unlike a hybrid app, a native app does not sacrifice performance because, well, it's running natively on the device! There is no WebView getting in the way on native. A native app also has full access to every API available on each platform it runs on (so there isn't necessarily the need to use plugins to fill any gaps, though they can help).

    When we talk about native, we think the best and easiest way for you to go native is by using our free and open source framework called NativeScript.

    nativescript architecture

    Why NativeScript? Well, like hybrid, it lets you utilize the web skills you know and love (CSS and JavaScript/TypeScript) while providing a seamless and engaging user experience with our add-ons like Telerik UI for NativeScript.

    Again, sounds good right? Let's again look at some more detailed strengths and weaknesses of native:

    Native Strengths

    • Cross-platform: Like with hybrid, apps you create with NativeScript run on both iOS and Android with one codebase
    • Code reuse: Again, like hybrid, you can copy a lot of your JavaScript business logic into a NativeScript app (depending on the situation of course)
    • Skill reuse: If you know JavaScript and CSS, or understand the concept of XML (for UI markup), then you already have the basics needed to understand NativeScript
    • Native UI and performance across all platforms and devices: Because your apps use native components, they look and run natively everywhere
    • Leverage existing native libraries: NativeScript provides out-of-the-box support for native libraries, including CocoaPods
    • Day zero support for new mobile features: When a new mobile OS version becomes available, NativeScript immediately provides support for the new version and its features

    Native Weaknesses

    • Relatively new:JavaScript Native frameworks are relatively new to the game, therefore the community is still building resources and extended documentation for you
    • Steeper learning curve: While hybrid lets you use HTML, NativeScript forces you to use more native app concepts like native UI elements. Sorry, no more divs, but the NativeScript layout engine is pretty easy to understand

    When Would I use Hybrid vs Native?

    THIS is the key question, isn't it? If you know that you want to develop a mobile app AND you know now that you have choices AND you also know that the Telerik Platform supports both methods, what do you do? Here are some common issues we hear people talking about when choosing between hybrid and native development:

    Performance is critical for me—my customers will drop my app if it doesn't feel right! If performance is key (and it usually is), then going native with NativeScript is a great way to start.

    I just need to put an app together as quickly as possible. It doesn't have to be perfect or feel 100% native. Need to quickly develop a proof-of-concept app? Then hybrid is probably your best choice to get something quick out there. The cool thing about NativeScript is that you may even be able to copy most of your business logic from your POC app into a NativeScript app (since they both run on JavaScript!).

    I want to future-proof my app. I can't wait for someone else to write a plugin or update a framework. Staying up to date with the latest mobile platforms is critical, which is why NativeScript provides zero day support for all new OS releases and API updates.

    I need to create a Windows Phone version of my app! As of today, Windows Phone is only supported with hybrid (although the NativeScript team is working on it).

    Next Steps

    Set up a free trial for the Telerik Platform today. Once you start your trial, we provide you with an instantly-available development experience with numerous step-by-step quick start tutorials for both hybrid and native. Best of luck with your app development!

    Official ASP.NET Core 1.0 Support Now in UI for ASP.NET MVC

    $
    0
    0

    We announce our official support for the new ASP.NET Core framework (MVC 6), and answer some of the most frequently asked questions by our community.

    ASP.NET Core 1.0 RTM is now live and developers around the globe are highly excited to give it a spin. Now that it's released, more and more developers are about to start new or to migrate existing apps onto it. This means the need for beautiful and high quality UI components that run on the new Microsoft framework is increasingly vital.

    As a result, the inevitable question arises:

    When will Telerik UI for ASP.NET AJAX officially support it?

    I'm proud to share that as of today the R2 2016 SP2 release of Telerik UI for ASPNET MVC fully supports ASPNET Core 1.0 RTM!

    All included components are fully compliant with ASP.NET Core (MVC 6) and will allow you to build apps with beautiful and accessible UI that runs on the supported three operating systems: Windows, Mac, and Linux.

    Is there a new name for the Kendo.Mvc assembly for ASP.NET Core?

    Yes, that's right, the name of the new assembly is Telerik.UI.for.AspNet.Core and it clearly highlights the framework targeted by the suite. The new name replaces the old Kendo.Mvc.dll one.

    What’s new in the Kendo UI MVC wrappers for ASP.NET Core 1.0 RTM?

    That's a good question!

    • Tag Helpers—we are following the ASP.NET Core specification and we have included Tag Helpers for some of the popular components: NumericTextBox, Button, Window, DatePicker and TimePicker. We plan to add more tag helpers in the next releases, but it will be awesome if you share feedback on exactly which components you'd like to define and configure through Tag Helpers.
    • New VS template—You can now use the new Telerik template to quickly setup and create a project for ASP.NET Core.
    • GitHub Demo appThe demo app is now obsolete and will be replaced by a brand new demo app for ASP.NET Core in the R3'16 release.

    Will the temporary NuGet.org feed be updated?

    The idea of the NuGet feed was to provide a fast way to obtain all latest releases of our MVC bundle built against the beta and release candidates of ASP.NET Core. Since NuGet is suitable for open source resources, and we also offer a private Telerik feed for distributing NuGet packets, we won't distribute any more MVC Core related installations.

    From now on we recommend using the Telerik private feed for the UI for ASP.NET MVC product. You can access it via https://nuget.telerik.com/nuget by referencing this URL as a new package source inside of a Visual Studio project. To gain access to the server you have to provide your Telerik account credentials:

    Telerik NuGet feed

    Figure 1.Configuring Telerik NuGet feed in Visual Studio -> Tools -> NuGet Package Manager -> Manage NuGet Packages for Solution...

    Manage NuGet Packages for Solution

    Figure 2. Telerik Private NuGet feed along with the Telerik.UI.for.AspNet.Core package

    Is there a new Visual Studio template for building ASP.NET Core 1.0 RTM apps with Kendo UI MVC wrappers?

    Yes, you can easily get started with the new Telerik ASP.NET Core project through the create a new project wizard of Visual Studio: File -> New -> Project ... -> Installed -> Templates -> Telerik Web -> Telerik C# ASP.NET Core MVC Application. The template is based on the default ASP.NET Core one and features two of our popular Telerik MVC navigation components Menu and TabStrip:

    Menu And Tab Template

    Figure 3. Try the new Telerik Template for ASP.NET Core

    Are there any alternative ways to obtain the new R2'16 SP2 release?

    You can always log into your Telerik.com accounts, go to the Downloads section and download the preferred installation type.

    Important Resources

    Digitally Transform Sitefinity Sites into Mobile Apps

    $
    0
    0

    Sitefinity is a powerful and scalable CMS for websites, but what about a mobile app? With NativeScript or Telerik Platform you can transform your sites into apps.

    Sitefinity is a powerful CMS solution for creating websites, with capabilities that scale and allow you to easily manage hundreds of sites in different languages. While an effective and responsive website remains essential, a mobile app is increasingly necessary too—both to engage with customers browsing app stores and to enable developers with better performance and more features.

    There are two effective options that make it easy to transform your Sitefinity sites into mobile apps: NativeScript and Telerik Platform.

    NativeScript and Native Apps

    Developing a native app from scratch can be painful and time-consuming, requiring you to learn multiple languages and frameworks. NativeScript was custom-built to solve this problem. It allows web developers to use the skills they already have in JavaScript or Angular to build and deploy apps—native apps, with all the efficiency and feature benefits that entails—for both Android and iOS.

    Sitefinity and NativeScript might seem to be in totally different worlds, but there’s a simple answer that allows for easy integration with a little coding—Sitefinity Web Services.

    To install NativeScript and get started, check out the documentation here. For a deep dive into how to use Sitefinity Web Services to turn your Sitefinity sites mobile with NativeScript, read more here.

    Cross-Platform Mobile Apps with Telerik Platform

    Cross-platform development is key to driving down development costs, saving developers time and businesses money. Telerik Platform is a holistic platform for the entire development cycle, giving you the ability to build your whole app on-premise or in the cloud. You can build for Android, iOS and Windows Phone without the need for specific hardware, test your apps and then deploy to app stores.

    Telerik Platform supports both NativeScript for native apps and Apache Cordova for hybrid apps.

    The solution for integration between Telerik Platform and Sitefinity is once again Sitefinity Web Services. This integration is a little simpler than the one above though, and doesn’t require you to write a single line of code.

    To learn more about how to use Telerik Platform to transform your Sitefinity sites, check out the full guide here.

    What’s your favorite way to develop Sitefinity sites into mobile apps? Happy coding!

    Viewing all 4176 articles
    Browse latest View live


    <script src="https://jsc.adskeeper.com/r/s/rssing.com.1596347.js" async> </script>