Quantcast
Channel: Telerik Blogs
Viewing all 4338 articles
Browse latest View live

Test Studio Step-by-Step: Data-Driven Tests

$
0
0

Here’s how to convert any test into a data-driven test that lets you prove your app works with every set of data that matters.

So you’ve created your first end-to-end (E2E) test and it’s proving that, even as more changes are made to your application, your application continues to process your test transaction “as expected.”

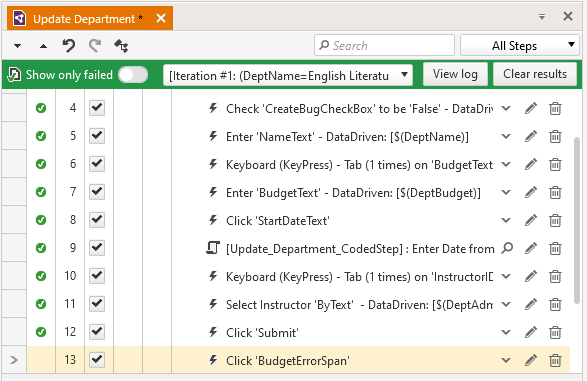
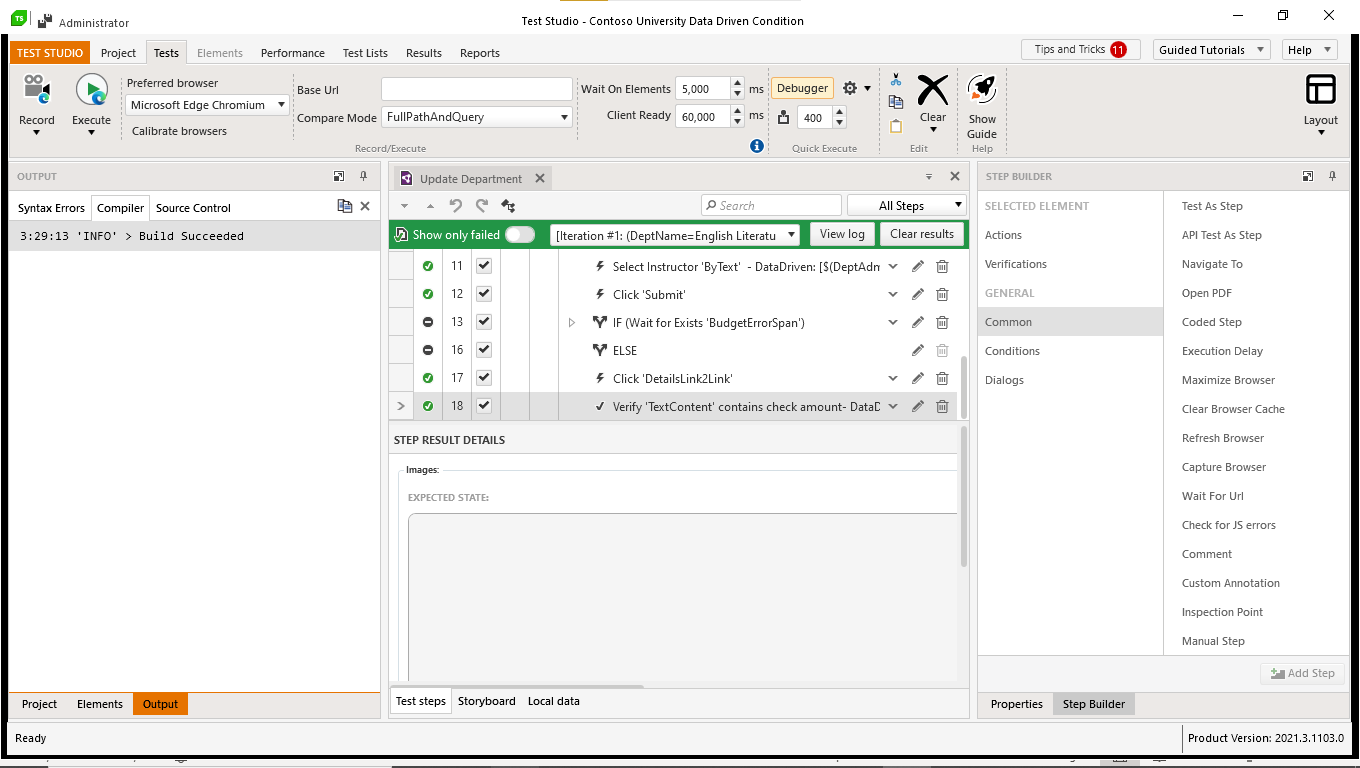
Test Studio showing the results of running a successful test

And you’d like to run that test again, but with different data. You’ve done your equivalence partitioning to determine what groups of data exist that are relevant to your application (i.e., where “significant” differences exist in the application’s potential inputs). You’ve also pulled at least one set of data from each group. Now you want to prove that your application works “as expected” with each set of data that you’ve identified.

What you don’t want to do is write a new test for each set of data. While the data is different, the application should be able to process each set of data just like the inputs from your original test. You also don’t want to make your test so complicated that the test itself needs to be tested. One of the benefits of Test Studio’s data-driven tests is that you can incorporate multiple sets of data into a single test without violating that rule.

For example, my case study is built around updating department data in the fictional Contoso University app. (Feel free to download both my version of the Contoso University application and the Test Studio project I used to test it.) The user should be able to change the department’s name, its start date, budget and administrator. Within the budget alone, I want to make sure the application will accept “typical” budget amounts (e.g., $5,000) and very large numbers (e.g., $1,000,000). The application should even accept negative numbers like -$200 (some departments actually bring in more money than they spend and, as a result, return money to the university).

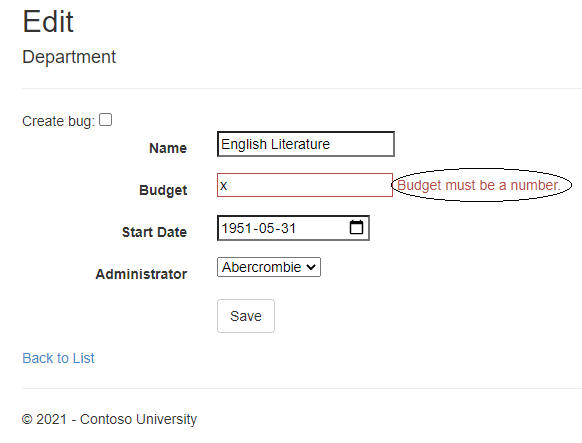
The test script for all of these sets of data looks the same—just the inputs change (if the test script is different from one set of data to another, it suggests that you’re testing a different transaction). Eventually, you’ll want to check that the application handles bad data correctly, but I’ll cover that in a separate post.

There are real benefits to creating one test that handles all the data items for this transaction. If, for example, you do have to come back and change your test, you’ll only have to update one script instead of many similar scripts. It may make even more sense to create a data-driven test when you have only a single set of data. By moving your test values out of your test and into a separate source, it’s not only easier to change that data (as you’ll see here), but you can share that dataset among multiple test scripts, when that makes sense.

It’s a good idea to start off by creating a test without worrying about making it data-driven (much like the test I created in the post at the start of this article). Test Studio makes integrating multiple sets of data into a test easy.

Setting Up Your Data

Once you’ve created a standard test, your next step is to create the sets of data you intend to use with your test—your data source. You don’t need to do a lot of planning here because, as you’ll see, it’s easy to go back and modify your data source if you need to make a change.

Test Studio provides a convenient built-in tool for creating and holding your data (you can find it on the “Local Data” tab at the bottom of your test steps). However, you can use almost any tool that holds data to drive your test (including pulling data from an actual database). For this case study, I’ll use Excel because, I assume, you’re already familiar with it.

The list of test steps with the ‘Local data’ tab at the bottom of the steps circled.

After you start Excel, you must first set up the columns that will hold the data you need. You can do that by scanning your test steps and inventing some appropriate names for the data the columns will hold. Looking at both the Edit Department page and my sample test, I’ll need one column for each field the Department Edit page lets me update. I’ll call three of those columns DeptName, DeptBudget and DeptAdministrator.

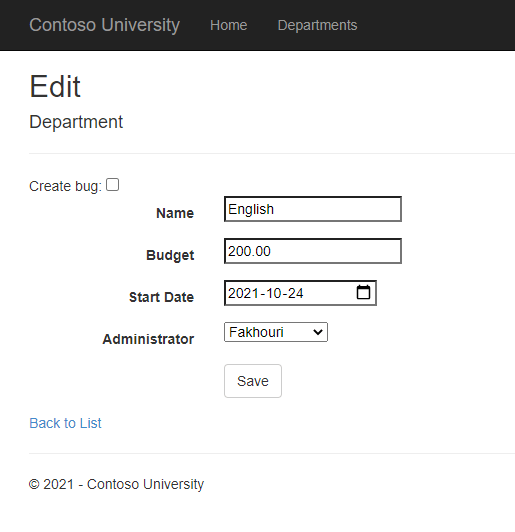
The Contoso update department page showing three textboxes (Name, Budget, and Start Date) and a dropdown list labeled Administrator, with a Submit button at the bottom of the page. At the top of the page is a checkbox labeled ‘Create Bug’

I’ve used a coded step to handle entering the date and, because of the way I’ve written that step, I’ll need three more columns for it: DeptStartYear, DeptStartMonth and DeptStartDay. In addition, for the purposes of this case study, I added a checkbox to the page that lets me create a failing test whenever I need to demonstrate an error in this case study. I’ll add a column called InsertBug for that.

Finally, I’ll put in a column called Notes so that I can document the intent of each test row.

I don’t need to set up columns for anything that doesn’t change from one test to another (e.g., clicking the submit button at the end) and, as my Notes column suggests, I don’t have to use every column I set up in my data source. Purely for documentation purposes, I give my worksheet a name (DeptEditTests), save it and close it.

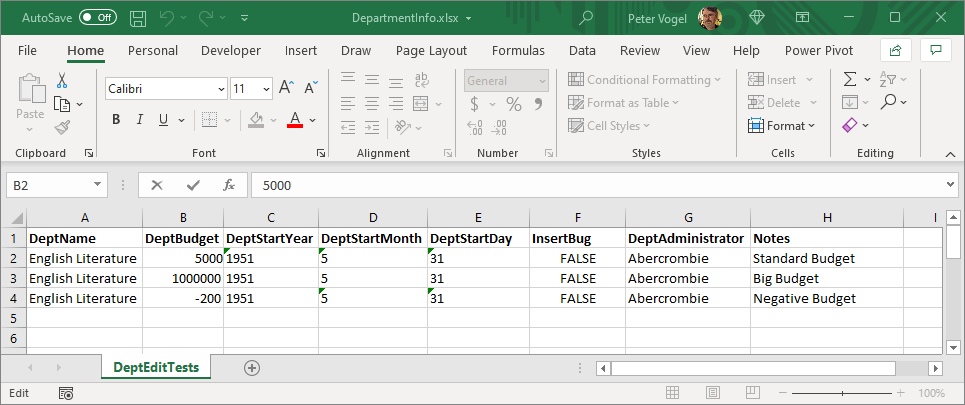
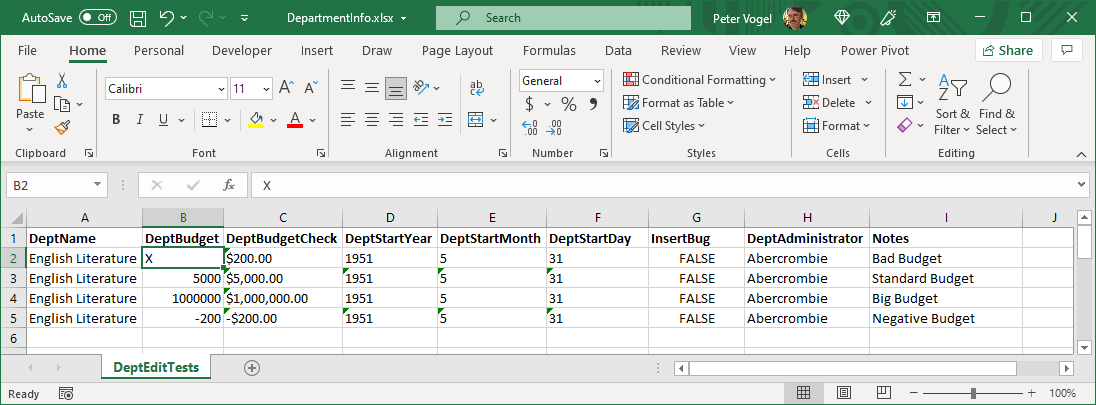
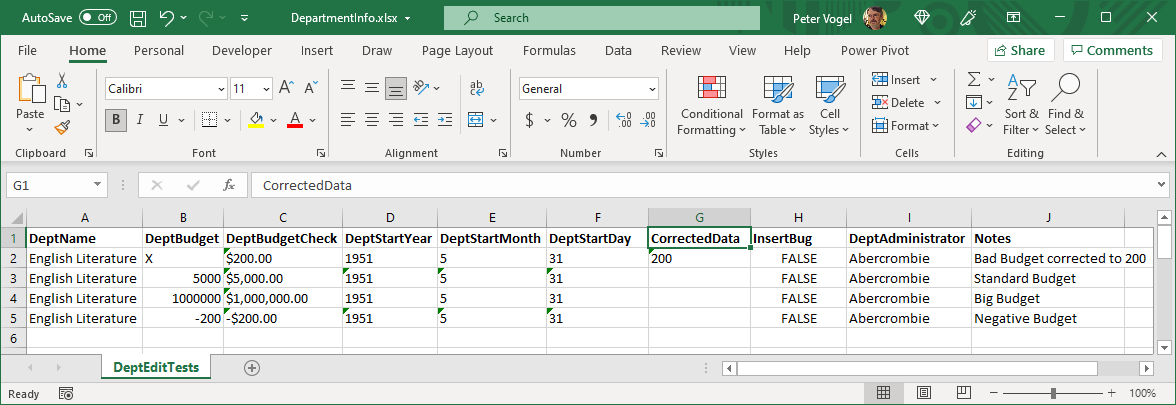
The result, with my test data, looks something like this:

An Excel worksheet name DeptEditTests with the columns described in the article. There are three rows with identical data in each column except for two: The DeptBudget column has different values in each of the three rows (1000000, 5000, and -200) and the Notes column also has different values in each of its three rows (“Standard Budget,” “Big Budget,” and “Negative Budget”) that describe the purpose of each row.

One word of warning when working with Excel: Make sure that the rows that follow your test data really are empty. A blank space in a cell in a row following your test data will convince Test Studio that it should feed that row to your application as part of your test. Select the row following your test data and press the Delete key to clear it.

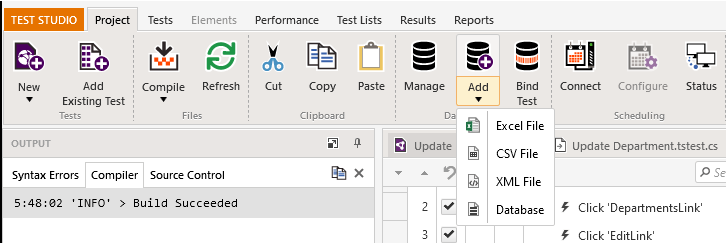
Now that I’ve prepared my data, I can add my Excel spreadsheet as a data source in Test Studio. Back in Test Studio, I first switch to the Project tab and then, in the Data Sources section, click the arrow under the Add+ icon to get a list of the formats that Test Studio accepts. I select Excel File, which opens a file open dialog. In the dialog, I surf to the folder with my spreadsheet, select it and click the Create button. Test Studio copies the file to my test project’s data folder.

The Test Studio menu bar with the Project tab selected and the dropdown list under the add icon displayed showing the four options: Excel File, CSV File, XML File, and Database. To the right of the Add icon is the Bind Test icon.

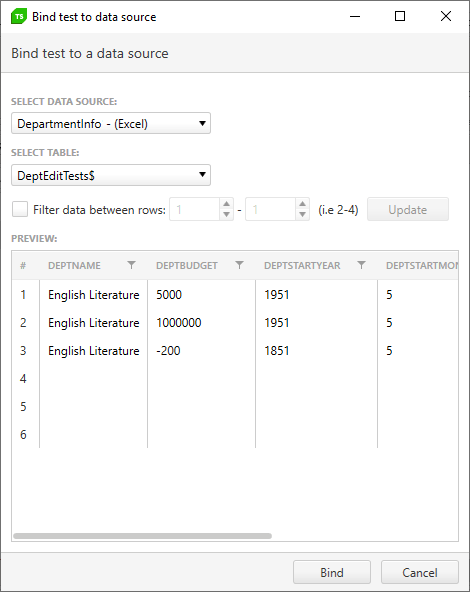
With my data source loaded, I can bind it to my test by clicking the Bind Test icon. This opens another dialog with a Select Data Source dropdown list at the top. Clicking that reveals my Excel data source, which I select. That causes the dialog to display another dropdown list, labeled Select Table—clicking that lets me select which sheet in my Excel spreadsheet I want to use for this test script. When I select my spreadsheet, the dialog gives me a preview of my data.

The Bind test to a data source dialog showing the dropdown lists with the DepartmentInfo Excel spreadsheet in the top dropdown list and Sheet1 selected in the bottom list. The four rows of the Excel spreadsheet (the heading row and the three rows of data) are displayed below. At the bottom of the dialog is a Bind button.

Clicking the Bind button at the bottom of the dialog completes adding the spreadsheet to my project. I’m ready to have my test script use this data.

Binding a Test Step

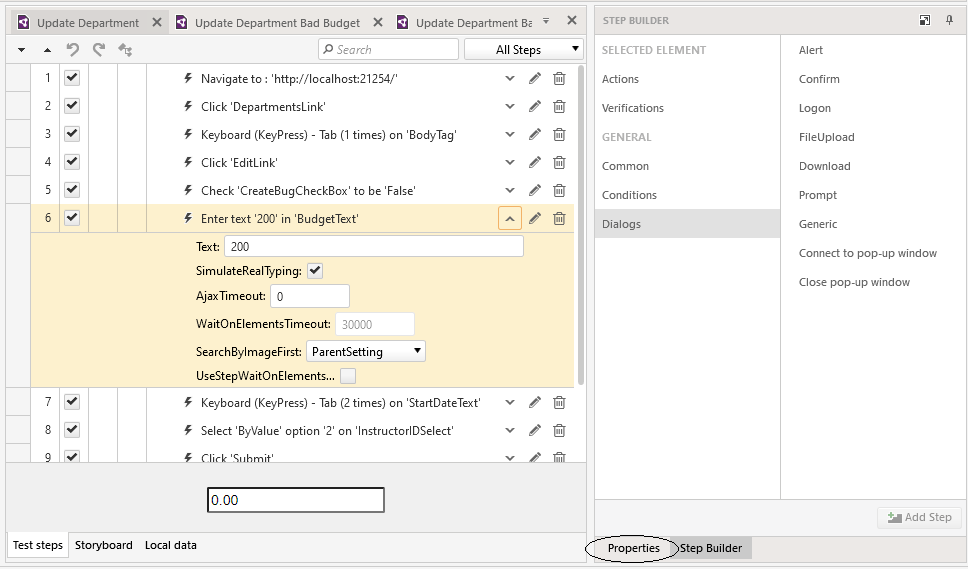
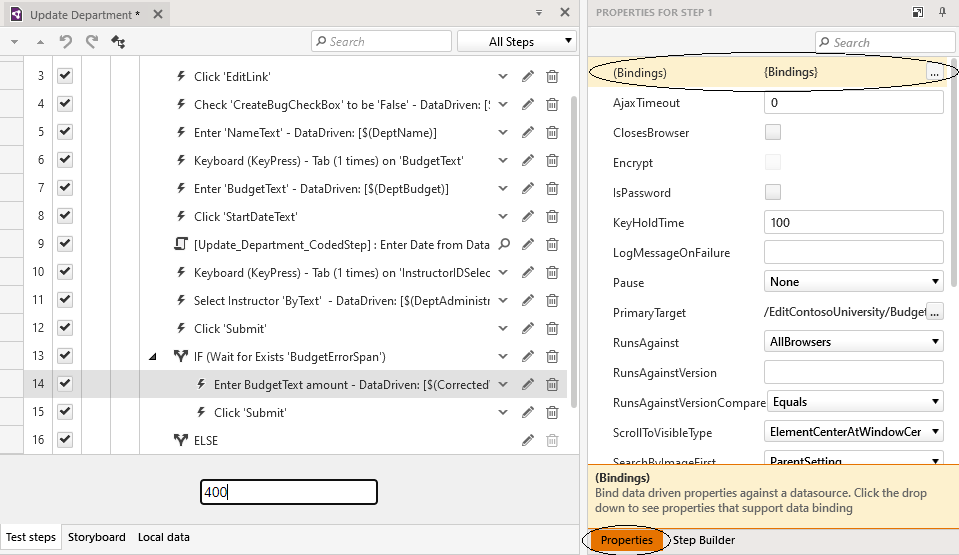
All that’s required to data-bind a test step is to tie a column in your data source to the value used by the test step. You do that in the Properties window for the step you want to data-bind. After you select the step, you’ll find the Properties window to the right of your step list, tabbed together with the Step Builder—just click on the Properties tab to show the window. I’ll start by binding the step where my original, non-data-driven test currently types in the number 200.

The list of steps in a recorded test with the “Enter text ‘200’ in ‘Budget Text’” step expanded to show that its Text value is currently set to 200. The Step Builder pane shown to the right of the test script. At the bottom of the pane the tab labelled “Properties” is circled.

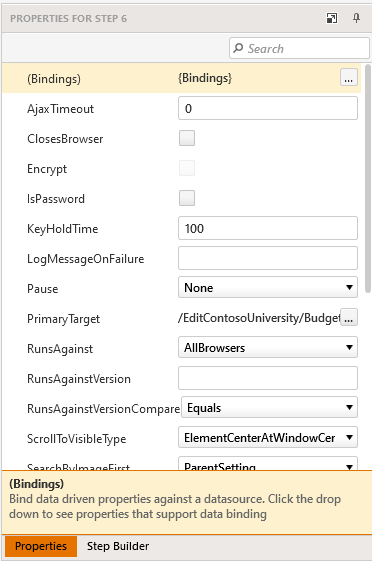
Once the step’s Properties tab is displayed, you’ll find the Bindings builder button (the button with the three dots) at the top of the property pane. Clicking the Bindings button will let you replace your fixed value with the name of a column from the data source bound to your test.

The step’s Properties tab with the top line – labelled “Bindings” – highlighted. The line has a button with three dots at the right hand end.

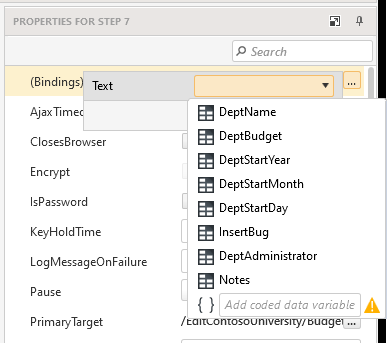
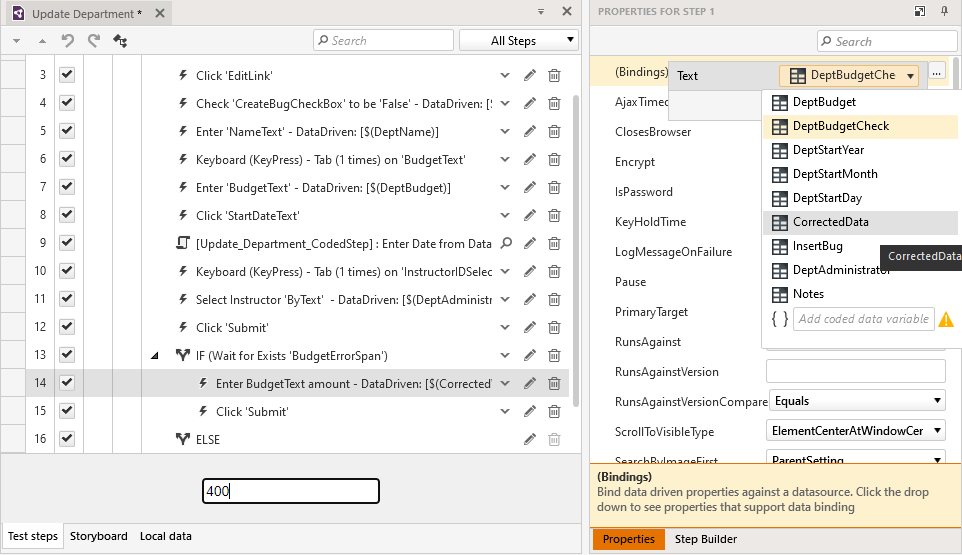
When I click the builder button, I get a popup dialog with a dropdown list that displays the column names from my Excel spreadsheet: DeptName, DeptBudget, DeptStartMonth and so on. Since this step is entering the budget data, I select DeptBudget and click the Set button on the dialog. The title of my step in the test script is updated to show that the step is now Data Driven. I then repeat that process with the other data entry steps in my test script.

The dropdown list that’s displayed after clicking the Bindings builder button, showing the columns from the Excel spreadsheet.

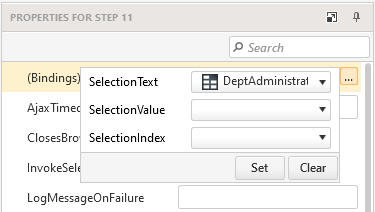
When I bind the dropdown list, however, the Bindings dialog gives me a different set of options: I can set one or more of SelectionText, SelectionValue and SelectionIndex. I entered the name of my administrator into my spreadsheet and, on the Department Edit page, the administrator’s name is displayed in a dropdown list as the list’s Text. As a result, I’ll need to set the SelectionText option to my Excel spreadsheet column to have the dropdown list select the correct option using the data from my data source.

The Bindings dialog for a dropdown list showing three dropdown lists labeled SelectionText, SelectionValue, and SelectionIndex. The first dropdown list – SelectionText – has been set to DeptAdministrator

In addition to binding my actions, I also need to bind any verification steps I set up when I created my manual so that I’m checking my results against what’s being pulled from my data source (fortunately, binding a verification step is just like binding a textbox). This is typical of data-driven tests: You have one set of columns for your inputs (what you think of as your “test data”) and another set of columns holding the data you’ll use to validate the test (your “expected results”).

By the way, if your application includes checkboxes or radio buttons and you’re binding data from an Excel spreadsheet, just use Excel’s TRUE and FALSE values in your spreadsheet columns when setting, unsetting or verifying them.

Updating the Data Source

As I’m binding my verification step, I realize that I could use two columns to represent my budget amount. When I enter the data on the Department Edit page, I just want to enter digits (200, for example) because that’s all the textbox will accept. But, because of the way that the data is displayed on Department Display page, when I want to verify the data, I want to use the character string “$200.00”.

My verification step can handle that difference if I use the “Contains” operator in my verification test (the string “$200.00” contains the digits 200, after all). But I’d be more comfortable using the “Exact” match to make sure the data is being displayed correctly (to ensure the negative sign is in the proper place, for example).

Fortunately, updating my data source is easy: First, I click on the Manage icon in the Data Sources box on the menu to display a list of my data sources.

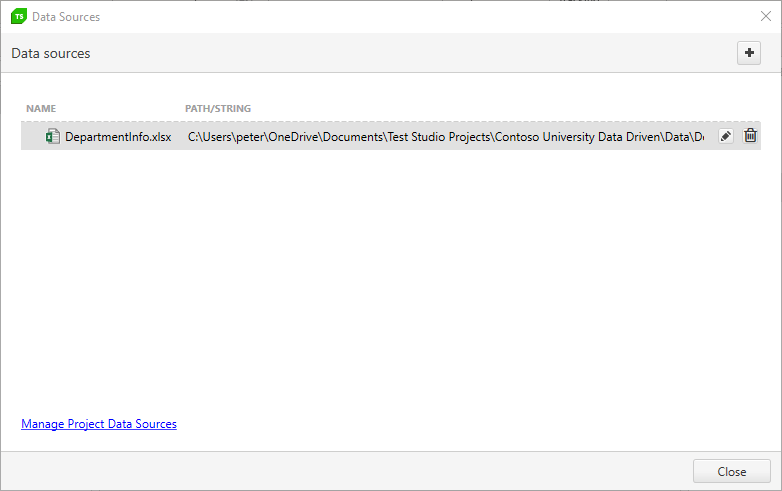
The Data Sources dialog showing the project’s single data source as the full path to the Excel spreadsheet in the data folder of my Test Studio project. To the right of the spreadsheet path is a pencil icon and a trashcan icon.

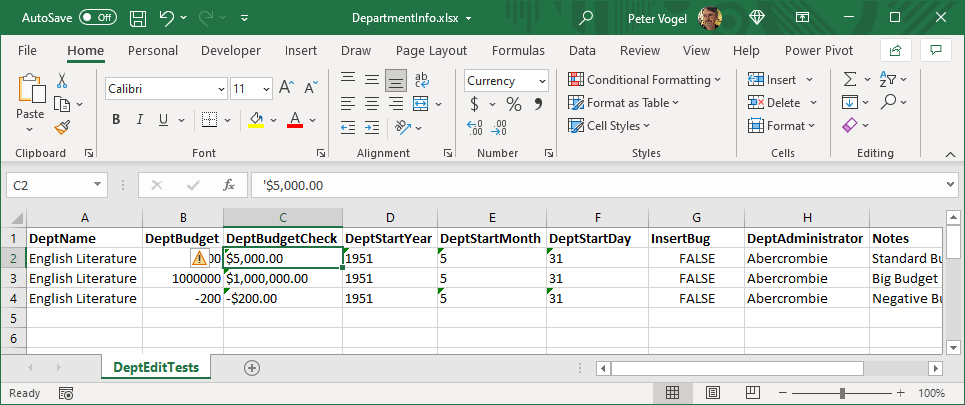
Clicking on the pencil icon for the Excel spreadsheet driving this test will open my spreadsheet in Excel. I add a new column to my spreadsheet called DeptBudgetChecked and fill it with the formatted display I’ll get on the Department Display page (make sure you enter the string with an apostrophe in front of it—‘$5,000.00—or Excel will store it as a number). I then just close and save my spreadsheet to update my data source in Test Studio.

An Excel spreadsheet holding the row of headings and data from the earlier example with a new column added. The new column is headed DeptBudgetChecked and contains a formatted version of the data in DeptBudget column.

Back in Test Studio, in my verification step, when I return to the Bindings dialog, I find the DeptBudgetChecked column is there for me to use. I can use the same process to add, update or remove the data that drives my test.

Running the Test

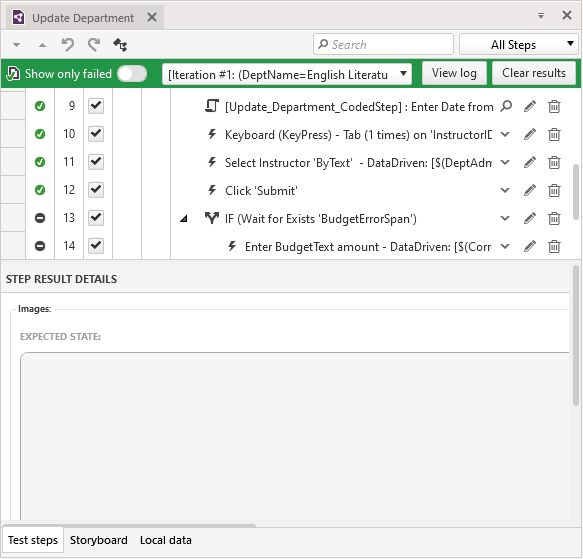
After I’ve bound all my steps, I can run my test. With my sample data, I’ll see the test run three times as Test Studio processes each row in my dataset. If all my tests pass, a green bar will be displayed at the top of my test script.

The test script after a successful run. At the top of the test script a green bar is displayed with a dropdown list in the middle. The dropdown list shows “Iteration #1: (DeptName = English” and then is cut off by the width of dropdown list..

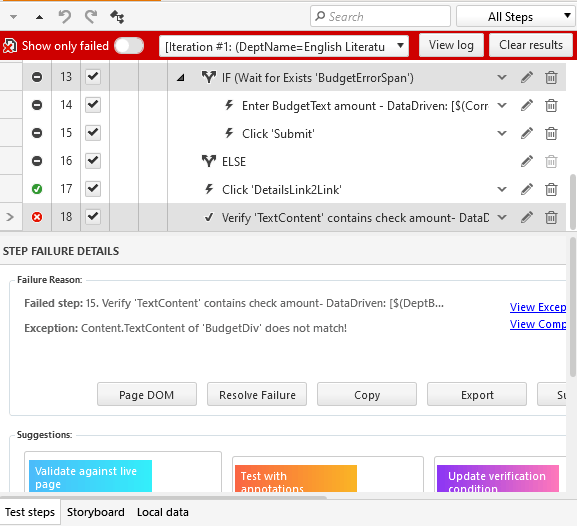
If one of my test runs has failed, I’ll get a red bar at the top of my test script.

The test script after a failed run. At the top of the test script a red bar is displayed with a dropdown list in the middle. The dropdown list shows “Iteration #1: (DeptName = English” and then is cut off by the width of dropdown list. At the bottom of the test script is a pane labelled Step Failure Details with tools for recording and analyzing the failing test.

To determine which run(s) failed, you can use the dropdown list to select each run. As you select each run, those runs which failed will have a Step Failure Details pane beneath your test script.

The test script after a failed run with the dropdown list in the middle of the red bar at the top expanded. The dropdown list shows three entries beginning “Iteration #1”, “Iteration #2”, and “Iteration #3” along with the data used in each iteration. The dropdown list’s options are displayed across the width of the Test Studio screen

The runs that succeeded will have a Step Result Details pane beneath your test script.

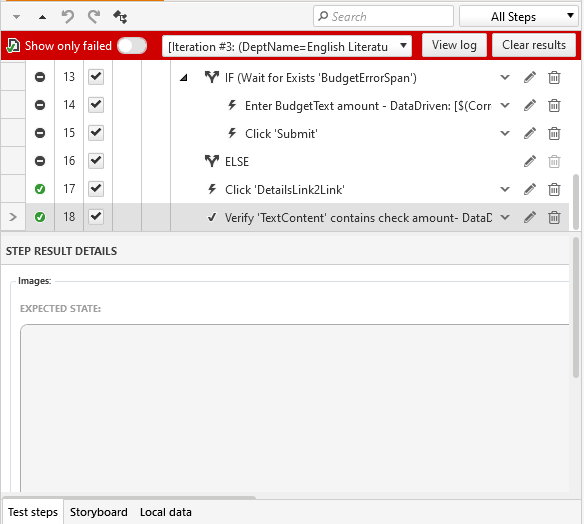
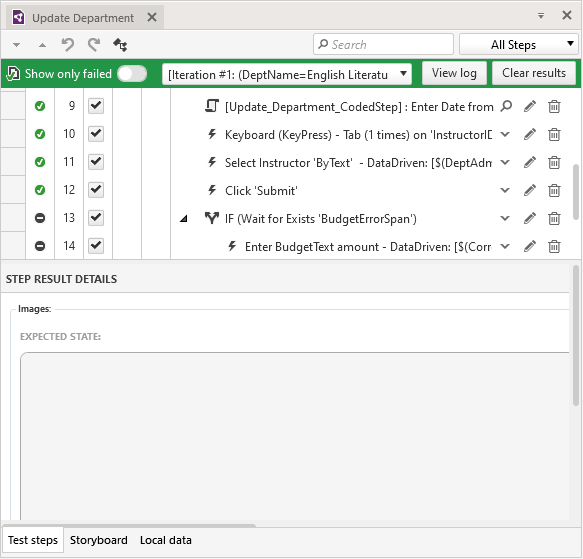
The test script after a failed run will also show steps that have succeeded, with green checkmarks

With data-driven testing, effectively every row in your data source is another test. With a single test script and a data source with multiple rows of data, you can start running more tests earlier (and cheaper) than if you had to craft individual test scripts.

Maintenance becomes easier and faster. Also, as you come up with more test cases, you just add them to your data source; if your application changes and starts to produce different output, you just update your “expected results” columns. Either way, you don’t have to write new tests or make changes to an existing test. It’s hard to beat easier, cheaper and faster, but data-driven tests can let you do all three.


Learn more about Test Studio, and start your free trial today!


Bring Your Apps to Life With SignalR and .NET 6

$
0
0

Today’s apps are expected to provide up-to-date information without the need to hit an update button. How can we make this possible? An interesting way is with the use of SignalR.

Something very common in software development are applications that make requests to a server and wait for the server to process this request and return the data.

But what if we need this data at the exact moment we make a request, like in a game for example, where we can’t have delays?

To meet this need, ASP.NET Core has a technology called SignalR. In this article, we will get an introduction to SignalR and create a simple example that will provide real-time data to an application. For that we will use the minimal APIs available in .NET 6.

What Is SignalR?

SignalR is a library for ASP.NET developers that simplifies the process of adding real-time web functionality to applications.

With SignalR we can make server content available to connected clients instantly as it becomes available instead of the server waiting for a client to request new data.

SignalR is an excellent choice for handling “real-time” web functionality through ASP.NET. A common example of its use is in the development of chats where the user needs to have their message sent immediately the same way they receive it. While chat is common, it’s not the only example of using SignalR. Monitoring apps, collaborative forms and real-time games are also great use cases.

For detailed information about SignalR, you can access the official Microsoft website through this link: Introduction to SignalR.

Hands-on Approach

In this article, we will create a practical example of using SignalR in a simple way with a minimal API available in .NET 6.

Note: In these examples, we will use Visual Studio 2022, as well as the .NET 6 SDK.

If you don’t know the concept of minimal APIs, I suggest taking a look at this article: Low Ceremony, High Value: A Tour of Minimal APIs in .NET 6. It provides a great approach to the subject.

You can access the full code of the example used in this article through this link: source code.

Creating the Server

First, let’s create a server. So, run the commands below in the terminal:

dotnet new web -o MainSignalServer
cd MainSignalServer
dotnet add package Microsoft.AspNetCore.SignalR

With these commands, we create our server (MainSignalServer) and add the “Microsoft.AspNetCore.SignalR” package that we need to implement SignalR on the server.

Creating the Hub

A Hub allows the client and server to call methods to each other directly. SignalR uses a Hub instead of controllers like in ASP.NET MVC. For that, we need to create a class that will inherit from the Hub class.

So within the project, create a class called “MainHub” and replace your code with this:

using Microsoft.AspNetCore.SignalR;

public class MainHub : Hub
{
    public async IAsyncEnumerable<DateTime> Streaming(CancellationToken cancellationToken)
    {
        while (true)
        {
            yield return DateTime.UtcNow;
            await Task.Delay(1000, cancellationToken);
        }
    }
}

For this example, we are returning an “IAsyncEnumerable” which is a type added in more recent versions of C#. We are also passing a “CancellationToken” parameter which allows us to cancel the action at any time. We also added the “yield” so that the client doesn’t need a class to store the state.

Now, we need to add the SignalR configuration and create a route to our server. For that, replace the Program class code with this:

var builder = WebApplication.CreateBuilder(args);
builder.Services.AddSignalR();

var app = builder.Build();
app.MapHub<MainHub>("/current-time");

app.Run();

Our server is ready—now just give the command below in the terminal, and it will be running.

dotnet watch run

Creating the Client

Now let’s create a simple app to consume the information our server is providing in real time.

Then, in another terminal, execute the following commands:

dotnet new console -o MainSignalClient
cd MainSignalClient
dotnet add package Microsoft.AspNetCore.SignalR.Client

Now, inside the created project, create a class called “MainClient” and replace the code with the code below:

using Microsoft.AspNetCore.SignalR.Client;

public class MainClient
{
    public static async Task ExecuteAsync()
    {
        //Replace port "7054" with the port running the MainSignalServer project
        var uri = "https://localhost:7054/current-time";

        await using var connection = new HubConnectionBuilder().WithUrl(uri).Build();

        await connection.StartAsync();

        await foreach (var date in connection.StreamAsync<DateTime>("Streaming"))
        {
            Console.WriteLine(date);
        }
    }
}

In the class we created, we are defining a method to consume the data that the server is making available in real time For that, we create a connection to the Hub, passing our server’s URL, which returns a list of dates and displays it on the terminal.

Now we just need to call this method in our app’s Program. So, replace the code of the Program class with the code below:

await MainClient.ExecuteAsync();

Now, just start the client project with this command in the console, and check the result:

dotnet watch run

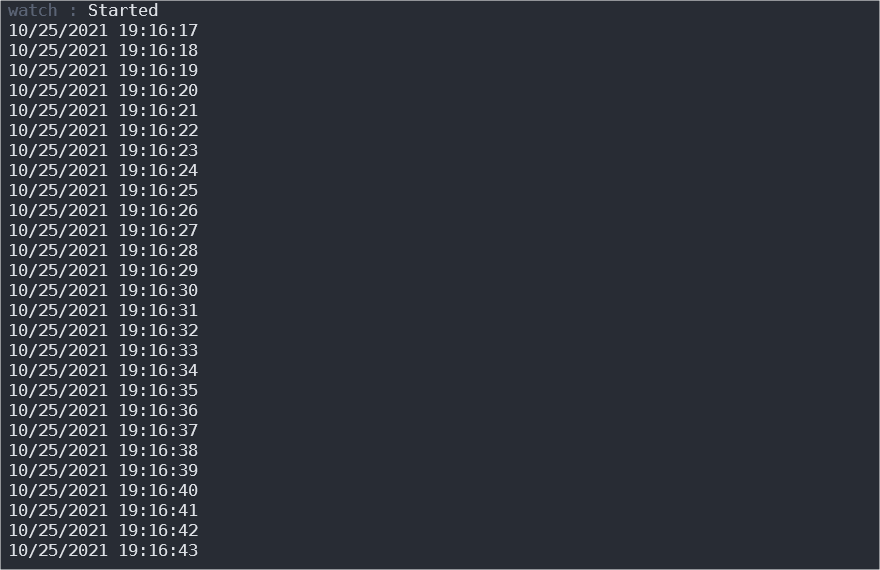
The client console is displaying the current date and time made available by our server.

Client Console Result lists dates and times

Conclusion

In this article, we created simple examples of using SignalR and minimal APIs available in .NET 6.

We created a server that makes real-time information available to a console app.

The purpose of this example was just to demonstrate the use of SignalR, but you can do amazing things with this feature of ASP.NET Core. There are many examples available on the internet like chats, games and more!

Two New Streams Coming to CodeItLive in January!

$
0
0

Exciting news from CodeItLive: we've got the cure for your case of the Mondays!

We're adding two new streams to our regular weekly schedule in 2022: Dev by Design (weekly, at 10AM ET) with Kathryn Grayson Nanz and UI Mondays (weekly, at 2PM ET) with Alyssa Nicoll and Kathryn Grayson Nanz.

Dev by Design

Dev by Design will explain the science behind art and design. A lot of folks think design is an innate talent, and you either have "the eye" or you don't. Good news: this is totally false!

If you're a developer looking to level up your design skills (or just understand why the designers on your team make the decisions they do), then join Kathryn every Monday for this look at design through a developer lens. We'll be going through the foundations of art and design and discussing how you can apply them to your user interfaces, so come hang out and learn enough design to be dangerous.

UI Mondays

Are you among the growing group of developers that describe themselves as working on the "front of the front-end"? Or maybe you're more looking to brush up that side of your skillset? Either way, you'll definitely want to catch UI Mondays, when Alyssa and Kathryn will be talking about everything related to the craft of creating user interfaces!

Industry news and trends, animation, accessibility, new CSS, exciting guests, and so much more. Tune in for UI Mondays and start every week with a little front-end goodness.

Your Christmas Holiday Gift from Telerik UI for .NET MAUI: Support for Preview 11, New TabView and Map Controls

$
0
0

Jingle bells, jingle bells, aloha dear friends! A new release of your most favorite .NET MAUI suite is along the way!

As part of our festive season, the .NET MAUI team at Telerik decided to gift you one final release for 2021 before we head out for a well-deserved rest for the holiday season and come back refreshed for a new year of many more releases!

In addition to the mandatory support for the latest Preview of .NET MAUI, we are now shipping two brand new controls as part of our growing Telerik UI for .NET MAUI suite—TabView and Map control!

Support for .NET MAUI Preview 11

As always, we make sure that all our existing controls are compatible with the latest Preview from Microsoft. Despite the jolly holiday spirit, we made sure that the Telerik UI for the .NET MAUI controls suite is up to date with the .NET MAUI Preview 11.

Tab Away with a The New .NET MAUI TabView Control

You want to create tabbed interfaces for your next .NET MAUI application? We’ve got you covered! The Telerik UI for .NET MAUI TabView is a highly flexible and fully customizable navigation control which allows each item to be associated with content displayed on selection.

Telerik UI for .NET MAUI .NET MAUI TabView control

Here are some of the key features to watch out for:

  • Item selection: The selection API of the .NET MAUI TabView control allows you to extend the navigation per your application requirements.
  • Customizable header: The control enables you to fully customize the tabs' header area—easily adjust the position, orientation, and spacing between the tabs and modify its look & feel.
  • Support for images in the header: The Telerik TabView control allows you to easily add and position images inside the header.
  • Adjustable header position: You can easily change the header position to top, bottom, left or right.
  • Tabs customization: The appearance of each tab—from its header to the content— can be fully customized. You can easily set Tab's header text, add an image which will be displayed in the header, add a content and decide whether the tab will be selected, visible and enabled.

For more information on getting started with the Telerik UI for .NET MAUI TabView control, visit our product documentation.

Find Your Way with the new Telerik Map control for .NET MAUI

The Telerik Map control for .NET MAUI has countless applications—from creating floor plans, airplane seat distribution to maps for countries, roads, rivers, etc. This powerful .NET MAUI data visualization control enables you to visualize rich spatial data from ESRI shape files consisting of lines, polylines and polygons.

Telerik UI for .NET MAUI Map control

Here are some of the key features of the Telerik Map control for .NET MAUI:

  • Shapefile visualization: Each shapefile from ESRI is loaded and configured through a ShapefileLayer instance added to the Layers collection of the control.
  • Support for multiple layers: Easily visualize different types of elements on the same map thought the layered architecture of the control which enables you to load multiple shapefiles.
  • Various ways to load shapefiles: Load the shapefiles from a stream, from a file added as embedded resource or a file located on the device, etc.
  • Pan and Zoom: The pan and zoom functionality of the .NET MAUI Map control allows you to interact with the view and easily inspect your data. You could choose between only pan, only zoom or both.
  • Shape Labels: You can easily show a label for each shape in the Map control.
  • Selection: The Map control for .NET MAUI supports single and multiple selection of shapes to help you draw attention on specific areas.
  • Commands: Easily replace the default behavior of ZoomIn and ZoomOut commands with a custom implementation.
  • Shapes Styling: The styling capacities of the Map control allows you to apply various Fill and Stroke colors to the shapes to make the map consistent with the design of your app.

For more information on getting started with the Telerik UI for .NET MAUI Map Control, visit our product documentation.

Happy Holidays from the Telerik UI for .NET team: See you in January 2022!

We’d like to take a second and thank all of our Preview users that have been experimenting with our new UI suite—your support and feedback is highly appreciated, so if you have any questions, feedback or requests, head out to our feedback portal!

Telerik UI for .NET MAUI

If you are new to Telerik UI for .NET MAUI, you can learn more about it via the product page. The Telerik UI for .NET MAUI controls are currently in preview and they are free to experiment with, so don’t wait—jump on the cross-platform development bandwagon!

Happy holidays and happy coding!

We look forward to our next major release in January, so stay tuned.

The .NET MAUI Team @Telerik.

Santa Wrote Us: He Needs Help with a Vue Form for the Kids

$
0
0

Dear Kendo,

            I need an easy-to-build Form for my Vue 3 site to help out the kids who haven’t sent me their Christmas letters yet. Please help!

Sincerely,

Santa

            No doubt—seeing this e-mail completely changed our roadmap and put the Christmas Vue Form as our top priority item. Millions of kids and their presents depended on us! Luckily, we were prepared—earlier this year we released the Kendo UI for Vue Native Form component, along with all the needed editors and guidelines on how to use them in order to cover all the fields needed in Santa’s Christmas Form:

  •     Name
  •     Age
  •     Date of Birth    
  •     Country
  •     Phone
  •     “Goodness” Rating for the year (from 1 to 10)
  •      Number of good and bad deeds throughout the year
  •      Delivery time
  •      Listened to your parents (yes/no)

            In the lines below, I will cover the detailed information on how we created this great Christmas Form for Santa in Vue 3. All the fields are implemented with Kendo Native UI for Vue components and the new purple swatch Kendo Bootstrap theme. All of them are fully accessible, which allowed us to be fully professional in this situation, keeping in mind that so many kids’ dreams were depending on this.

            As a starting point, we will import Kendo UI for Vue Form from the ‘@progress/kendo-vue-form’ package. It will wrap and coordinate the state management of the form and its individual fields: whether they are touched, modified, visited, valid or have a different value.

<template>
    <k-form
      @submit="handleSubmit">
      <formcontent />
   </k-form>
</template>
 

            Then we will include one by one all the needed field components. Each of them defines the props that are passed to the editor and the focus, blur and change events that are responsible for the important form related states:

Name field

            The name field is usually considered the easiest one when creating a form—we just add the usual styled input, right? Yet, in reality it is not that easy. In order to implement it in the form, it has to have the proper label, hint, and a validation so the child doesn’t accidentally leave it blank.

<field
       :id="'name'"
       :name="'name'"
       :label="'Name'"
       :component="'myTemplate'"
       :validator="nameValidator"
     >
       <template v-slot:myTemplate="{ props }">
         <forminput
           v-bind="props"
           @change="props.onChange"
           @blur="props.onBlur"
           @focus="props.onFocus"
         />
       </template>
     </field>
 Name Input

Date of Birth

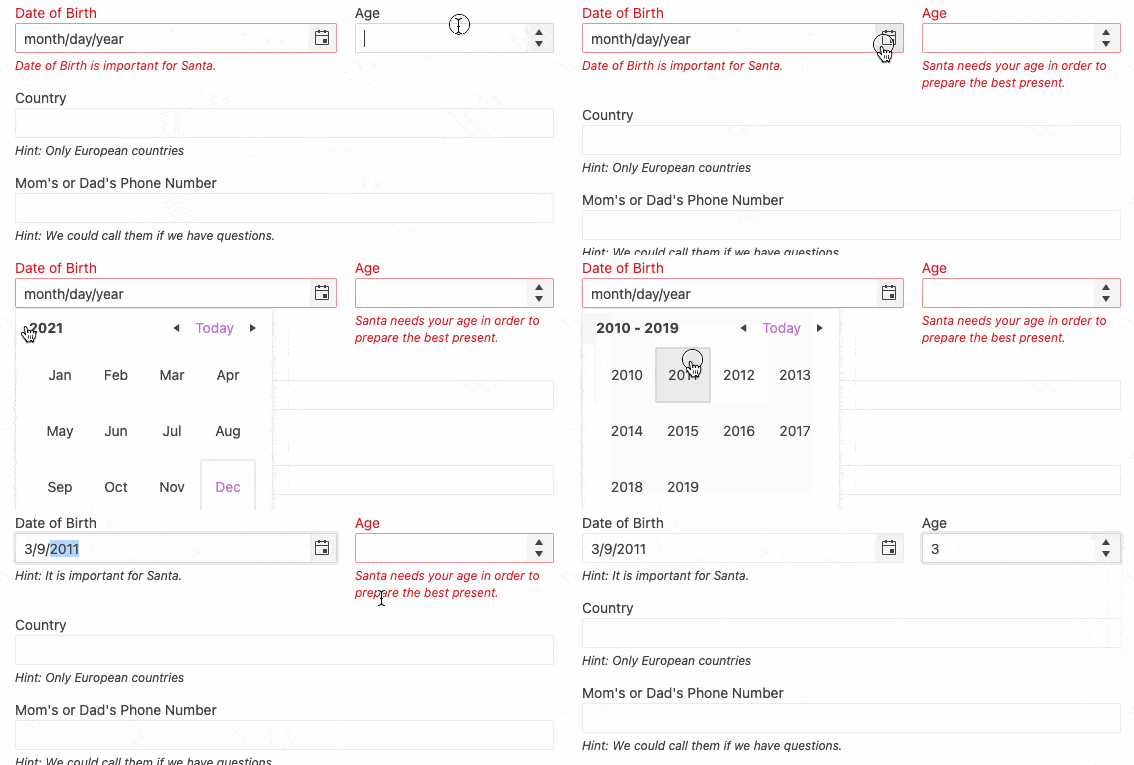
            In order to choose the most appropriate present, Santa also needs the date of birth of the child. It can be selected by the DatePicker Kendo component where the year, month and the day can be selected seamlessly by the kids.

<field
         :id="'dateOfBirth'"
         :name="'dateOfBirth'"
         :label="'Date of Birth'"
         :hint="'Hint: It is important for Santa.'"
         :component="'myTemplate'"
         :validator="dateOfBirthValidator"
         :style="{ width: '90%', 'margin-right': '18px' }"
       >
         <template v-slot:myTemplate="{ props }">
           <formdatepicker
             v-bind="props"
             @change="props.onChange"
             @blur="props.onBlur"
             @focus="props.onFocus"
           ></formdatepicker>
         </template>
       </field>
 

Age field

     The NumericTextBox Kendo component is a perfect match when we need to fill in the age, and the form validation can be appropriately added to avoid the minus values as well.

<field
         :id="'age'"
         :name="'age'"
         :label="'Age'"
         :format="'n0'"
         :component="'myTemplate'"
         :validator="ageValidator"
       >
         <template v-slot:myTemplate="{ props }">
           <formnumerictextbox
             v-bind="props"
             @change="props.onChange"
             @blur="props.onBlur"
             @focus="props.onFocus"
           ></formnumerictextbox>
         </template>
       </field>
birth date 

Country

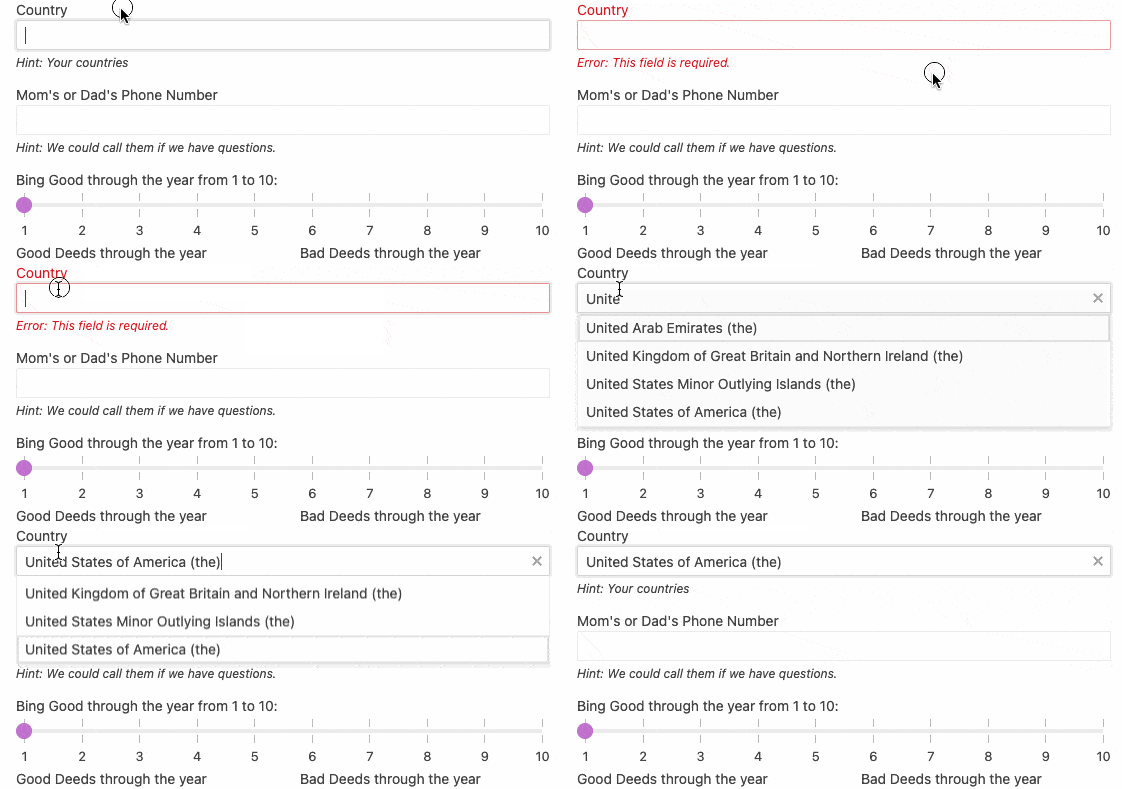
            Choosing the country will help Santa prepare his most optimized Christmas schedule. When a collection of such data is needed, we often need an AutoComplete component where we can type the first letter of the country and then find it in the filtered list. We can add the validation message that will explain why is this field important for Santa.

<field
       :id="'countryselected'"
       :name="'countryselected'"
       :label="'Country'"
       :hint="'Hint: Your countries'"
       :component="'myTemplate'"
       :dataItems="countries"
       :validator="requiredValidator"
     >
       <template v-slot:myTemplate="{ props }">
         <formautocomplete
           v-bind="props"
           @change="props.onChange"
           @blur="props.onBlur"
           @focus="props.onFocus"
         ></formautocomplete>
       </template>
     </field>
 santaFormCountry 


Please share your mom or dad’s phone number (in case something goes wrong).

            In these modern times, a parent’s phone is incredibly important if something goes wrong with the Christmas delivery. The best choice for filling in the number is the MaskedTextbox, which will help visually fill in the correct numbers mask.

<field
       :id="'parentsNumber'"
       :name="'parentsNumber'"
       :label="`Mom's or Dad's Phone Number`"
       :mask="'(999) 000-00-00-00'"
       :hint="'Hint: We could call them if we have questions.'"
       :component="'myTemplate'"
       :validator="phoneValidator"
     >
       <template v-slot:myTemplate="{ props }">
         <formmaskedtextbox
           v-bind="props"
           @change="props.onChange"
           @blur="props.onBlur"
           @focus="props.onFocus"
         ></formmaskedtextbox>
       </template>
     </field>
 telephone 

From here on, the questions become more serious. They are all about the behavior of the kids through the year—were they good or bad? After all, Santa needs to know how well they've been behaving all year.

How good were you throughout the year, from 1 to 10?

            This is the moment when the kids should be really honest and complete a field about how good they were through the year. The most intuitive form editor for such needs is the Slider that can visually show the number options and the minimum and maximum values that can be selected.

<field
       :id="'beingGood'"
       :name="'beingGood'"
       :label="'How good where you through the year from 1 to 10?'"
       :component="'myTemplate'"
       :min="min"
       :max="max"
       :data-items="sliderData"
     >
       <template v-slot:myTemplate="{ props }">
         <formslider
           v-bind="props"
           @change="props.onChange"
           @blur="props.onBlur"
           @focus="props.onFocus"
         ></formslider>
       </template>
     </field>
 slider 


How many good and bad deeds have you accomplished throughout the year?

            With simple NumericTextBoxes, we can let the children tell Santa how many good and bad deeds they did throughout the year.

<field
         :id="'goodDeeds'"
         :name="'goodDeeds'"
         :label="'Good Deeds through the year'"
         :format="'n0'"
         :component="'myTemplate'"
         :validator="ageValidator"
       >
         <template v-slot:myTemplate="{ props }">
           <formnumerictextbox
             v-bind="props"
             @change="props.onChange"
             @blur="props.onBlur"
             @focus="props.onFocus"
           ></formnumerictextbox>
         </template>
       </field>


good bad 


What is the most appropriate delivery time for you?

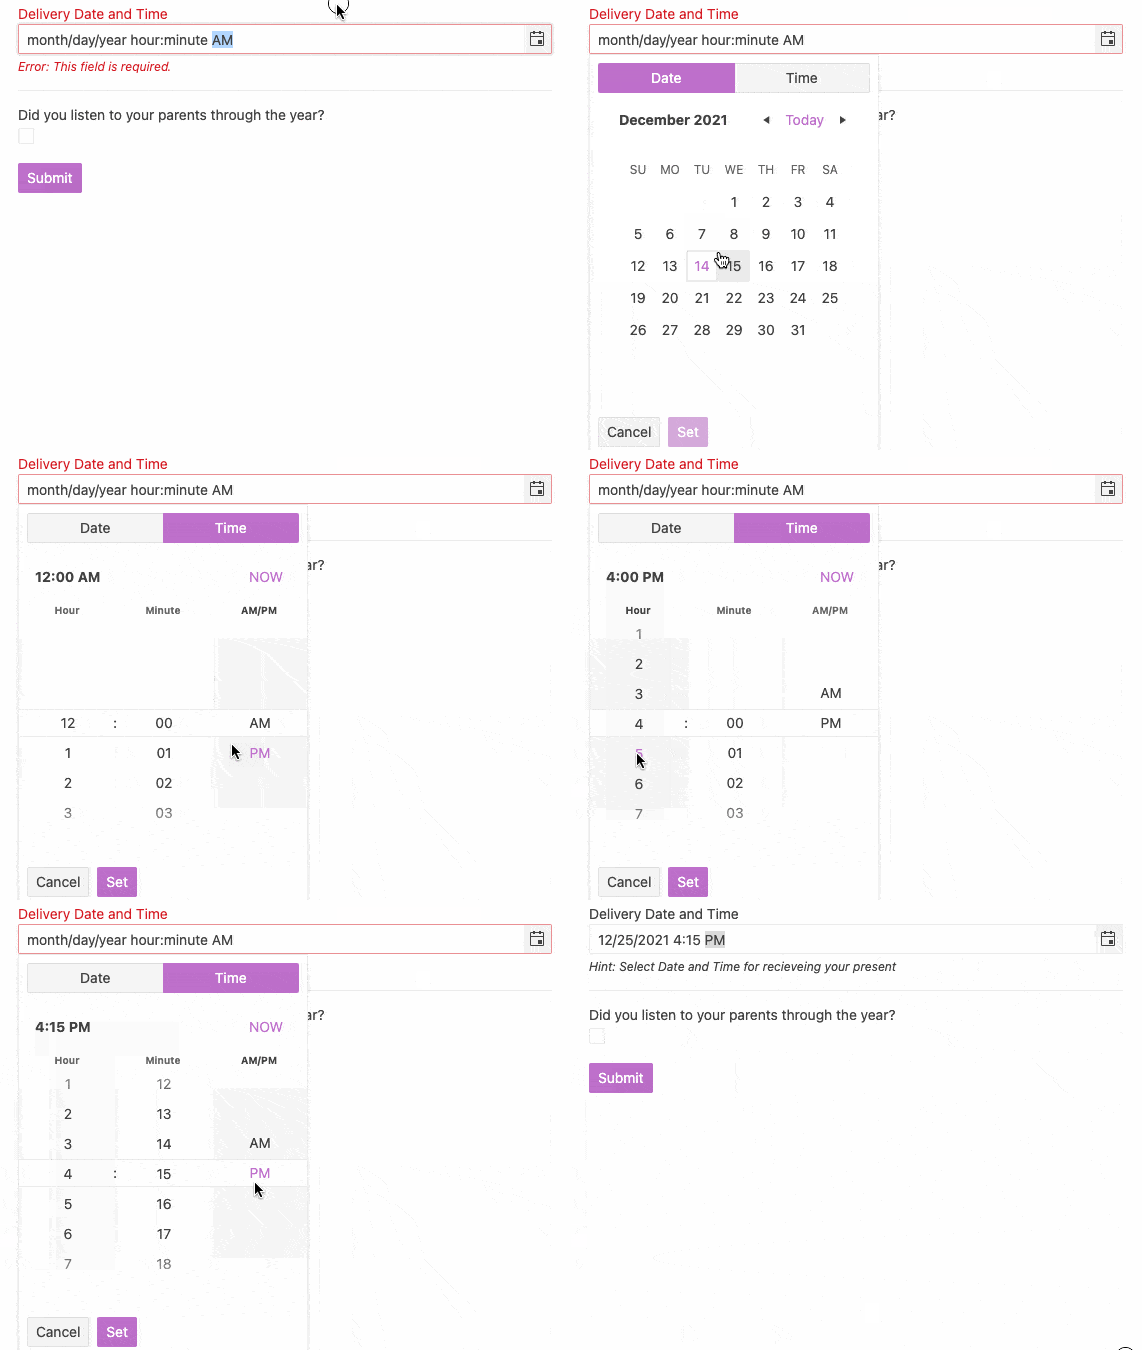
            To help even more, we can choose the best time to have the present delivered. Here the help is coming from the DateTimePicker component which lets us pick the most appropriate day, hour and minute when Santa and his reindeer will be most welcome onto the child’s rooftop.

<field
        :id="'deliveryTime'"
        :name="'deliveryTime'"
        :label="'Delivery Date and Time'"
        :hint="'Hint: Select Date and Time for receiving your present'"
        :component="'myTemplate'"
        :validator="requiredValidator"
      >
        <template v-slot:myTemplate="{ props }">
          <formdatetimepicker
            v-bind="props"
            @change="props.onChange"
            @blur="props.onBlur"
            @focus="props.onFocus"
          ></formdatetimepicker>
        </template>
      </field>
 

delivery

Have you listened to your parents?

            Last but not least, the kids should confirm that they have listened to their parents before they submit the form. It is a requirement to be able to send the form to the server in the North Pole.

<field
        :id="'listenedToParents'"
        :name="'listenedToParents'"
        :label="'Did you listen to your parents through the year?'"
        :component="'myTemplate'"
        :validator="listenedToParentsValidator"
      >
        <template v-slot:myTemplate="{ props }">
          <formcheckbox
            v-bind="props"
            @change="props.onChange"
            @blur="props.onBlur"
            @focus="props.onFocus"
          ></formcheckbox>
        </template>
      </field>

listen

    After having all these fields ready, the form is fully accessible and ready to use. The code and a runnable sample are both available at this StackBlitz example.

Hope this information helps you too when you need a Vue 2 or Vue 3 form. For more similar Vue tips or blogs, you can follow me on Twitter—@pa4oZdravkov.

Merry Christmas and happy Vue coding in the new year!

Sands of MAUI: Issue #38

$
0
0

Welcome to the Sands of MAUI—newsletter-style issues dedicated to bringing together the latest .NET MAUI content relevant to developers.

A particle of sand—tiny and innocuous. But put a lot of sand particles together and we have something big—a force to reckon with. It is the smallest grains of sand that often add up to form massive beaches, dunes and deserts.

Most .NET developers are looking forward to .NET Multi-platform App UI (MAUI)—the evolution of Xamarin.Forms with .NET 6. Going forward, developers should have much more confidence in the technology stack and tools as .NET MAUI empowers native cross-platform solutions on mobile and desktop.

While it is a long flight until we reach the sands of MAUI, developer excitement is palpable in all the news/content as we tinker and prepare for .NET MAUI. Like the grains of sand, every piece of news/article/video/tutorial/stream contributes towards developer knowledge and we grow a community/ecosystem willing to learn and help.

Sands of MAUI is a humble attempt to collect all the .NET MAUI awesomeness in one place. Here's what is noteworthy for the week of December 20, 2021:

.NET MAUI Preview 11

The next iteration of .NET MAUI aka Preview 11 is now out. As Jonathan Dick pointed out, this release was a little unceremonious—.NET MAUI updates are now being aligned concurrently with Visual Studio 2022 and the next release of VS 2022 17.1 Preview 2 is being held back a little.

The .NET MAUI Preview 11 bits are available irrespective of VS 2022 though—available through CLI and .NET Workload update. Highlights of Preview 11 include Multi-window implementation across platforms, Fluent Design System styling on Windows, updated Templates, C# 10 support and iOS type alignment with .NET 6. Go get the hot bits developers!

MauiPreview11

Migration and Modernization with .NET MAUI

The latest .NET Docs show was hosted by Maira Wenzel, Cecil Phillip and David Pine, with an over-enthusiastic .NET MAUI aficianado. On the cards was talking about migrations and modernization with .NET MAUI—something top of mind for many developers/enterprises with .NET 6 carrying the LTS badge.

The show started with differences between Xamarin.Forms and .NET MAUI and how to move apps over with considerations for Custom Renderers/Handlers. Any modernization discussion with .NET MAUI has to bring in code sharing with web apps—Blazor is very welcome in .NET MAUI, but the WebView approach also means investments in JS SPA frameworks can now coexist with .NET.

MauiMigrations

Platform-Specific Code in .NET MAUI

.NET MAUI provides wonderful set of abstractions to reach mobile/desktop platforms from a truly single code base—there is plumbing to make sure native UI is rendered on each corresponding platform. However, developers may have a need to dive into native land for customizations/per platform behaviors and .NET MAUI does not get in the way.

Gerald Versluis produced a video on how to write platform-specific code in .NET MAUI—leveraging the multi-targeting approach in .NET MAUI single project. Gerald starts with the basics of platform-specific code in .NET MAUI, shows example of creating partial classes in shared code and demonstrates platform specific implementations for iOS/Android—this is a great resource for developers to understand the abstractions and go under the native covers when needed.

MauiPlatformCode

Image Caching

Imagery makes mobile apps engaging, but dealing with images often comes with development considerations and optimizations. James Montemagno produced a video about Image Caching in Xamarin.Forms and .NET MAUI—this is a must-watch for developers seeking fine grained control over how images are handled in apps.

There are some wonderful libraries like FFImageLoading and Nuke that help with image caching in Xamarin.Forms, but the built-in platform support isn't shabby either. Xamarin.Forms and .NET MAUI can automatically download and cache images for a full 24 hours—developers have control over how long to cache and to manually refresh the image caches. Image management can be tricky and these are handy tips for today in Xamarin.Forms and tomorrow in .NET MAUI.

ImageCaching

Comet ImagePicker

Interested in trying the Model View Update (MVU) design pattern with .NET MAUI? James Clancey and gang have you covered with Comet—an experimental framework that lets you write simple MVU-style C# code to describe/drive visual tree with data binding and state updates.

Forever the tinkerer, James put out a fully-interactive scrollable Image Picker for Comet—works across platforms as well. Short concise C# code from an expert is sometimes indistinguishable from magic—the future is good with this kind of flexibility on top of .NET MAUI.

CometPicker

That's it for now.

We will take a two-week break, and we'll see you next year with more awesome content relevant to .NET MAUI.

Cheers, developers!

Operator Precedence in JavaScript

$
0
0
Operator precedence tells us the order of priority in which operations are evaluated. Let’s take a closer look.

One of the initial exercises when you start out as a JavaScript developer is to create a calculator—a very simple but powerful exercise to learn about how operations work in JavaScript and how to use the operators the right way.

What we learn is that the structure of our code will make all the difference, and just how important it is to understand operator precedence—the order in which our code evaluates operators.

Let’s learn more about operator precedence.

Operator Precedence

Operator precedence in JavaScript determines the priority of operators in an operation. It determines which operators have higher precedence than others, and thus tells us the order to perform a given mathematical expression.

Operators with higher precedence will become the operands of operators with lower precedence. This means that the operator with higher precedence goes first in an operation.

Changing a simple operator inside an operation can change the result. It’s a mistake to try to create a complex operation without knowing operator precedence.

You may know operator precedence as “order of operations.” These are the same rules, widely used in both mathematics and computer programming, broken out into this order: Parentheses, Exponents, Multiplication/Division, Addition/Subtraction. This tells us parentheses are evaluated first come first, and addition/subtraction are performed last.

JavaScript has 21 levels of operator precedence. You can check them out here. The table shows the operator, the usage of the symbol, which direction we should read the operation and the precedence from highest (21) to the lowest (1) precedence.

Imagine an operation like the following:

(3 + 10) * 2

What do you think would be the output? Well, if you said 26, you are correct. The parentheses change the order of the operation because this function has higher precedence.

Imagine a simple operation where we want to subtract and multiply:

3 - 5 * 10

The subtraction operator is shown first, but the multiplication is evaluated first. The multiplication operator has a higher precedence level over the subtraction operator. The associativity here does not matter—the subtraction operator will always be evaluated later.

When there are operators of the same precedence, associativity affects the process of the operation whether processing it from right-to-left or left-to-right.

Left-to-right

Left-associativity (left-to-right), the normal way of operating, is when the operation is evaluated from left-to-right. When we write a simple statement in JavaScript, we are writing it left-to-right.

Imagine a simple operation, where we have three numbers. We will start the operation with the first two numbers, then go to the last one.

10 + 20 + 30
// Left-to-right associativity would be:
(10 + 20) + 30
// then:
30 + 30

This is left-to-right associativity. We use it in every aspect of our lives when we use numbers. In this example, we will always get the same result no matter what because addition is associative.

An associative operation is a calculation that will always return the same result no matter how the numbers are grouped. Multiplication is also associative, while subtraction and division are not.

For example, the following operations are associative because they always return the same result:

10 + (10 + 2)
(10 + 10) + 2

The following operations are not associative because the way the numbers are grouped affects the result:

5 - (4 - 3)
(5 - 4) - 3

Right-to-left

Right-associativity (right-to-left) is when the operation is evaluated from right-to-left.

10 + 20 + 30
// Right-to-left associativity would be:
10 + (20 + 30)
// then:
30 + 30

Assignment operators always have right-to-left associativity.

a = b = c = 5

This is how right-to-left associativity works: a, b and c are assigned to 5. First, first c is set to 5, then b, then a.

The difference in associativity happens when there are many operators of the same precedence. With many operators of different precedence, associativity does not affects the final result.

Grouping

Grouping is the operator with highest precedence. JavaScript developers in general use parentheses to control the order of the operation. Since grouping has the highest precedence, they are always calculated first.

2 + 8 + 9 + (10 - 5)

We can place parentheses inside one another—this is called nesting parentheses. JavaScript always evaluates the inner set of parentheses first.

(2 + 2) + ((9 - 5) - 2)

Groupings are almost always evaluated first, but sometimes this is not true. When we have a conditional evaluation, grouping might not even be evaluated.

Imagine the following operation:

a && (b + c)

In case the a value is false, the grouping expression (b + c) will never be evaluated. This is called short-circuiting.

Logical Operators

Short-circuiting is very common in JavaScript and usually happens because of logical operators.

Short-circuit means that inside an OR operation, in case the first operand is true, JavaScript will never look at the second operand.

if (20 === number || 10 === number) return true;

Logical operators are usually used for boolean comparisons. They are used in logical statements to compare the difference between values.

We have four logical operators in JavaScript, each one of these operators also has its precedence number:

  • ! — NOT
  • && — AND
  • || — OR
  • ?? — Nullish Coalescing

Logical operators are usually used for boolean comparisons. When they are used in boolean comparisons, they return a boolean value. Logical operators return the value of one of the operands used in the operation. They’re always evaluated from left to right and the operator with higher precedence is the logical NOT (!) operator.

The logical NOT (!) operator has the highest precedence of all logical operators. This operator takes truth to falsity. When this operator is used with a non-boolean value, it returns false if its single operand can be converted to true; otherwise, it returns true.

const bool = true;

if (!bool) {
  console.log("false!");
} else {
  console.log("true!");
}

// 'true!'

const arr = ["operator", "precedence"];

if (!arr) {
  console.log("false!");
} else {
  console.log("true!");
}

// 'true!'

The logical AND (&&) returns true if a set of operands are true and returns false otherwise. Most of the time, this operator is used with boolean values, and whenever it is, it always returns a boolean value. In case this operator is used with non-boolean values, it will return a non-boolean value.

const bool = true;
const arr = ["operator", "precedence"];

if (arr && bool) {
  console.log("true!");
} else {
  console.log("false!");
}

// 'true!'

if (arr && bool && 1 > 2) {
  console.log("true!");
} else {
  console.log("false!");
}

// 'false!'

The logical OR (||) returns true if inside a set of operands, at least one or more of its operands are true; otherwise it returns false. If this operator is used with non-boolean values, it will return a non-boolean value.

const bool = true;
const arr = ["operator", "precedence"];

if (arr || 1 > 2) {
  console.log("true!");
} else {
  console.log("false!");
}

// 'true!'

if (1 > 2 || 2 > 3) {
  console.log("true!");
} else {
  console.log("false!");
}

// 'false!'

The nullish coalescing operator (??) is the least used operator of all logical operators. This operator returns the right-side operand when the left-side operand is null or undefined.

const bool = null ?? true;
console.log(bool);

// 'true'

const boool = 1 ?? true;
console.log(boool);
// '1'

Conclusion

Operator precedence in JavaScript is a vital concept. It helps us to create operations in a better way. We create operations to make decisions. Based on an input, we want a specific output every time. We should aim to create the most functional code possible.

JavaScript is a good language, but we should pay attention to not make mistakes. Especially when working with operations, operator precedence plays a very important part. Operator precedence tell us which operators should and will go first in an operation—operators with higher precedence will go first, followed by operators with lower precedence. By remembering the concept of operator precedence, we can avoid a lot of errors.

What’s New in Unite UX 1.4.0 and 1.5.0

$
0
0

There were two Unite UX releases in the past month that bring commenting functionality, guided onboarding, performance optimizations and much more.

Commenting Functionality

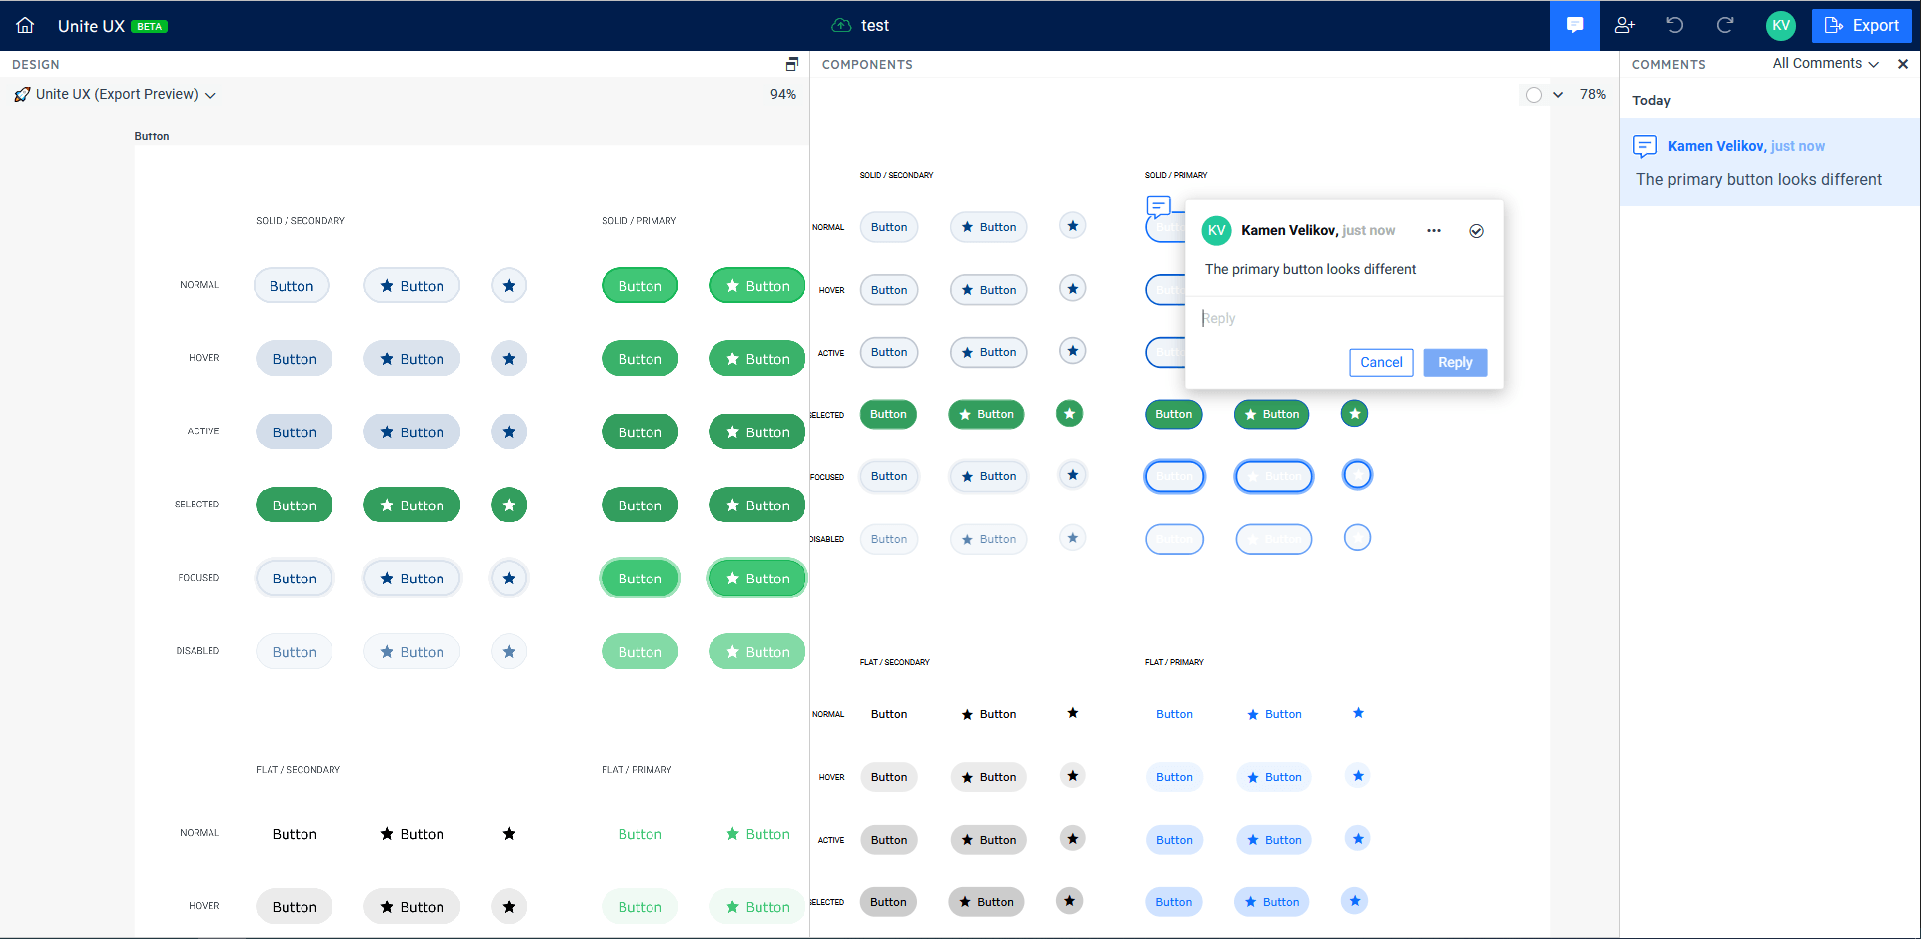
Comments

With this release, we’re introducing the commenting functionality that extends the collaborative capabilities of Unite UX. Now you don’t have to leave the app to give feedback about the design or the implementation of your components. Just click on the spot and leave your thoughts. Use @ to mention anyone that has access to your project to notify them via email. Resolve the threads that are already fixed and build your design system just as intended.

Onboarding

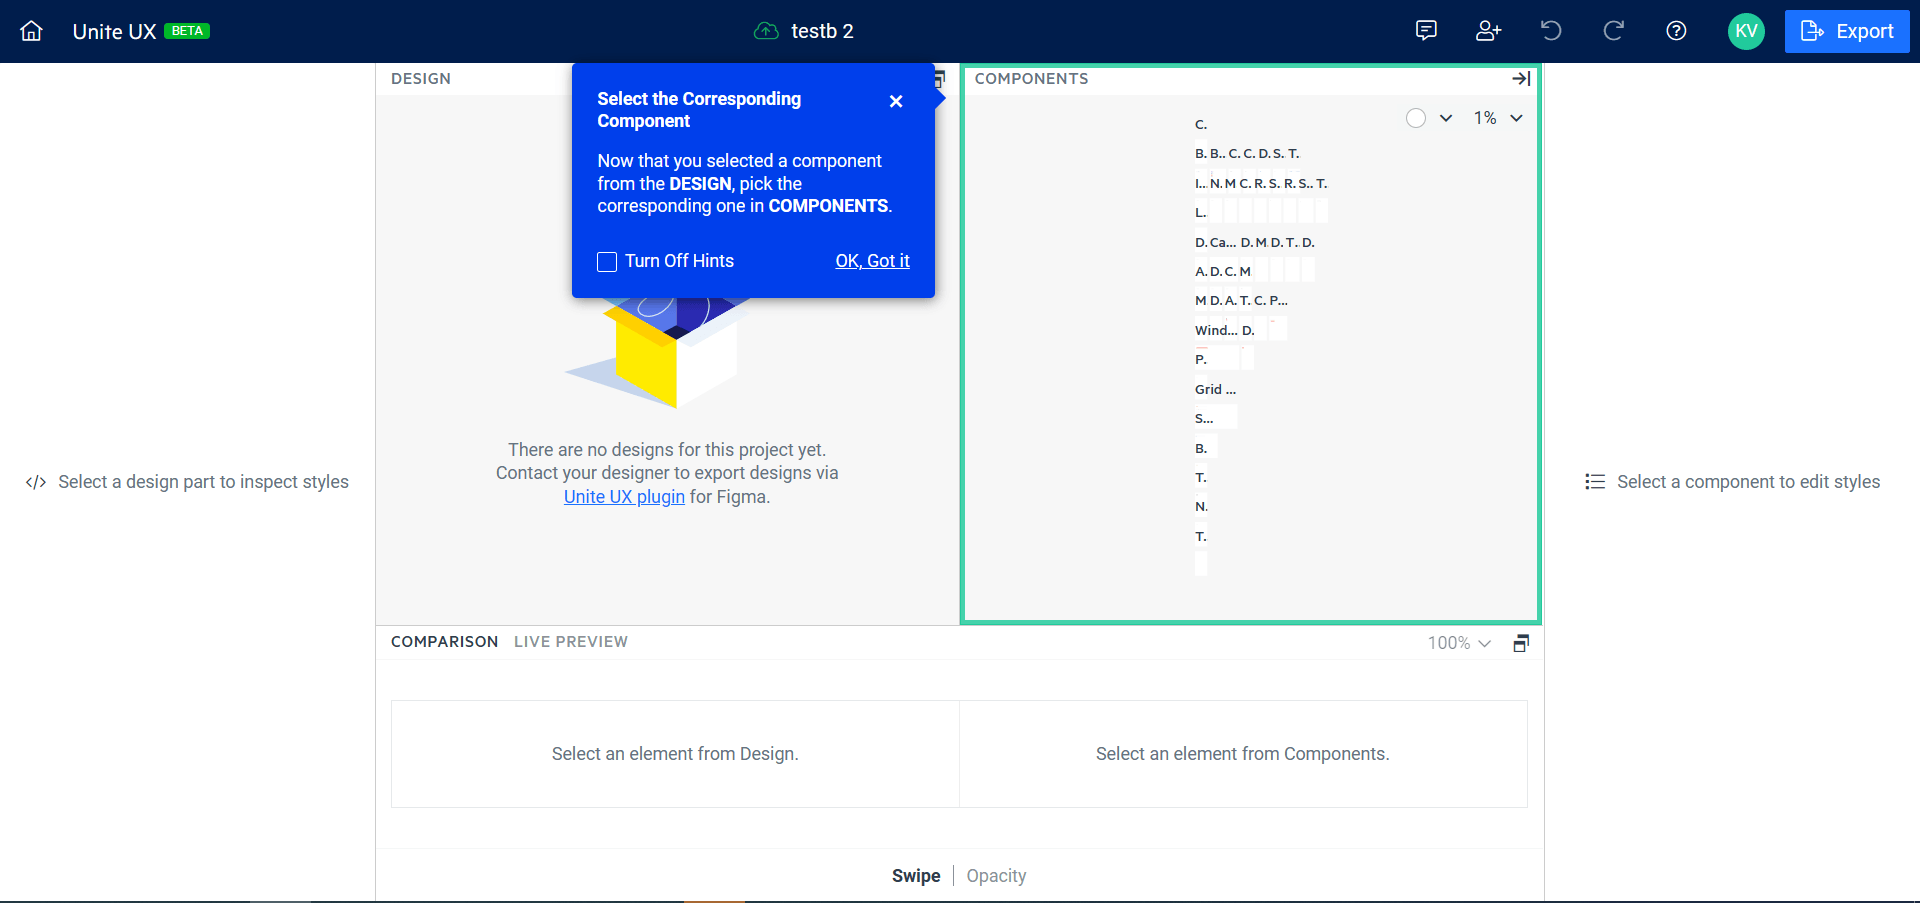
1.5.0 - 1

The new Unite UX comes with some predefined flows that explain in detail how to get started using the product. You will see guided tutorials, tips and tricks and key functionalities, highlighted to help you get most of the product in no time. So, make sure not to skip it, but even if you do, you can always go back to it using the ‘?’ button in the toolbar.

Link functionality

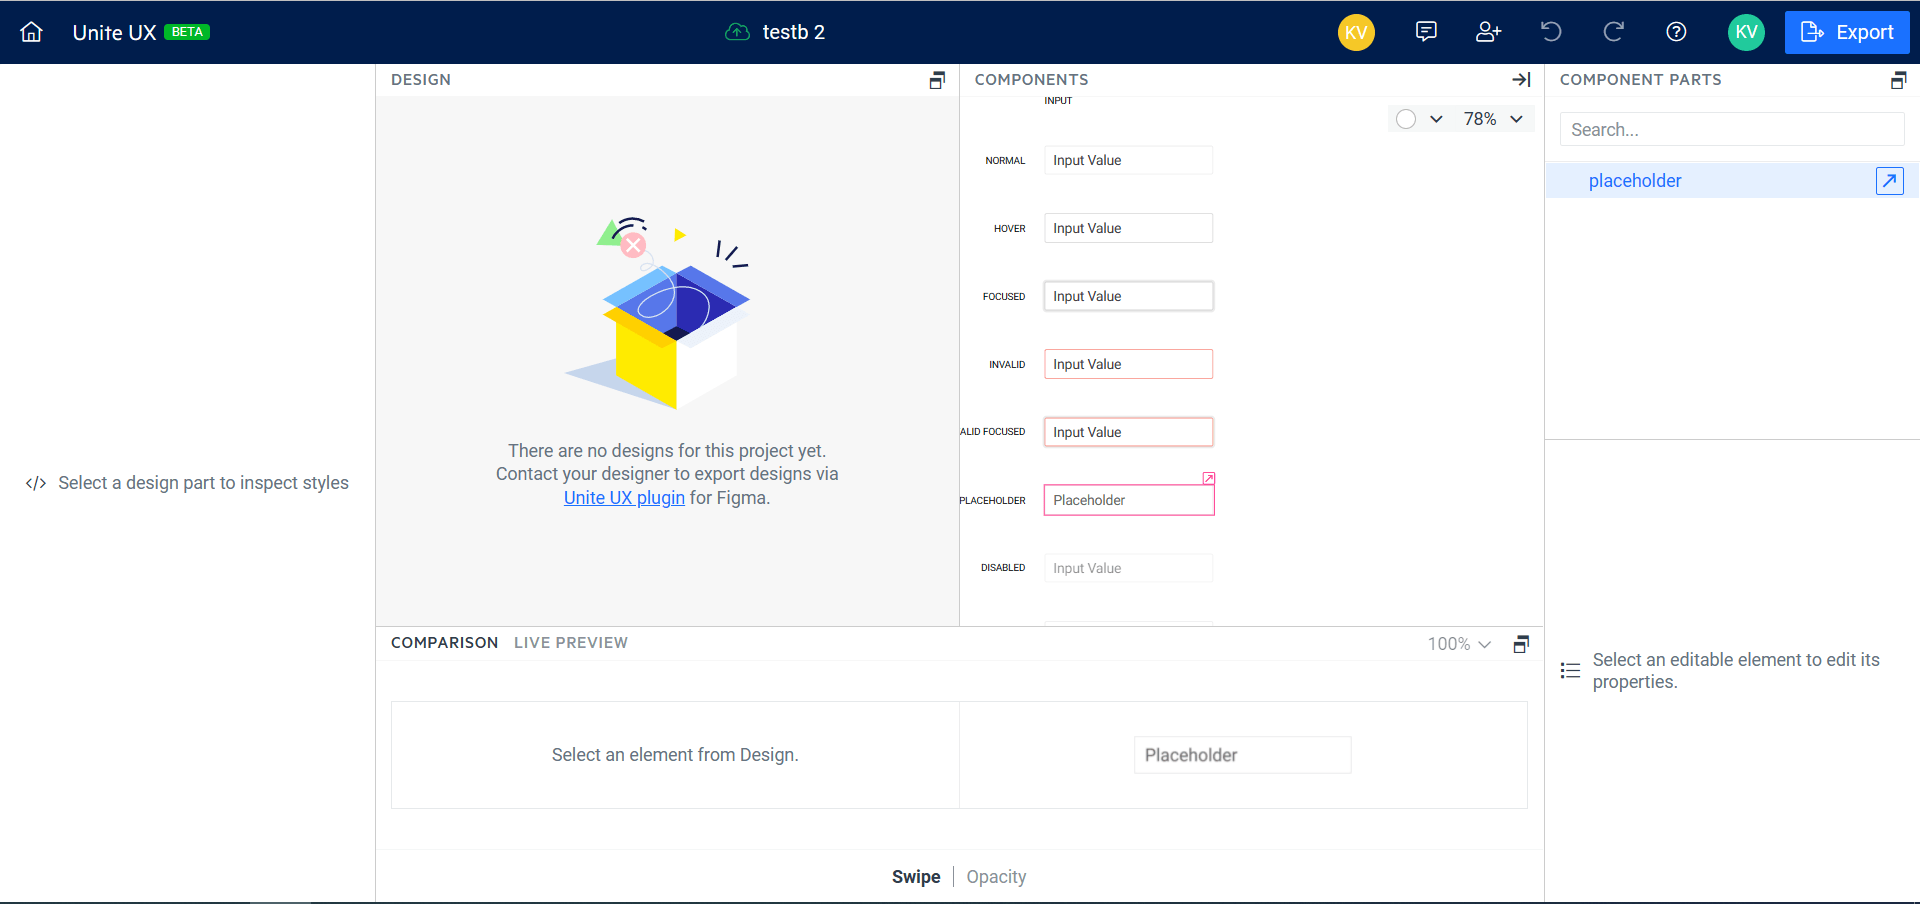
1.5.0 - 2

The 1.5.0 release brings a new type of component parts—links. Sometimes, the components are complex and some of the parts are hidden in the components tree. To improve the visibility of some parts and at the same time preserve the top-right to bottom-left styling from one place algorithm, we’ve extracted such parts and visualize them as links to their original parts where they can be edited. This will improve the overall visibility of the parts and preserve the natural way of styling things.

Performance Optimizations

Performance

The performance of the Unite UX is of highest importance for the team. With this release, we managed to locate and fix some bottlenecks, making the app blazing fast. No more endless loading indicator—everything will load before you know it.

New Component Templates

The 1.5.0 release includes 2 new components: The Card and the TextArea in the list of supported components. At the same time, we’ve optimized the existing component parts to be more intuitive and easier to style—we have included the No Records template for the grid and redesigned the Button Group templates. And last but not least, all common drop-down (popup, list and items) templates are extracted to separate page in order to be styled globally.

Various Bug Fixes

Performance and quality come hand in hand. That’s why we’re always trying to fix as many things as we can—especially the things that are reported from our users. Here are the things we’ve fixed in the 1.4.0 release:

  • Some component states cannot be styled
  • Font detection doesn’t work with some (icon) fonts
  • Cannot change the color of the circle in Radio button
  • Icon styles are not exported correctly
  • Improved Font export performance
  • Other minor fixes

Get your Unite UX Trial

If you still haven’t had the chance to try Unite UX, you can start your 21-day trial now.


React Query—Fetching Data the Right Way

$
0
0

Let’s learn how to use React Query, which is a data-fetching library that uses a set of hooks to handle fetching for our React apps.

When we’re starting to learn React and how it works, we don’t see a problem with data fetching. Usually, our first React apps are simple apps where we’re not handling and we don’t need any data fetching.

Components play an important part in React applications because they are responsible for rendering content. We can create as many components as we want, and we can split a huge and messy component into small components and make our whole application more composable. But components are not responsible for fetching data from APIs. We need something else to help with that.

We have a lot of different ways of fetching data in React applications. We can use APIs and libraries that are widely used in React applications, such as the Fetch API, the Axios library, a custom React hook we can create ourselves, etc.

Every developer has a favorite method for fetching data, and choosing the right way can take time and discussion. Most of the time, fetching data can bring complexity to our code. Fetching data in modern React applications is a very important topic and that is what we’re going to learn more about today.

We’re going to learn about React Query and how the library is becoming one of the most standard ways for data fetching in React applications. It makes data fetching for React easy, powerful and fun.

React Query

Building custom React hooks for data fetching can be a good solution. We can create them the way we want them and use them whenever we want. A good point for not creating custom React hooks is that it requires a lot of time and testing, and you will need to support it now and then.

React Query is a data-fetching library for React applications that simplifies fetching data. It is a set of React hooks that help us improve the way we do data fetching in our applications. It can be customized as our application grows and has powerful features such as window refocus fetching, prefetching, optimistic updates, TypeScript support, React Suspense support, etc.

React Query makes fetching, caching, synchronizing, and updating server state in your React applications a breeze.React Query

It is very straightforward and simple to get started with React Query:

yarn add react-query

All we have to do is import the QueryClientProvider and QueryClient and do the following:

import { QueryClient, QueryClientProvider } from "react-query";
import { ReactQueryDevtools } from "react-query-devtools";

const queryClient = new QueryClient({});

const App = () => {
  return (
    <QueryClientProvider client={queryClient}>
      {/* The rest of your application */}
    </QueryClientProvider>
  );
};

export default App;

Debugging data fetching can be a pain and that’s why React Query comes with a dedicated devtools component.

import { ReactQueryDevtools } from 'react-query/devtools'

It will help you to understand and visualize how React Query fetches the data. It will save you hours of debugging and help you to check the current state of your requests.

import { QueryClient, QueryClientProvider } from "react-query";
import { ReactQueryDevtools } from "react-query/devtools";

const queryClient = new QueryClient({});

const App = () => {
  return (
    <QueryClientProvider client={queryClient}>
      {/* The rest of your application */}
      <ReactQueryDevtools initialIsOpen={false} />
    </QueryClientProvider>
  )
}

useQuery Hook

The useQuery hook handles fetching data and can be used with any promise-based method. Whenever you want to fetch some resource, you’re going to use the useQuery hook.

This hook accepts a unique key for the query and a function that returns a promise. The unique key is used for internally refetching, caching and sharing your query.

const result = useQuery(key, promiseBasedFn);

The object that the useQuery hook returns has some internal states that are very helpful, such as isLoading, isError, isSuccess, isSuccess, error, data, isFetching.

Let’s create a simple example using the useQuery hook. We’re going to use the Chuck Norris API for fetching a random chuck joke.

We’re going to install Axios to use it as our promise-based function to fetch our data.

yarn add axios

Now, we’re going to create a component called Joke. Inside this component, we’re going to use the useQuery hook for fetching a random chuck joke.

import React from "react";

cont Joke = () => {
  return (
    ...
  )
};

export default Joke;

The first thing we’re going to do is pass a unique key to the useQuery hook, which we’re going to call joke.

As a second argument, we’re going to pass the promise-based function for fetching our data and this is where we’re going to use Axios. We’re going to create a simple async/await function and return our data.

import React from "react";
import axios from "axios";
import { useQuery } from "react-query";

cont Joke = () => {
  const result = useQuery(
    "joke",
    async () => {
      const { data } = await axios("https://api.chucknorris.io/jokes/random");
      return data;
    }
  );

  return (
    ...
  )
};

export default Joke;

We’re going to use object destructuring to destructure our object response and use some properties on our component. We’re going to render a simple h1 element for showing our joke and a button to refetch a new joke.

import React from "react";
import axios from "axios";
import { useQuery } from "react-query";

const Joke = () => {
  const { isLoading, isError, data, error, refetch } = useQuery(
    "joke",
    async () => {
      const { data } = await axios("https://api.chucknorris.io/jokes/random");
      return data;
    }
  );

  if (isLoading) {
    return <h1>Loading...</h1>;
  }

  if (isError) {
    return <h1>{error}</h1>;
  }

  return (
    <>
      <h1>{data.value}</h1>
      <button type="button" onClick={refetch}>
        Another joke
      </button>
    </>
  );
};

export default Joke;

The refetch function is very helpful for manually fetching the query.

You can check out all the options and returned values that the useQuery hook accepts here. There are plenty more examples that we could build and the documentation is very helpful for it. One of the best is the Suspense example, showing how easy it is to use the useQuery hook with React Suspense.

useMutation Hook

The useMutation hook handles side effects on the server. Whenever you need to perform something—like create, update or delete a resource on the server—the useMutation hook is the right hook for it.

The useMutation hook is very similar to the useQuery hook, but instead of receiving two arguments, it receives only one. It receives a callback function that returns a promise and performs an asynchronous task on the server.

const mutation = useMutation((variables) => promiseBasedFn);

A good way to debug your function on the React Query devtools is to pass an object as a second argument. Inside this object, you can pass a mutation key, and a few more functions such as onError, onSuccess, onMutate, onSettled and useErrorBoundary.

const mutation = useMutation((variables) => promiseBasedFn, { 
  onError,
  onSuccess,
  onMutate,
  onSettled,
  useErrorBoundary
});

Conclusion

Since React hooks were released, data fetching in React is becoming easier. We can split our data fetching logic in custom React hooks and make our applications more composable by default.

React Query comes to brings a set of powerful React hooks for data fetching in React applications. It comes with many features out of the box that help us to take care of what data to fetch instead of how we are going to fetch a resource on our server.

Demystifying Closures in JavaScript

$
0
0

A closure is the combination of a function bundled together with references to its surrounding state. It’s a simple and useful technique once you understand it.

Closures are one of the most widely discussed and still confusing concepts in JavaScript—and also one of the most common questions you are likely to encounter in an interview when applying for a JavaScript position. As the title says, I will be making the topic clearer and easier to understand.

What Is a Closure?

A closure is a feature in JavaScript where an inner function has access to the scope (variables and parameters) of its outer functions, even after the outer function has returned.

Note: Scope in JavaScript refers to the current context of code, which determines the accessibility of variables to JavaScript. The two types of scope are local and global:

  • Global variables are those declared outside of a block
  • Local variables are those variables declared inside a block

In other words, a closure gives you access to the following scope:

  • Access to its scope; variables defined within its block of code
  • Access to the outer function’s variables
  • Access to the global variables

Here’s is a simple example of a closure in JavaScript:

    // Defining the outer function.
    function enclosing() {
      var x = "outer";
      // Defining the inner function.
      function inner() {
        var y = "inner";
        console.log(x, y)
      }
      return inner;
    } 
    
    // invoking enclosing returns the inner function.
    var a = enclosing()
    x()

We defined two functions:

  • The outer function enclosing with a variable x that returns a nested function
  • The nested function inner with a variable y that logs both the value of its variable and that of its parent function

Note: A function can return another function in JavaScript. A function that is assigned to a variable is called function expression. And, the return statement does not execute the inner function—a function is executed only when followed by ()—but rather the return statement returns the entire body of the function.

This is a step-by-step walkthrough of the flow of execution:

  1. After invoking enclosing() at line 13, variable x is declared and assigned a value.
  2. Next is the declaration of the function inner.
  3. The return inner returns the entire body of the function inner.
  4. The contents returned by the return statement are stored in a. Thus, a will store the following:
    function inner() {
        var y = "inner";
        console.log(x, y)
    }
  1. Function outer() finishes execution, and all variables within the scope of outer() now no longer exist.

Note: The lifespan of a variable defined inside a function is the lifespan of the function execution.

What this means is that in console.log(x, y), the variable x exists only during the execution of the enclosing() function. Once the enclosing function has finished execution, the variable x no longer exists.

Now, we know that the function enclosing returns a function, and that gets stored in variable a.

  1. Since a is a function, we execute it on line 14. When we execute a(), we are essentially executing the inner function. Let us examine step-by-step what happens when a() is executed:

         a. Variable y is created and assigned a value.

         b. Next, it logs to the console the value of parent function variable x and its local variable y.

Now, you may be asking, “How does the function inner have access to its parent function variable x, since its parent function has finished execution long before we invoked a() and we noted earlier that the lifespan of a variable defined inside a function is the lifespan of the function execution?”

The answer to this question is …

Closures!

The function inner has access to the variables of the enclosing function due to closures in JavaScript. In other words, the function inner preserves the scope chain of function enclosing at the time it was executed, and thus can access the parent’s function variables.

The function inner had preserved the value of its parent function variable x when the parent function was executed and continued to preserve (closure) it.

It now refers to its scope chain and notices that it does have the value of variable x within its scope chain since it had enclosed the value of x within a closure at the point when the enclosing() function had executed.

Thus, that is how JavaScript can remember not only the value but also the variable of the parent function after it has long finished execution.

When to Use a Closure?

Closures are useful in hiding implementation details in JavaScript. In other words, it can be useful to create private variables or functions.

The following example shows how to create private functions and variables.

    var name = (function() {
        var username = "";
        function setName(val) {
          username = val;
          return username
        }
        return {
          set: function(val) {
            return setName(val);
          }
        };   
    })();
      
    console.log(name.set("John Doe"))

In the above example, set becomes a public function because it is included in the return object, whereas function setName becomes a private function because it is not returned and can only be used internally within the parent function.

Summary

Hopefully these step-by-step explanations helped you understand the concept of closures in JavaScript.

Accessibility for Mobile Developers

$
0
0

Every developer should be ensuring their mobile app is accessible. Here are a few resources and tips to get you started.

In the United States alone there are around 54 million people with disabilities. This means 1 in 6 Americans has some kind of disability or impairment. Mobile apps increasingly play a role in the digital world, so it is even more important to make the internet accessible for everyone.

This is also a good practice from a business standpoint because 54 million people is a pretty big chunk of potential customers. Technology and business leaders cannot afford to ignore this demographic anymore.

If you are building a user interface (UI) for iOS and Android apps, accessibility should be at the top of your mind. Making your apps inclusive will delight your users and help you stay out of legal troubles.

If you don’t know where to start, both Apple and Google provide well-documented guidelines around accessibility. Below are the resources you should check out if you are building mobile applications.

While Apple and Google guidelines are worthwhile as reference for developers and designers, they should also use the guidelines from WCAG to understand accessibility. WCAG is a working body around web accessibility. Keep in mind, there is no official body around mobile accessibility yet. W3C is still working on updating official requirements and standards, so, unlike the web, mobile is still a work in progress.

Use Native Screen Readers

Accessibility should be part of your testing strategy, both for web and mobile. They are both equally important. For testing, there are many independent tools, but either they are costly or require some sort of onboarding training.

Developers should leverage native screen reader tools to test functionality and ensure proper accessibility is implemented. Screen readers are used to transform text to speech. These tools can be vital to unearthing accessibility gaps in your mobile application. Check out these platform-specific native screen readers:

Some might think screen readers are no longer relevant in the day and age of Siri and Alexa. These voice assistants certainly aid users with some disabilities in making a more accessible user experience. But they are limited in ways the screen readers are not, so pay close attention to screen readers while addressing accessibility.

And better yet, conduct actual usability tests for your app with a diverse set of participants. If you are having trouble recruiting users with disabilities, you can reach out to colleges and universities, which might be able to assist you with beta users.

So, How Do I Improve Accessibility on Mobile?

As a developer and now a product manager on a team that is responsible for building frontend tools and UIs, I often talk with my team about practicing consistency. Consistent experience across web and mobile will delight your users, but also allow developers to get into the right habit of building features that are accessible.

Trying to innovate too much by introducing complex UIs, you will most likely lose users and make it hard for developers to build features that are accessible. Therefore, custom UIs with no standards come with risks and require extra work around accessibility. Once your design standards have been accessibility-tested, they should be codified into a documented design system to ensure consistent implementation into the future.

Every user, with or without disabilities, should experience the same UX across different browsers and mobile platforms. Let’s explore some of the ways to build consistent user experience while addressing accessibility on mobile.

Here are some of the most relevant UX features and tips for your mobile application:

  • Resolution—mobile applications can be viewed at a different resolution ranging it up to 200%. Ensure your mobile applications are being built for and tested for different resolutions.

  • Color Contrast—there are about 300 million people who are color blind, but both Apple and Google have guidelines around color handling. This is super important for users who are color blind or have some sort of eyesight impairment. For example, always allow for color contrast between foreground and background.

  • Captions—for users who are blind, videos and images don’t provide meaningful experience. So always provide content description for your images using captions or alternative text. This way users with visual impairment can experience your apps the same way others do. Screen readers will read out the description supplemented with captions.

  • Timely Caption—it’s great that you are using captions but that is not enough. Captions will only take you so far if you are trying to meet WCAG standards. Ensure text is synced up accordingly with your audio and video so users can follow along in a timely form. Too fast or too slow will earn you negative points on accessibility.

  • Alternating Content—avoid alternating texts and color backgrounds on your app. Users can experience seizures from altering content. If your app does offer any of these elements, give the user an option to turn it off.

Accessibility solutions may differ from Android to iOS, but the core part of accessibility applies to all mobile platforms. Major platform providers (Apple and Google) have done a wonderful job of documenting their guidelines for developers and designers. Though each platform has its own guidelines and screen readers, developers and designers should strive to make their mobile applications more inclusive.

The Americans with Disabilities Act (ADA) is hard at work to ensure digital tools are not discriminating against users with disabilities and impairments.

Accessibility for mobile devices is still new, standards are still being created and guidelines are being documented. Due to this, accessibility is overlooked by many developers. However, it is no longer a “nice-to-have” feature. Accessibility is a must for mobile applications.

Accessibility comes with a wide array of benefits—financial, moral and legal—if done right.

Understanding Execution Context in JavaScript

$
0
0

One of the most important concepts of JavaScript is execution context. Let’s define global, function and eval execution contexts and see some examples.

Modern applications are usually written by single pieces of code. There are a variety of single pieces of code inside an application that play important roles. Functions usually do something based on an input and an output, variables hold data, etc.

Managing code in pieces reduces the complexity of our code and increases scalability. A huge block of code is not scalable in the long term. At some point, it will introduce complexity and create unexpected bugs. The way we compose our code can hugely determine whether our application will be successful or not.

Modern applications usually make heavy use of JavaScript. JavaScript is being used everywhere nowadays—from building beautiful UI components to scalable APIs and web services.

Understanding the core concepts of JavaScript can get a developer to a whole new level. One of the most important concepts of JavaScript is execution context. It’s present everywhere—every time you start to create something using JavaScript, you will be using it under the hood, whether you know it or not. Every time a new application starts, every time a function is executed, execution context will be there. So, what is execution context?

Execution Context

Execution context allows the JavaScript engine to manage the complexity of interpreting and running our code.

Execution context is an abstract concept that holds information about the environment where the current code is being executed.

We have three different types of JavaScript execution contexts:

  1. Global execution context – This execution context is created by default by the JavaScript engine.
  2. Function execution context – This execution context is created whenever a function is executed.
  3. Eval execution context – This execution context is created inside an eval function.

We are going to use a tool created by ui.dev called JavaScript Visualizer. This tool was created to easily visualize how execution context, hoisting, closures and scopes work in JavaScript. We are going to use this tool to help us understand the JavaScript execution context and how it works.

Global Execution Context

The first execution context is created when the JavaScript engines run your code. The JavaScript engine creates a new execution context before any code is executed, and this new execution context is called global execution context.

The global execution context is the default execution context that is created by the JavaScript engine. All the global code that is not inside a function or object will be executed inside the global execution context.

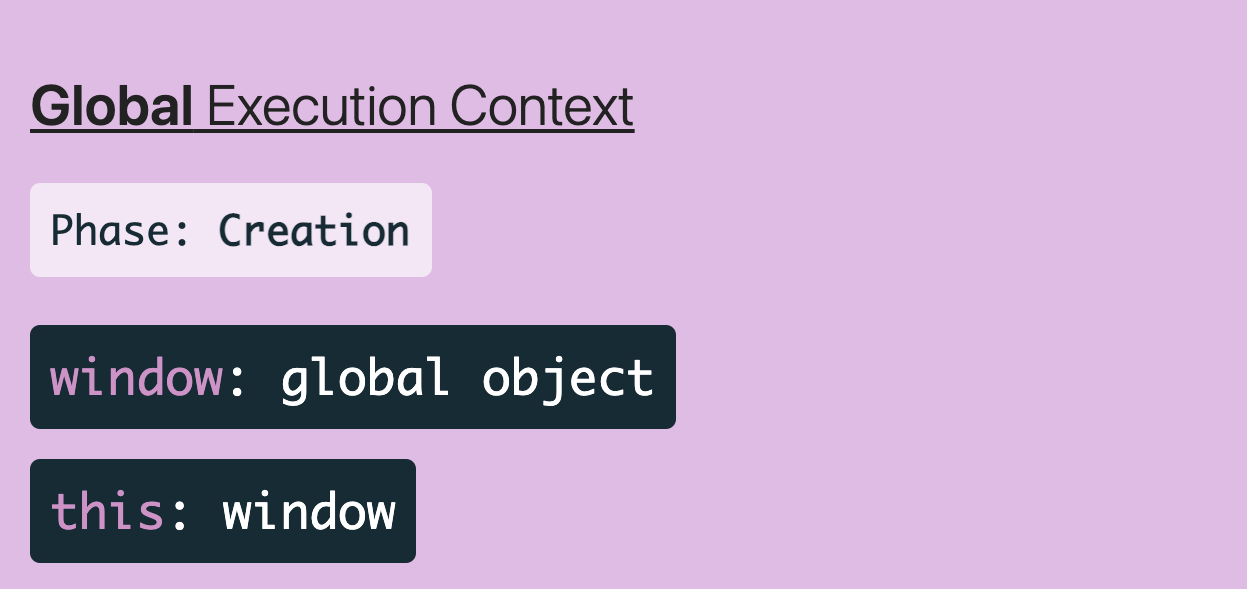
Go to our JavaScript Visualizer and click on the “Run” button without writing any code. You can see that our global execution context was created by default.

Global execution context. Phase: Creation. window: global object. this: window.

Every execution context (not just global ones) will consist of two things:

  1. A global object –  Provides variables and functions that are available anywhere inside the current environment. In the browser, the global object is named window; when using Node.js, the global object is named global.
  2. A this object –  The this keyword points to the current object of execution context where the code belongs.

The JavaScript engine will still create a global execution context even when we don’t have any code written. JavaScript is a single-threaded programming language, so it’s not possible to have more than one global execution context for a JavaScript execution.

Inside our JavaScript Visualizer, we are going to create a few lines of code to see how the function execution context works in conjunction with the global execution context.

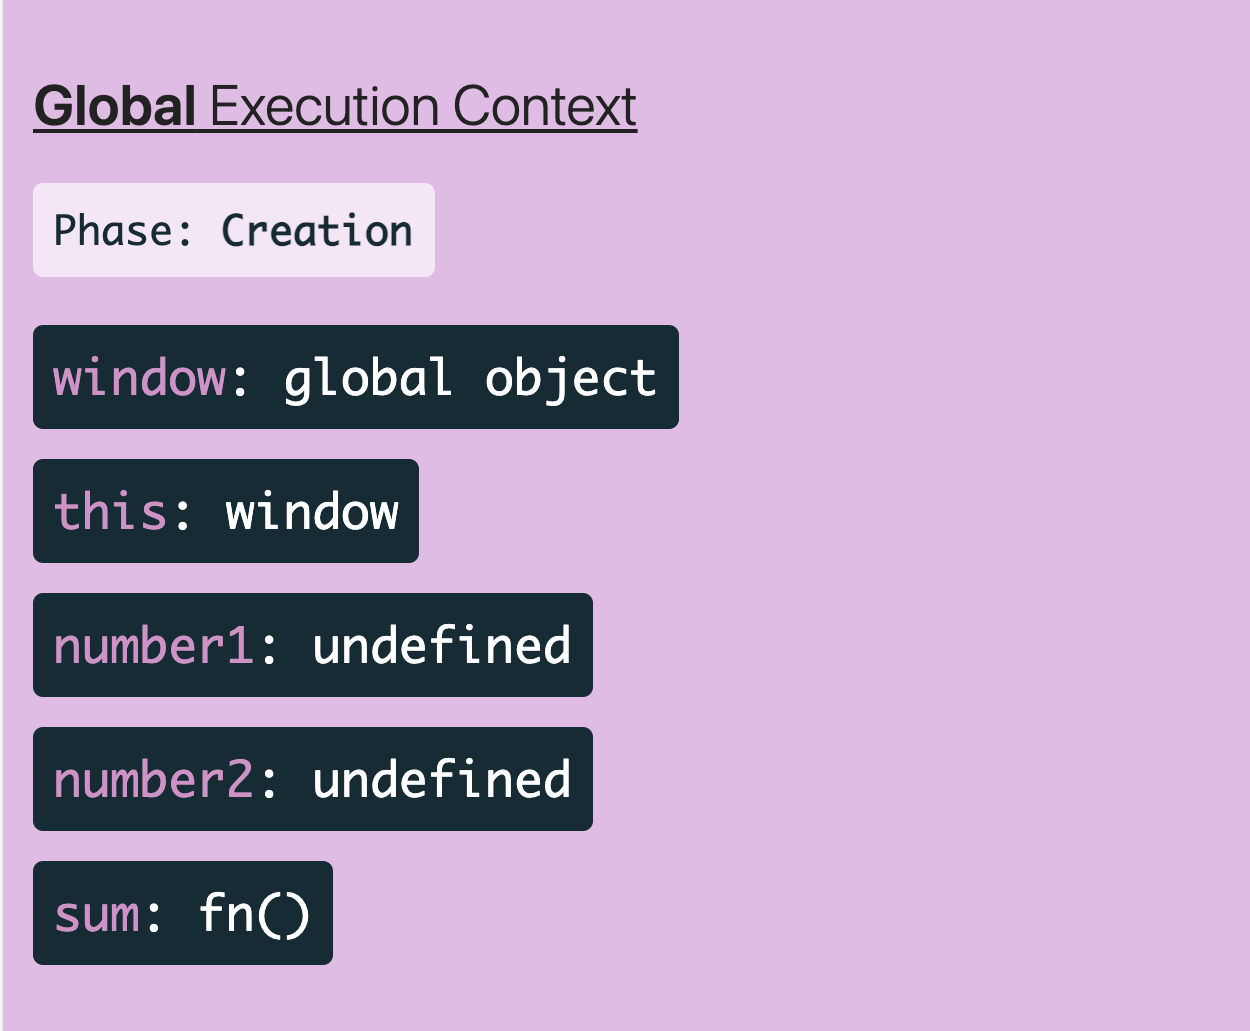
We are going to create two variables that hold two values and a function to add two numbers.

var number1 = 10;
var number2 = 10;


function sum(n1, n2) { 
  return n1 + n2;
}

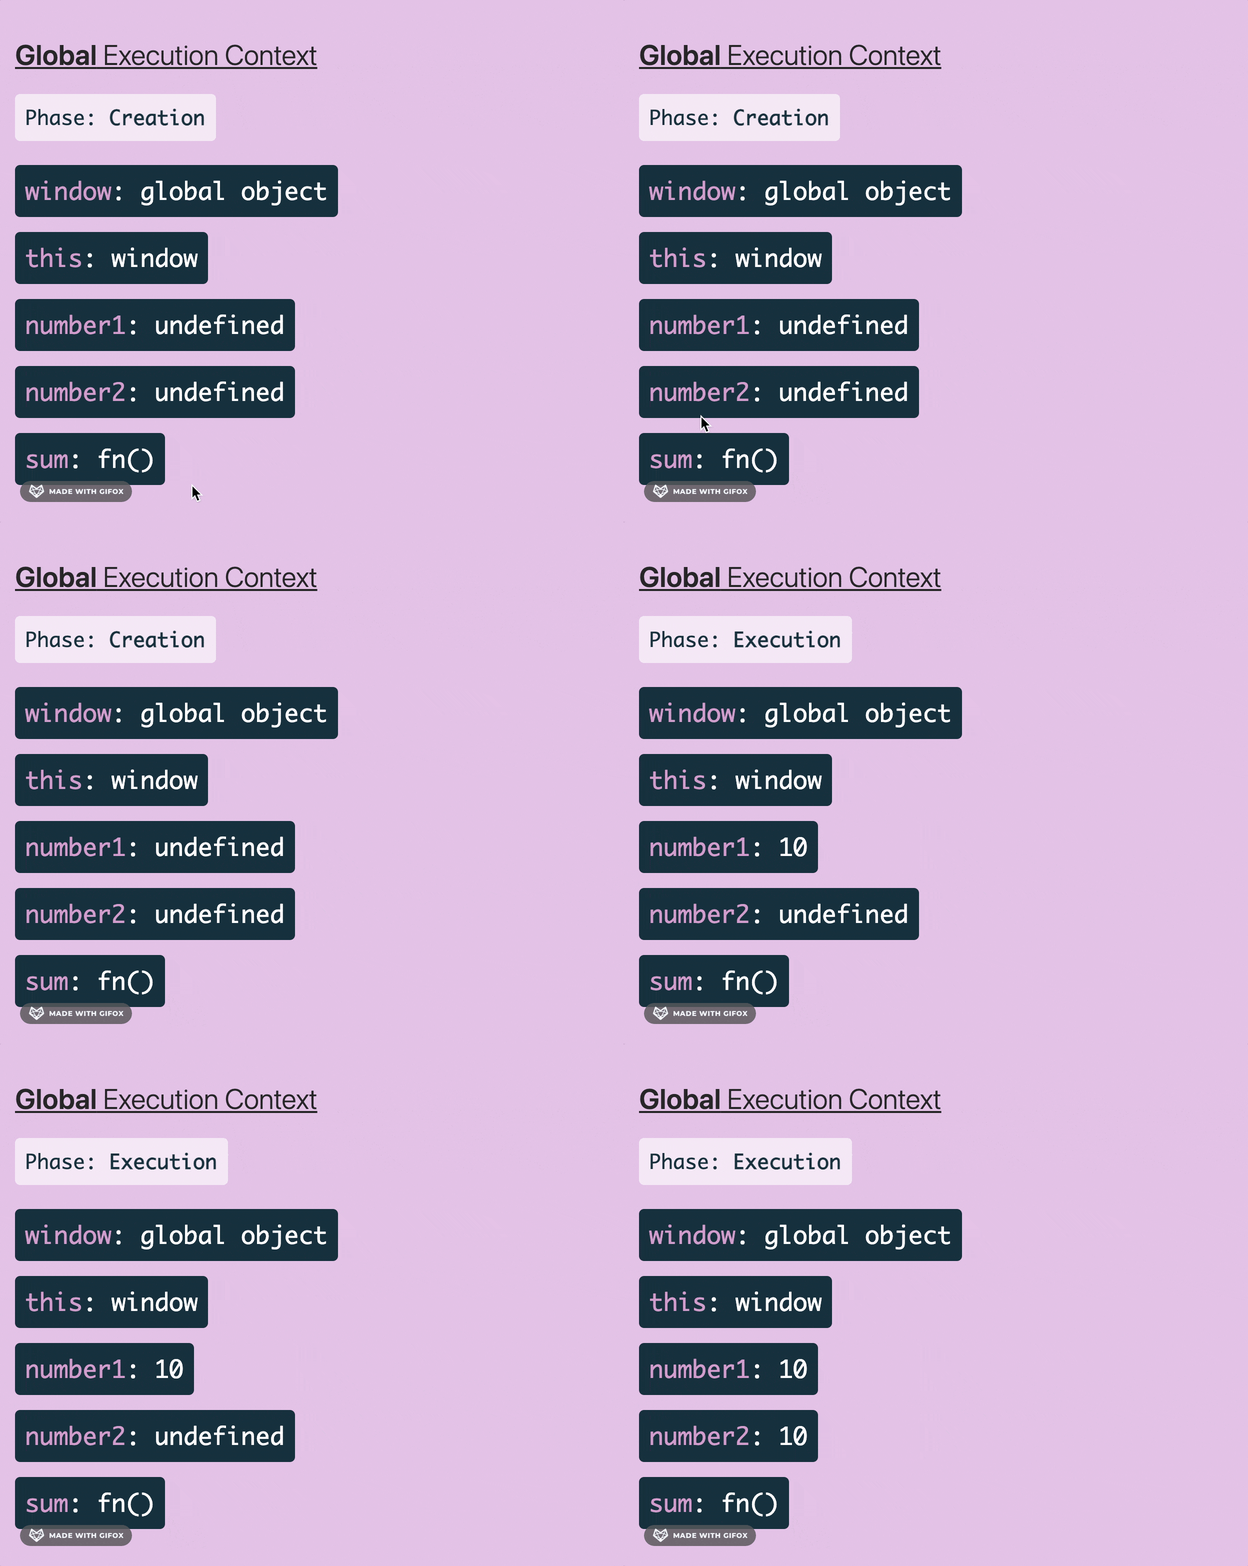
With this, we can see that our global execution context has changed.

Global execution context. Phase: Creation. window: global object. this: window. number1: undefined. number2: undefined. sum: fn().

Initially, there are two phases in the global execution context:

  1. Creation –  Inside this phase, the global object and the this keyword are created. Memory is allocated for the variables and functions created. You can see that our variables hold the value of “undefined.”
  2. Execution  –  Inside this phase, the execution of the code starts. In our example, we assigned values to our variables and defined our function.

Go to our JavaScript Visualizer and click on the “Run” button. We can see that the global execution context will change and the values of our variables will be assigned in the execution phase.

We start with the same screen: Global execution context. Phase: Creation. window: global object. this: window. number1: undefined. number2: undefined. sum: fn(). Then the Phase upadates to 'Execution'. number1 becomes 10 and then number2 also becomes 10.

Function Execution Context

A function execution context is created when a function is executed.

We are going to add a single line of code inside our example. We are going to invoke the sum function and see what happens.

var number1 = 10;
var number2 = 10;

function sum(n1, n2) { 
  return n1 + n2;
}

sum(number1, number2);

Go to our JavaScript Visualizer again and click on the “Run” button. We can see that our global execution context has changed again, and a new execution context was created.

We start on this screen: Global execution context. Phase: Execution. window: global object. this: window. number1: 10. number2: 10. sum: fn(). Then we click into the global execution context title and see a function execution below the 'sum: fn()' line. It reads: sum Execution Context. Phase: first shows creation then execution. arguments: {0: 10, 1:, length: 2}, this: window. n1: 10. n2: 10.

The new execution context created is the function execution context. It has the same phases and we have access to a special value called arguments. The arguments value is the arguments that we passed to our function while executing it.

A function can execute a function inside it, and so on. Every time a function is executed, a new function execution context is created.

Eval Execution Context

The eval function is created for turning a string into executable JavaScript code. Although it seems very powerful, this function is not recommended to be used because we can’t control the privileges of it.

The usage of the eval function can open your application or service to injection attacks. The string that the eval function receives can be a malicious string that can totally destroy your database or application. This is why the eval function is deprecated and not used.

Execution Context vs. Scope

There are a lot of programming terms that developers are used to, and sometimes this might cause some confusion. JavaScript developers might get confused and incorrectly describe what terms they are referring to.

Execution context and scope are not the same thing.

Scope is function-based. Scope belongs to the variable access of a function. There are only two scopes in JavaScript — global and function scope.

Execution context is object-based. Execution context is an abstract concept that holds information about the environment where the current code is being executed. A context of a function is the value of the this keyword for that function.

Conclusion

The core concepts of JavaScript can be a total game-changer for developing modern applications. Execution context is a very important concept to grasp to know how JavaScript code runs under the hood. It is present in every JavaScript code written and it is one of the requirements for learning other JavaScript concepts such as hoisting, closures, scope, etc.

React Developers’ Top 10 Topics of 2021

$
0
0

Aren’t you curious about the topics that interested React developers the most in 2021? I know I am!

Luckily, I have a handy way of finding out, so today I’m going to share the top 10 list of React hot topics of 2021 with you. Who knows, you may have missed something—and it’s not too late to catch up.

What is my method? Well, I have access to all the Telerik Blogs data and I’m not afraid to use it. Mua-ha-ha-ha-HA!… Erm, you know, it’s actually Google Analytics stuff, nothing crazy. But still—knowledge is power! Mua-ha-ha-ha-HA. Ha. Okay. I want to share that power with you.

You see, the Telerik Blogs serve millions of readers every year across all the technologies we cover, and we’ve had hundreds of thousands of unique views of our React blogs. Considering that there are about 6-7 million React developers today, I would call our React audience a representative sample and my method—semi-scientific.

(If you’re wondering about the size of the React developer community, I combined SlashData’s Q3 2021 survey data that there are ~16M JavaScript developers and took a conservative 40% of that number, based on Stack Overflow React usage stats. I say “conservative” because according to the State of JavaScript 2021, 80% of JavaScript devs use React.)

So, let’s begin! In true countdown fashion, we’ll start from #10 and work our way up to #1. This will also give you the opportunity to make a guess what the top topics are—and adjust your guesses as we go. Beware, if you peek at what sits on number 1, Santa may skip you this year. Nah! Just kidding. It’s the holiday season, do what makes you happy.

Here we go!

Hot Topic #10: The React Context API

State management is always on React developers' minds, which is why it’s no surprise that ever since graduating to “safe to use in production” with React 16.3, the React Context API has been growing in usage. Sometimes hailed as the Redux killer, one of React Context API’s main benefits is that with its help, you don’t need to install external libraries to handle state management.

Leonardo Maldonado did a great job explaining what the Context API is, the problems it solves and how to use it with his popular blog, Understand React Context API—number 10 on today’s list.

Hot Topic #9: Building Dashboard Apps With React

You can build all sorts of apps with React and it can be lots of fun. Where things get challenging is when you have to build more complex, line-of-business apps that need to handle a lot of data (perhaps even live-updating data), enable the users to edit, and visualize all this in a user-friendly way. In other words: it can be tough to build a dashboard with React.

That’s why we saw steady interest in our three popular dashboard building tutorials all year round. If you haven’t read them, you’re building dashboards the hard way: Let’s Build a Financial Dashboard with React, Let's Build a Sales Dashboard with React and How To Build an Interactive Dashboard with React.

Hot Topic #8: PDF Rendering: Exporting HTML to PDF

How to export HTML to PDF in your React apps is a very popular question—mostly because it is hard to do, and you need to have a couple of tricks up your sleeve to do it right. That’s why Carl Bergenhem’s 3-part series on different React-to-PDF exporting scenarios was a true hit in 2021. You missed it? Now you haven’t:

Hot Topic #7: How to Create a Responsive Layout in React

We find that developers love design-related development tutorials—and no wonder! Creating good UI/UX often falls on them, yet one could argue that it requires a separate skillset. Products can be of great help (spotlight on KendoReact), but even so, there’s no doubt that good developers need to know a thing or two about UI/UX.

That’s why Eric Bishard’s blog has perennial appeal and has been helping developers create responsive layouts since 2019: Creating a Responsive Layout in React.

Hot Topic #6: React Hooks

Hooks all the things!… or something. Ever since React Hooks were released in October 2018, they have been helping developers write clearer and more concise code. Needless to say, to make the most of them, you need to learn about them first. No wonder our Ultimate Guide to Learning React Hooks is still a go-to resource for tens of thousands of developers.

What’s more, Leonardo Maldonado strikes again in our top 10 chart with his helpful coverage of useCallback and useRef: Two React Hooks You Should Learn.

Hot Topic #5: Loops in React JSX

JSX is a custom syntax extension to JavaScript which is used for creating markup with React. The most common way of using a loop to render a list of items is with the map function that will return JSX. Not sure how to do that? You’re not alone! Happily, Thomas Findlay solved that mystery for all of us with his super helpful Beginner’s Guide to Loops in React JSX.

Hot Topic #4: Building Forms in React & React Form Validation

Four is my favorite number and forms are an interface React developers love to build. Okay, one of these statements is a lie. Forms are an extremely common thing to have in your React app and look deceptively simple to implement until you get down to it. We’ve done our fair share of helping demystify them, and based on readership interest, we’ve done a good job.

Start with How to Build Forms with React the Easy Way with TJ VanToll, dive into React Form validation with Eric Bishard’s Up and Running with React Form Validation and explore the KendoReact team’s best practices and usage examples for building great forms in React—all extremely popular resources throughout 2021.

Hot Topic #3: Dealing With CORS in CRA

If you thought Create React App (CRA) would be high on the list of the most popular React topics, you’ve guessed right! At number 3 of our most popular resources, we have Blanca Mendizábal Perelló’s short and sweet Dealing with CORS in Create React App—a blog that helps you get around CORS issues using CRA’s proxying capabilities. It’s great value for your time as you can scan the blog in three minutes and come out the wiser for it!

Hot Topic #2: React Router

Did you guess that one? If you search for “what is React Router” with Google, you’ll get a mind-boggling 49,800,000 results. Developed by the Remix team, Ryan Florence and Michael Jackson, this lightweight, fully featured routing library generates over 6 million npm downloads each week!

Little wonder then, that Gift Egwuenu’s Programmatically Navigate with React Router served so many of you this year. If you don’t know what programmatic navigation is, now you know.

Hot Topic #1: How To Show and Hide Elements in React

Does the most popular React topic of 2021 surprise you? How to control what gets displayed in your app is one of the first things you need to learn when you start developing—this holds the key to the incredible popularity of this topic.

A rough estimate based on this year’s developer surveys (referring to the SlashData’s Q3 2021 survey again, where they note that 4 million developers have joined the JavaScript community in the last year) indicates that every year, hundreds of thousands of developers enter the React ecosystem and start learning. Well, where else to start but from the beginning? With that, I present to you the most popular React blog on Telerik Blogs in 2021, by far: it is Leigh Halliday’s How to Show and Hide Elements in React.

This concludes our yearly retrospective of the topics that rocked the React world. How many of you guessed the top 3? What are the topics that didn’t make it in this list, but you would put in your personal Top 10? Don’t be a silent observer, let me know in the comments!

Batching and Caching With Dataloader

$
0
0

In this article, we’re going to cover what Dataloader is and how it can help us with database requests and reduce our database costs.

Databases are a pain point in modern applications because fetching resources on databases can quickly become complex. Data is stored in a database to be consumed later. Achieving a nice way of fetching and storing data inside a database requires a lot of knowledge and hard work.

Database optimization is something that developers don’t pay attention to when they’re starting to build their applications. Especially when building an MVP, database optimization can be unnoticed and become a huge pain point in the future. Database requests cost money—meaning it can get expensive over time.

An application that wants to scale to millions of users needs to take care of database requests and the way the data is stored. There are plenty of alternatives and patterns that can be followed to minimize unnecessary costs related to the database and help save some money.

One of the areas that can be improved in modern databases is how the requests are being sent to the database. Reducing the number of requests can improve the performance of the application.

In this article, we’re going to cover what Dataloader is and how it can help us with database requests and reduce our database costs. First, we’re going to understand the N+1 problem and how Dataloader solves it in an elegant way to help us reduce unnecessary requests.

What Is the N+1 Query Problem?

The N+1 query problem is caused when you need to make N+1 queries to the database. N stands for the number of items.

This problem usually occurs when we want to fetch data from our database and we loop through the results. It causes a lot of unnecessary round-trips to our database because we’re making a new request every time.

At the end of the operation, it results in N requests for each item (N) and the original query (+1).

This is how it works:

  • Imagine that you have a table called Posts with 100 items inside it.
  • You want to fetch all the points in a single request.
  • After you fetch all the posts, for each post, you want to return the author.
  • You map over the results and for each post you make a new request to your database.
  • It results in 100 unnecessary requests to your database, plus the first request for fetching all the posts.

Making a lot of unnecessary requests to our database can make our application slower. It is pretty easy to naively write our database queries and not even notice that you have this problem.

What Is Dataloader?

Dataloader is a generic utility library that can be used on our application’s data fetching layer to reduce requests to the database via batching and caching. It provides a simplified API to access remote data sources and reduce unnecessary round-trips.

Dataloader is not something particular to Node.js and JavaScript applications—it can be used with any other technology and in different situations. There are currently a ton of implementations in different languages.

One of the most common uses of Dataloader is in GraphQL services. It combines the batching and caching concepts with the core concepts of GraphQL and helps to create faster and more reliable modern APIs.

Batching With Dataloader

Batching is the primary job of Dataloader. It creates our loader by providing us a batch loading function.

import Dataloader from "dataloader";
const postLoader = new DataLoader(batchPostFn)

It’s a function that receives an array of keys and returns a promise, which resolves to an array of values.

After that, we can load our values using the loader that we just created. Dataloader will coalesce all individual loads and call our batch function with all requested keys.

const post = await postLoader.load(1);
const postAuthor = await postLoader.load(post.author);

In this code, you see what we discussed: The batch function accepts an array of keys and returns a promise, which will resolve to an array of values. The first point to pay attention here is that the array of values must be the same length as the array of keys. Another point is that each index in the array of values must correspond to the same index in the array of keys.

import Dataloader from "dataloader";
async function batchPostFn(keys) {
  const results = await db.fetchAllKeys(keys);
  return keys.map(key => results[key] || new Error(`No result for ${key}`))
};
const postLoader = new DataLoader(batchPostFn);

With this simple configuration, we can reduce our unnecessary round-trips to the database and make our database requests more efficient. We would have ended up making a lot of requests to our database, and with a few lines of code we reduced it to only two requests.

Caching With Dataloader

Dataloader provides a memoization cache for all loads that occur in a single request to your application.

After the load function is called twice, Dataloader does in-memory caching and caches the resulting value to reduce redundancy. The data will only be deleted when the data is garbage-collected.

Some developers might think that Dataloader can replace some shared application-level cache such as Redis. But the Dataloader GitHub clarifies:

Dataloader is first and foremost a data loading mechanism, and its cache only serves the purpose of not repeatedly loading the same data in the context of a single request to your Application.

The fact is that Dataloader does not replace Redis or any other application-level cache. Redis is a key-value store that’s used for caching and many other situations.

Getting Started With Dataloader

To get started with Dataloader, we need to install the package:

yarn add dataloader

Now, let’s imagine that we have a simple GraphQL schema, like the following:

type Post {
  id: ID!
  name: String!
  description: String!
  body: String!
  author: Author!
  comments: [User!]
}

type Author {
  id: ID!
  firstName: String!
  lastName: String!
  posts: [Post!]
}

type Comment {
  id: ID!
  text: String!
  user: User!
}

type User {
  id: ID!
  firstName: String!
  lastName: String!
}

Now, we need to create our Dataloader instance. We’re going to create a Dataloader instance for our Post type.

import Dataloader from "dataloader";

async function batchPostFn(keys) {
  const results = await db.fetchAllKeys(keys);
  return keys.map(key => results[key] || new Error(`No result for ${key}`))
};

const postLoader = new DataLoader(batchPostFn);

A good alternative here for making use of our loader without having to import it every time would put it in our GraphQL context, like this:

const graphql = async (req: Request, res: Response) => {
  return {
    schema,
    context: {
      user,
      req,
      postLoader,
    },
  };
};

Now, we can use it in our GraphQL resolvers.

const resolvers = {
  Query: {
    post: (parent, args, context, info) => context.postLoader.load(args.id),
    ...
  }
};

As soon as you start to think about performance, your application will become better and more reliable. It’s very easy to get started with Dataloader and create loaders of all types in your GraphQL API. It will definitely help you to reduce costs and make your GraphQL API more performant.

Conclusion

A naive approach for fetching resources from the database might be expensive over time. Dataloader helps us to reduce our costs and save unnecessary round-trips to our database by batching and caching.

Can Music Really Help You Work Faster or Be More Creative?

$
0
0

Researchers have studied the relationship between music and work for a long time now. Here’s how you can come up with a personal strategy for using music as a productivity booster.

I met another writer recently who told me that he can’t write unless he’s sitting in a busy coffee shop with lots of ambient noise. That would be impossible for me to do. Because if I hear any words besides the ones swirling around inside my head, I can’t focus.

That said, not every task I do requires a quiet environment. For instance, when I’m doing any sort of business administration or project management tasks, I play loud upbeat music. We’re talking ’80s rock ballads and ’90s alt hits. This “90s Rock Anthems” Spotify playlist is in heavy rotation in my house:

On the other hand, when I’m working on strategy and content creation, I listen to instrumental music or ambient sounds. This “Long Ambients” playlist by Moby is one of my favorites:

But is this a subjective matter? Not just in terms of the music we prefer to listen to when we work, but in terms of whether music makes us more productive or creative?

According to some researchers, there may be some common ground among us all when it comes to music and productivity. In this post, I’m going to share some of the research and suggest ways in which designers and developers can use it to improve productivity, creativity, as well as job satisfaction.

What the Science Says About Using Music to Boost Productivity and Creativity

While researching this subject, I found dozens of studies that compared the relationship between music and work. The only problem is that the studies are somewhat limited in scope.

So I don’t want to suggest that music is a cure-all for an unproductive day. Instead, let the following research provide you with some direction on what to put on in the background if you do enjoy listening to something while you work.

1. Use Music When You Need an Attitude Adjustment

There are so many reasons why you might be in a bad mood when you’re working. Maybe a client yelled at you. Or one of your contractors went MIA. Or perhaps something personal soured your mood.

There’s a mood management technique in the field of music therapy called the iso principle. You don’t need to check yourself into therapy to reap the benefits of this technique. Just take a step back from your work, open your music player and do what a therapist would do.

First, gauge your current mood and then play a song that matches it. For example, let’s say you just got chewed out by a client and are feeling pretty down about it. You might start with a song like “Fake Plastic Trees”:

When the song finishes, queue up one that’s a level up in terms of positivity. Perhaps a bit faster in tempo, with some harder beats and a more optimistic message. Continue to do this, choosing songs that level up in positivity until you reach peak positivity.

For instance, you might finish the exercise off by playing a song like “I’m Still Standing”:

According to the iso principle, the gradual change in terms of musical mood should result in a gradual change in your own mood. If you think about it, this is probably something you do in your personal life when you’re feeling down or frustrated or in a funk. You throw on something that makes you smile and want to move because it feels better than wallowing in the negativity. This music therapy exercise simply formalizes the process.

One word of advice:

When the iso principle was originally studied, music therapists tended to use calm classical music. However, if that’s not your jam, use music that makes you happy. According to a study called “Effects of background music on concentration of workers”:

“We conclude background music influenced listener attention. This influence has more to do with listener fondness for the music than with type of music. Compared to situations without background music, the likelihood of background music affecting test-taker attention performance is likely to increase with the degree to which the test-taker likes or dislikes the music.”

While this experiment was performed on test takers, it should be just as relevant to anyone who’s focused on a task. As you’ll see in some of the tips coming up, some of the music that makes you happy might not be great in terms of resetting your mood while you actually work. However, if you need a quick mood adjustment, put your work aside and crank whatever tunes make you feel better.

2. Play Upbeat Instrumental Music When You Need Inspiration

In a Spotify study from 2021, 43% of respondents said they play instrumental music whenever they work on something that requires brain power—like creative tasks or data analysis. It’s not just Spotify users that find this useful.

For starters, the study “Background music: effects on attention performance” found that music with lyrics negatively affects how well people are able to concentrate and focus. So there’s certainly something to the usefulness of instrumental music while working.

But would it be better to just work in silence?

According to a study called “Happy creativity: Listening to happy music facilitates divergent thinking,” researchers gave some participants happy classical music to listen to while working on a creative task and the rest worked in silence. There were two types of creativity they were concerned with:

When it came to convergent creativity (i.e., linear problem solving and critical thinking), music neither helped nor hindered the participants’ work. When it came to divergent creativity (i.e., brainstorming, hypothesizing and experimentation), however, participants listening to music were more creative.

Here we see again how positive music leads to better work performance. But now we also have some proof as to what types of music help improve creativity and when you should listen to it.

For web designers, instrumental music would be really useful in the early stages of your jobs all the way through to design. You may want to hit the pause button on your music, though, when you move into prototyping, testing and debugging. It doesn’t appear that instrumental music will hurt the convergent creativity needed in these stages. But it’s something worth exploring on your own in case it does affect you negatively.

If you’re looking for an instrumental playlist to give your divergent creativity a boost, I personally enjoy this “Focus Flow” playlist:

The songs are upbeat and the rhythms aren’t super complicated, so they do a great job creating a feel-good atmosphere when you’re working.

3. Listen to Mozart When You Design

Have you ever heard of something called the Generalized Mozart Effect (GME)? I knew there was a connection between classical music and productivity, but I didn’t realize it was only certain types of classical music that it applied to as well as a certain type of productivity.

The GME suggests that there are certain songs by Mozart (as well as other musicians) that improve listeners’ spatial-temporal reasoning skills. This refers to our ability to conceptualize and manipulate objects through space and time.

Researchers aren’t totally clear on why this happens, though many believe it has to do with the structure of the brain. PET and magnetic resonance scans have found an overlap between where music perception happens in the brain and where spatial-temporal tasks are managed.

While it’s not directly cited in the research above, I think what they’re talking about is neuroplasticity. The theory that you can rewire and strengthen your brain through experience.

In the study, they observed young children who received music lessons for six months. At the end of their training, not only could they play basic pieces from composers like Mozart and Beethoven, but their spatial-reasoning tests exceeded the control group who had no musical training by 30%.

In the adult study, they only looked at what kind of effect listening to Mozart’s music over a span of 10 minutes would have on participants. It demonstrated a similar effect, just shorter lived.

While researchers were skeptical about the power that Mozart’s music had on spatial-temporal reasoning, they ran the same test on mice. They wanted to know if a person’s preference for classical music might have impacted the test results. However, the observed mice performed the same way the human test subjects did.

So, there is something to the theory.

Spatial-temporal reasoning is an important trait to have when you’re designing wireframes, MVPs and digital products. If you’re looking to get help from classical music, researchers suggest listening to Wolfgang Mozart, Johann Sebastian Bach or Johann Christian Bach. There’s something about the strength of their notes that resonates with the human brain.

There’s a playlist on Spotify dedicated to Mozart, so start there if you’re interested in putting the theory to the test:

4. Use Faster Music To Help You Pick up the Pace

According to researchers, music can do more than make you happy or to improve your creativity. It can actually speed you up or slow you down while you work, too.

In the study “Effects of music tempo upon submaximal cycling performance,” a dozen male participants cycled for 25 minutes. While they were left to cycle at their own pace, the tempo of the music changed over the course of the test.

Researchers noticed the following changes in the participants’ performance based on the music tempo increasing by 10% or decreasing by 10%:

  +10%   -10%
Distance covered +2.1% -3.8%
Power +3.5% -9.8%
Pedal cadence +0.7% -5.9%
Heart rate +0.1% -2.2%
Perceived exertion +2.4% -3.6%
Liked the music +1.3% -35.4%

When the tempo increased, researchers saw an across-the-board increase in terms of performance, perception of how hard they were performing, as well as how much they enjoyed the music.

When the tempo decreased, the metrics all dropped as well. But notice how significant those drops are compared with the up-tempo lift. When the music slowed down, performance, perception and satisfaction dropped by much greater percentages.

Now, this experiment measured what happened while the participants exercised. But is that so far off from the mental gymnastics you do when you design apps and websites?

According to neuroscientist Daniel Levitin, our neurons will fire in time with a rhythm we like the feeling or sound of. And when our brain syncs up with music, when our body follows along with it.

We’ve all had days where we feel sluggish, distracted or otherwise like we’re working slower than we want to. If we know that faster beats can make our bodies work harder and move more quickly, then why not incorporate fast-paced music when we need it?

There are so many avenues you could go with this. Pop music. Rock beats. Instrumental hip-hop. I’d also recommend movie and video game soundtracks.

There are a bunch of playlists with orchestral and “relaxing” video game music. That’s fine if you’re looking to get in the zone. However, if you want to get the speed benefits, go with something more old school like the “Upbeat Video Game Music” playlist:

As for movie soundtracks, you run into a similar issue as video game soundtracks. Movie soundtracks are often designed to not to be explicitly noticed in movies. They’re just there in the background to set the tone as well as to communicate changes in the storyline.

There are, however, some soundtracks designed to get the viewers’ heart pumping in time with the action on the screen. One of my favorite ones to listen to is the “John Wick Soundtrack”:

The majority of the songs on here are instrumental, so I skip over the few with lyrics if I’m trying to concentrate.

Wrap-up

Music in and of itself isn’t going to make you a better designer or developer. That said, if you enjoy listening to music, you may be able to use it to your advantage when optimizing your workflow.

By playing the right kind of music at the right place and time in your workflow, it can release any negative energy you’re holding onto, help you work faster and get the creative juices flowing more freely.


Master JavaScript Promise: Resolve, Reject and Chaining in ECMAScript 6

$
0
0

This post covers the necessary fundamentals to having a good understanding of promise. It covers resolve, reject, callbacks and chaining in ECMAScript 6.

The JavaScript promise is a great feature that has helped developers to write clean, elegant code. At the core, a promise is just an object that produces a single value some time in the future. If the promise was fulfilled, it produces a resolved value; on the contrary, it rejects with an error on why if the promise can’t be fulfilled.

Dissecting Promises

In the simplest terms, a promise allows you to run some code asynchronously (without blocking the execution of the rest of your program); depending on the result—whether it failed or succeeded—it then runs other code after it completes. More importantly, it does this in a way that avoids what JS developers have referred to over the years as “callback hell.”

A promise has three states:

  • Pending: This is the initial state of the promise before an operation begins
  • Fulfilled: The request was successful
  • Rejected: The request was unsuccessful

One of the misconceptions people have is that when a promise is settled it has been resolved, but in fact what it means is that the promise has either been resolved or rejected. So before the operation of a promise commences, it’s pending, and after the request begins it gets settled (either fulfilled or rejected).

Note: Once a promise is settled it cannot be resettled. It strictly produces only a single value.

By convention, you cannot access the state of a promise; only the function that creates the promise knows when it’s settled and whether it got resolved or rejected.

Create a Promise

Now, let’s create a simple promise just to set the groundwork.

    const get =  x => new Promise((resolve, reject) => {  
      // condition
    });

Firstly, we created an anonymous function that takes in an argument x and returns a constructor that creates a promise object. The promise object takes two parameters, one for success (resolve) and one for failure (reject):

    if (x % 2 === 0) {
      resolve(`${x} is an even number`);
    } else {
      reject("sorry");
    }

Next, if the condition above is True, the promise will be resolved; else it will be rejected.

To sum it all up, the function returns a promise that resolves if the argument passed is an even number, and it rejects if it’s not. So we have created our first promise. Now let’s use it.

Promise Resolved

    get(3)
    .then(res => {
      console.log(res);
    })

The get function is called with an argument 3, after which the .then method gets called if and only if the promise gets resolved.

Promise Rejected

    .catch(error => {
      console.log(error);
    })

If, based on the condition, the promise gets rejected, the .catch method gets called and it logs the error.

    .finally(() => {
      console.log("Are You Satisfied");
    });

The .finally is called once the promise has been settled (whether it gets resolved or rejected, it gets called after the promise is settled).

Note: I recommend always ending all promise chains with a .catch(), or .finally is needed.

Before Promise: CallBacks

Before the promise feature was added to JavaScript, developers used callback (when a function accepts another function as an argument, this contained function is known as a callback). Don’t get me wrong—callback is still useful. It’s a core functional programming concept still in use in simple functions like setTimeout or making API calls.

    setTimeout(() => {
      console.log("You Can't Get Rid Of Me You See")
    }, 1000)

Later on, developers coined the term “callback hell” because callbacks can get messy if you chain a lot of them together. Let’s see an example:

    request(function(response) {  
        secondRequest(response, function(nextResponse) {    
            thirdRequest(nextResponse, function(finalResponse) {     
                console.log('Final response: ' + finalResponse);    
            }, failureCallback);  
        }, failureCallback);
    }, failureCallback);

You can see how confusing it is to pass each function as a callback. Callback functions are useful for short asynchronous operations, but when working with large sets, this is not considered best practice. So we still use callback functions with promises, but differently (chaining).

Promise Chaining

Because .then() always returns a new promise, it’s possible to chain promises with precise control over how and where errors are handled. Now, let’s handle the same callback operation above with promises—this time the same code looks much cleaner and easier to read:

    request()
      .then(function(response) {
        return secondRequest(response);
    }).then(function(nextResponse) {  
        return thirdRequest(nextResponse);
    }).then( 
    function(finalResponse) {  
        console.log('Final response: ' + finalResponse);
    }).catch(failureCallback);

The above code shows how multiple callbacks can be chained one after another with a synchronous flow of execution. Chaining is one of the best features of promise.

Conclusion

Fully understanding what is covered in this post is crucial to furthering your understanding of promise. I hope you found it helpful.

Test Studio Step-by-Step: Testing Execution Paths With Conditional Tests

$
0
0

Here’s how to convert any test into a data-driven test that lets you prove your app works with every set of data that matters.

You’ve created an end-to-end (E2E) test with Test Studio that proves your application works “as intended” when passed standard data—your application’s “happy path.” Now you want to make sure your application works “as intended” when it’s faced with bad data.

Test Studio showing the results of running a successful test

First, you’ll have to decide what “as intended” means with bad data. You could, for example just test to ensure that the right message appears when bad data is entered. That’s not bad, but a more complete test would ensure three other things:

  • The application doesn’t let the user continue with bad data present.
  • When the user corrects the bad data, the user can continue.
  • Only the good data is saved.

You could create a separate test to prove each of those things, but with Test Studio’s conditional processing, you can create a single test that proves the application does all of those things.

But you also don’t want to create a test so complicated that you have to test it to prove your test is working right. Your goal is to create simple, focused, well-understood tests that prove that a transaction works “as intended” with bad inputs. Test Studio lets you prove everything you want with a test that remains easy to understand.

While the case study I’m using in this article (download my code and Test Studio project here) is a data-driven test, you can use Test Studio’s conditions in non-data-driven tests (just ignore the sections below on updating your data source). With a data-driven test, however, a single test can prove that your application works “as intended” with a variety of inputs, including bad ones.

The Application, the Test and the Condition

In my initial test, the steps in the “happy path” test look like this:

  1. Good data is entered.
  2. The Save button is clicked and the next page is displayed.
  3. The entered data is confirmed as having been saved by verifying the data on the Department Details page.

However, when bad data is involved, these are the steps I want followed:

  1. Bad data is entered.
  2. The Save button is clicked.
  3. The user is held on the page and an error message is displayed.
  4. The data is corrected.
  5. The Save button is clicked and the next page is displayed.
  6. The corrected data is confirmed as having been saved by verifying the data on the Department Details page.

If I want a single test to handle both good and bad data, I need a condition that ensures that steps 3 through 5 are executed when bad data is entered and skipped when good data is entered. My new test script should look like this:

  1. Data is entered.
  2. The Save button is clicked.
  3. The Condition: Did the application flag the data as bad?
    a. The data is corrected.
    b. The Save button is clicked.
  4. The entered/corrected data is confirmed as having been saved by verifying the data on the Department Details page.

The easiest way to build this script is to:

  • Create a script that proves the happy path works (see the article at the start of this post).
  • Potentially, make the test a data-driven test.
  • Enhance the test to handle bad data.

Regardless of how I got to this point, however, I need some bad data. Because I’m using a data-driven test for this case study, I’ll provide the data by updating my data source with some “unfortunate” input. In a non-data driven test, I would just expand the test steps that enter data and update the text field with invalid inputs.

Updating Your Data Source With Bad Data

In my data-driven test, I’m using an Excel spreadsheet as my data source, but the process is the same for wherever you’re getting your data from.

First, of course, I need to add at least one row containing bad data to my test data. I’ll add a row that enters an X for the budget amount (I put it first to make setting up my test easier).

An Excel spreadsheet showing the test data for the test. There are four rows but the key row is the first one which has an X in the DeptBudget column. The Notes column for this row has “Bad Budget”

When I’ve finished making my changes, I just close and save my spreadsheet to have Test Studio start using my revised data.

Conditional Processing

To begin enhancing my script, I right-click on my script on the step where the Save button is clicked and select Run > To Here. The script runs, the bad budget amount is entered, the Save button is clicked … and the application stops on my selected step, displaying an error message about the X in the budget textbox.

I’m going to use that error message in my condition to determine when the application has found bad data.

The Department Edit page in the Contoso app with the letter “X” entered as the budget amount for the department. Beside the budget textbox is an error message that reads “Budget must be a number.”

To use that error message element in my condition, I first need to make Test Studio aware of the element. That’s easy: I just click on the error message element in my page while Test Studio is still recording my actions (this adds a new step to my test script labeled “Click ‘BudgetErrorElement’”).

The test script showing a new step at the end, following a test labelled “Click Submit”. The test step is labeled “Click ‘BudgetErrorElement’”.

I then shut down the browser and return to Test Studio to stop Test Studio recording my actions.

To begin creating my condition, I add a verification step at this point in the script (one of the benefits of using Run > To Here is that I’ve made the step where I want to add my verification step the “current step”). I’ll now use Step Builder to add my verification step.

Hint: When you add a step using Step Builder, the new step gets added at the “current step” … which may not be where you want it. Don’t panic! If you add a new step in the wrong place in your script, you can always drag that step to the right place. It’s probably easier, though, to make sure that, before you add your new step, the current step is the “right step.” To make a test step the “current step,” click on the gray tab down on the left of the test step. A greater-than sign (>) will appear in the tab, marking the current step.

Three steps from the test script, each of which has a gray tab at its left end. The bottom row’s gray tab is circled and has a greater-than sign in it that signals that this step is the “current step.”

To add my verification step, I switch to the Step Builder panel to the right of my test script, select the Verifications > Exists choice and click on the Add Step button at the bottom of the pane. This adds a new step named “Wait for Exists ‘BudgetErrorSpan’” that checks for the existence of the message element in the current page.

The test script with the Step Builder panel to the script’s right. In the Step Builder panel, the Verifications choice, the Exists choice in the Verifications submenu, and the Add Step button are circled. At the end of the test script is a new, highlighted step labelled “Wait for Exists ‘BudgetErrorSpan’”

Now that I have a verification step that checks for the appearance of the error message, I’m ready to create the condition that uses my “correct the data” step when bad data is entered. I return to the Step Builder pane, select the Conditions > if…else choice, and click the Add Step button. An IF step and an ELSE step are added to my script.

The test script with the Step Builder panel to the script’s right. In the Step Builder panel, the Conditions choice and the if…else choice in the Conditions submenu are circled. At the end of the test script are two new steps, labeled “IF” and “ELSE”. The IF step has a dropdown list showing “Select verification…”

I then click on the dropdown list in IF step and get a list of all the verification steps in my test script. For this condition, I select the verification that checks for the existence of my error element. With that selection, I’ve created my condition.

The test script showing an IF statement with its dropdown list selected. The list shows two verification steps – the selected step is labeled “Wait for Exists ‘BudgetErrorSpan’”, which was created earlier in the process.

Side Note: My if…then block begins with an IF step and ends with an ELSE step. However, as I’m using the if…then here, the ELSE step just marks the end of the IF block rather than marking a separate processing branch.

With my IF statement set up, I can delete both the step generated when I clicked on the error message and the original verification step that checked for the existence of the message. That verification step has become part of the IF statement and, if I need to tweak the verification, I can access it through the IF step’s properties window.

Side Note #2: It’s worth pointing that the error message element is always on the Department Edit page (it’s just not always visible). This test won’t be true—the error message element won’t exist—only if the test has advanced to the next page after the user clicked the Save button. The verification step I added here is really just using the presence of the error message to see if the test has advanced to a new page when the Save button was clicked. I could have used any element on the page to check for this, but I picked the error element in case I want to extend this test for other kinds of bad data with different messages.

Handling Bad Data

Inside my IF block, I’ll add two steps. The first mimics the user entering good data into the budget field to correct the error; the second step mimics the user clicking on the Save button to carry on.

Elsewhere in my test script, I already have steps that enter data into the budget field and click the Save button. I can just copy those steps and paste them inside my IF block. Alternatively, I could use the Run > To here option from my IF step to execute my script and, with Test Studio still recording, enter the good data and click the Save button to add those steps.

The test script with the IF ELSE block expanded to hold two steps inside it. The first step is labeled “Enter Budget Text Amount” and the second step is labeled “Click ‘Submit’”

Enhancing the Dataset

It’s at this point that I realize that, for my data-driven test, I need another column in my data source to hold the corrected data that replaces the bad data in my budget textbox. I use Project > Manage to open my Excel spreadsheet and add a new column called CorrectedData to the spreadsheet. For any row with bad data, I’ll put in the value that corrects the problem in this column.

The Excel spreadsheet holding the data used in the data driven test. A new column called CorrectedData has been added. In the row that contains an X for the DeptBudget, the CorrectedData column holds 200. The Note column with the description for the row has been updated to contain “Bad Budget corrected to 200.” The CorrectedData column is empty for all the rows with good data in the other columns

Now that I’ve enhanced my data source, I have to enhance the binding on the step that enters the corrected budget amount: I want that step to use my new CorrectedValue column in my data source. To do that, I click on the step that enters the corrected budget data and switch to its Properties window (the Properties window is on the right, tabbed together with the Step Builder.

The test script with the “Enter BudgetText amount” step highlighted. The Properties tab for the step is displayed with the tab name circled. At the top of the Properties tab, the Bindings line is circled along with its builder button.

At the top of the Properties window, I find the Bindings line and click on the builder button (the button with three dots) to its right. From the dropdown list that appears, I select CorrectedData column.

The test script and the Step Builder pane. The Binding dropdown list is displayed showing all the column names from the data source. The CorrectedData column has been selected.

With this change made, I can run my test. I’ll see good data entered and bad data corrected. At the end I’ll be rewarded with a green bar at the top of my test script.

Test studio showing the test script for the data driven version of the test with a condition and a green part at the top of the script showing success.

It’s up to you how much you may want to extend this test script. There are, for example, three other input fields on the Department Edit form—do you want to expand this test to handle bad data for all of them? I probably would (it would just require duplicating my if…else block for each field), but you might decide that you’re better off with separate tests for each field to keep your tests more focused.

In my case study, I could have created two scripts: one that tests “good” inputs and one that tests “bad” inputs—two scripts that would look very much alike. Had I made that choice, I would not only have to manage a larger inventory of tests, I’d have to make sure that I kept these two scripts in sync as the application evolved.

By using conditional logic and having one just test to handle those places where the tests differed, I reduced the inventory of tests I have to manage. I also reduced the maintenance burden of managing my test inventory. Altogether, I have a test that checks that my application not only prevents bad data from being entered but proves the application does the right things when a user does make a mistake.

And, by building on a data-driven test, that single test proves my application does all of these right things for all of my data inputs. That’s a powerful test to have around.

Angular Basics: Introduction to Observables (RxJS)—Part 1

$
0
0

In the first article of two parts, we’ll cover the basics of observables, observers and RxJS.

Observables provide a unified way to work with different kinds of data. That is, observables can emit a single value or a sequence of values, synchronously or asynchronously, lazily (cold) or eagerly (hot), unicast to a single consumer (cold), or multicast to multiple consumers (hot).

Kitten playing with a plant. Representing observables.

Photo credit: Dim Hou on Unsplash

In this two-part article series, we will look at the observable type, learn how to create an observable instance and become familiar with the subscribe function. We will see that observables are data producers and observers are the consumers—subscribing and unsubscribing from observables—as well as explain terminologies such as “emit a sequence of values.”

Let us start from the beginning!

What Is an Observable?

“An observable represents a sequence of values which can be observed.” —TC39

Unlike promises and iteration protocols, observables are not part of JavaScript yet. However, there is a TC39 proposal to add an observable type to JavaScript.

Let us find out what an observable is and what it does by studying the TC39 proposal.

An Observable Is a Type

The TC39 proposal introduces the observable type as follows:

  • The observable type can be used to model push-based data sources such as DOM events, timer intervals and sockets.
  • The Observable constructor initializes a new observable object.
const myObservable$ = new Observable(subscriber);

function subscriber(observer) {
  // define the observable body
  
  return () => {
// teardown logic
  };
}
  • The subscriber argument must be a function object. It is called each time the subscribe() method of the observable object is invoked.

To create an observable instance, we implement the observable in a function and pass the function to the observable constructor. The TC39 proposal refers to this function as the subscriber function. The subscriber function will get invoked when each time we subscribe to the observable instance.

What Does an Observable Do?

We know that we define an observable in a subscriber function, but what should the function do? What should be the input and what should it return?

The TC39 proposal mentions that the observable type can be used to model push-based data sources.

An Observable Produces Data and Sends it to the Observer

I have written a separate article “Comparing Data Producers in JavaScript” that talks about data producers and push vs. pull data systems.

As explained in the accompanying article, our application includes code that produces data (producers) and code that consumes data (consumers).

Functions, promises, iterables and observables are the data producers in JavaScript. This is why the TC39 proposal said that the observable type can be used to model a data source. “Push-based” means that observables are in control of when they send data to their observers.

The producers differ in how they communicate data with their consumers. That is, they might have a push or pull system, produce a single value or a sequence of values, send data synchronously or asynchronously, lazily or eagerly.

The key point is that an observable produces data and sends the data to its consumers. The data produced by an observable is consumed by its observers (or subscribers).

Since we define what an observable instance does in its subscriber function, the subscriber function takes an observer as input, produces data, sends the data to the observer, and notifies the observer if an error happened or if it has completed sending data.

An Observable Allows Observers to Subscribe

Creating an observable instance is not enough to start producing and sending data—we also need to subscribe to the observable.

The observable needs to know who to send data to. We let an observable know that an observer is interested in receiving data by subscribing to it.

The observable type has a subscribe() method that accepts an observer as a parameter.

const subscription = myObservable$.subscribe(observer);

The subscribe() method begins sending values to the supplied observer object by executing the observable object’s subscriber function.

The subscribe() method executes the subscriber function, passing along the observer as an argument. The subscriber function then starts producing data and emitting values (or notifications) by executing the observer’s callbacks.

An Observable Allows its Observers to Unsubscribe

The subscribe() method returns a subscription object which may be used to cancel the subscription.

const subscription = myObservable$.subscribe(observer);

The subscription object has a method called unsubscribe() that lets the observer to unsubscribe (or cancel the subscription):

const subscription.unsubscribe();

Calling unsubscribe() clears the resources used by the subscription and calls the teardown function returned by the subscriber function.

function subscriber(observer) {
  // Produce Data
  // Send data and notifications
  
  return () => {
    // teardown logic
  };
}

What Is an Observer?

An observer is the consumer of the data produced by the observable. It is represented by an object with next, error and complete properties. These properties contain callback functions for processing data, handling errors and completion notifications.

The subscriber function emits data to the observer by calling the next() callback function. Likewise, it can send an error notification by calling the error() callback and a completion notification by calling the complete() callback.

function subscriber(observer) {
  observer.next('Hello there!');
  observer.complete();
}

What Is RxJS?

As we mentioned earlier, the observable type is not part of JavaScript yet. However, we can use libraries that implement the observable type.

Implementations of the observable include:

We can see from the weekly npm downloads that RxJS is extremely popular.

RxJS stands for Reactive Extensions for JavaScript. According to the documentation:

RxJS is a library for composing asynchronous and event-based programs by using observable sequences.

The RxJS library implements:

  • The observable type.
  • The related types—observer, scheduler and subject.
  • A set of observable creation functions. Observable creation functions make it easy to create observables from common data sources—for example, interval(), fromEvent() and range()—as well as combine observables—for example, concat(), race() and zip().
  • A set of operators. Operators let us operate on each item in the observable data sequence. RxJS operators cover a lot of operations that we might want to perform on our data. These include operations to transform data, filter data, perform mathematical calculations and more. map(), filter() and reduce() are examples of operators provided by RxJS that we’re already familiar with from arrays in JavaScript.

In this article we will focus on the observable and observer types.

Let us have a closer look at the observable type in RxJS next.

The Observable Class in RxJS

RxJS implements observable as a class with a constructor, properties and methods.

The most important methods in the observable class are subscribe and pipe:

  • subscribe() lets us subscribe to an observable instance.
  • pipe() lets us apply a chain of operators to the observable before subscribing to it. (If interested, you can read A simple explanation of functional pipe in JavaScript by Ben Lesh to learn how the pipe function enables tree-shaking, which is not possible with prototype augmentation.)

The observable class also has the following method:

  • forEach()—a non-cancellable means of subscribing to an observable, for use with APIs that expect promises

Additionally, the observable class has various protected properties for the RxJS library’s internal use, meaning we should not use these properties directly in our application code.

Creating an Observable in RxJS

As expected, we use the observable constructor to create an instance of observable:

import { Observable } from 'rxjs';

const myObservable$ = new Observable(subscriber);

function subscriber(observer) {  
  // Produce data
  // Emit data
  // Notify if error
  // Notify if/when complete

  return () => {
    // teardown logic
  };
}

Creating an observable in RxJS is pretty much the same as what we saw in the TC39 proposal, except we need to import the observable class from the RxJS library to use it.

It is customary to add the $ sign at the end of the variable name containing an observable. This is a helpful convention started by Andre Stalz that makes it easy to see at a glance we are working with an observable.

If we inspect the above observable instance, we see it has the subscribe() and pipe() methods, together with forEach() and the private properties.

The following methods in the list have been deprecated and will be removed in RxJS v8:

  • toPromise()—returns a promise that resolves to the last value emitted by the observable when it completes. It has been replaced with firstValueFrom and lastValueFrom and will be removed in v8. Please refer to https://rxjs.dev/deprecations/to-promise and this inDepthDev article—RxJS heads up: toPromise is being deprecated—for more details.
  • lift()—creates a new observable, with this observable instance as the source, and the passed operator defined as the new observable’s operator. However, this is an implementation detail and we should not use it directly in our application code. It will be made internal in v8.

observable instance list: _isScalar, _subscribe, _trySubscribe, forEach, lift, operator, pipe, source, subscribe, toPromise

The Subscribe Function

The observable constructor expects a function as its parameter. The RxJS library names the argument subscribe. Therefore, we could refer to the function passed into the constructor as the “subscribe function.”

constructor(subscribe?: (this: Observable<T>, subscriber: Subscriber<T>) => TeardownLogic) {  
    if (subscribe) {  
      this._subscribe = subscribe;  
    }  
  }

As we see, the subscribe function takes a subscriber as a parameter and returns a function containing the teardown logic. The constructor stores the subscribe function in an internal class property called _subscribe.

The TC39 proposal names the subscribe function similarly—subscriber.

The subscribe/subscriber function is very important for two reasons:

  1. It defines what the observable instance would do—that is, it defines how to produce data, and send data and notifications to the subscriber (observer).
  2. It is the function that is executed when we subscribe to the observable instance.

The Observable Function

To avoid confusing the “subscribe function” with the observable class’ subscribe() method, in the rest of this article we will refer to the function we pass to the observable constructor as the “observable function.”

Calling it observable function highlights that this function contains the body of the observable. Whereas calling it the subscribe function highlights that this function is invoked when we subscribe to the observable.

How is the observable function different from other functions?

A function usually takes an input, acts on the input and returns a single value.

An observable function is a higher order function that:

  • takes a subscriber object as input (the subscriber object contains the callback functions)
  • produces data
  • sends a sequence of values, error notification or completion notification to the subscriber by calling its corresponding callback functions
  • optionally returns a teardown function

Now that we’ve seen that “subscribe function,” “subscriber function” and “observable function” are all names we may call the function we pass to the observable constructor and talked about what it does, let us talk about how subscribers relate to observers.

Sequence of Values

We said that an observable can emit zero to multiple values. But how does an observable emit multiple values?

The observable function can call the next() callback multiple times, thus it can emit a sequence of values. Since the observable can emit a sequence of values over time, it is also referred to as a data stream.

The number of values in the sequence depends on the observable instance. An observable may do any of these:

  • produce a single value and then complete
  • produce multiple values before it completes
  • continue producing values until we tell it to stop by unsubscribing
  • not produce any values at all

Synchronous or Asynchronous

Do observables call the observer callbacks synchronously or asynchronously?

In order to answer this question, we need an understanding of what it means to call a function asynchronously.

Please read the accompanying article “Angular Basics: Introduction to Processes and Threads for Web UI Developers” to learn more about processes and threads and asynchronous programming.

Following is a quick explanation for convenience.

Main Thread of the Renderer Process

Modern browsers have a multi-process architecture. Instead of running everything in one process, browsers create multiple processes to take care of different parts of the browser.

Browsers typically have a separate process for rendering web pages.

The main thread of the renderer process is responsible for:

  • rendering the web page
  • running the application’s JavaScript (except workers)
  • responding to user interactions

Our application code includes JavaScript and Web APIs. We use Web APIs (also known as Browser APIs) to provide a variety of features to enhance our web application.

Browser APIs are built into your web browser and are able to expose data from the browser and surrounding computer environment and do useful complex things with it. —MDN

Our application’s JavaScript (except workers) runs on the main thread of the Renderer process in the browser. Calls to Web APIs may run on another process in the browser. A web worker runs the script on a worker thread in the renderer process.

Worker Threads

JavaScript code that takes too long to execute blocks the renderer process’s main thread. That is, while the main thread is waiting for the JavaScript code to return, it cannot update the rendering or respond to user interactions. This negatively impacts the user experience of our application.

Not to worry though—we can offload computationally intensive functions in our applications to run on worker threads by using the Web Workers API. A worker thread executes the script and communicates the result to the application running on the main thread by posting a message. The application has an onmessage event to process the result.

Web APIs

Besides keeping the main thread from blocking, we can use Web APIs to access privileged parts of a browser from our web applications.

A browser’s renderer process is typically sandboxed for security. This means the web application code cannot directly access the user’s files or camera, make network requests or operating system calls, etc. Instead, we use Web APIs provided by the browsers to access privileged parts of a browser in our web applications.

It is important to highlight that calls to these Web APIs are not executed on the renderer process, but on a process with more privilege such as the main browser process.

For example, we can use the Fetch API or XMLHttpRequest to request data from the network. In Chrome, the network thread in the browser process is responsible for fetching data from the internet.

Callbacks, Task Queues and Event Loop

The tasks performed on another thread (other than the renderer process’s main thread) are asynchronous tasks. The process/thread performing the asynchronous task communicates with the renderer process using Inter-Process Communication (IPC).

We define callback functions to be executed once the asynchronous tasks are completed. For example:

setTimeout(() => console.log('This is the callback function passed to setTimeout'), 1000);

The callback processes any results returned by the asynchronous task. For example:

// navigator.geolocation.getCurrentPosition(successCallback, errorCallback);

navigator.geolocation.getCurrentPosition(console.log, console.warn);  

When an asynchronous task is completed, the thread performing the asynchronous task adds the callback to a queue on the main thread of the renderer process.

The renderer process has queues (job queue, task queue, or message queue and a microtask queue) for asynchronous callbacks that are ready to run on the main thread. The renderer process also has an event loop that executes the queued callbacks when the JavaScript callstack is empty. The event loop executes the queued callback passing in any value returned by the asynchronous task as an argument.

Back to the question: Do observables call the observer callbacks synchronously or asynchronously?

The answer is: It actually depends on the observable instance. Observables can emit data synchronously or asynchronously—it depends on whether the observable function performs a synchronous task or asynchronous task to produce data.

Just because observables use callbacks to send data and notifications does not mean that the callbacks are always executed asynchronously—that is, added to a task or microtask queue to be executed by the event loop.

Observables Can Emit Data and Notifications Asynchronously

If the observable function performs an asynchronous task to produce data, then it emits the data asynchronously.

For example, an observable may fetch resources from the network using the browser’s Fetch API:

pikachu$ = new Observable(observer => {  
  fetch('https://pokeapi.co/api/v2/pokemon/pikachu')  
    .then(response => response.json())  
    .then(pikachu => {  
      observer.next(pikachu);  
      observer.complete();  
    })  
    .catch(err => observer.error(err))  
});

pikachu$.subscribe({
  next: pikachu => console.log(pikachu),
  error: err => console.error(err)
});

Fetching data from the network is an asynchronous task that is carried out by a network thread. The fetch() method returns a promise object that lets us process the results of the asynchronous task.

We pass a success callback to the promise object by calling its then() method. In the success callback, we emit the data returned from fetch by calling observer.next(pikachu) and also notify the observer that we have finished sending data by calling observer.complete().

We also pass an error callback to the promise by calling the catch() method. In the error callback, we notify the observer of the error by calling observer.error(err) and passing in the error information.

The promise object queues the success or error callback in the microtask queue so the event loop can execute it when the callstack is empty. Thus, the observer methods (next and complete, or error) are called asynchronously in this observable.

Observables Can Emit Data and Notifications Synchronously

Observables can also emit data and notifications synchronously.

const colourPalette$ = new Observable(observer => {
  const palette = [
    'hsl(216,87%,48%)', 
    'hsl(216,87%,48%)', 
    'hsl(42,99%,52%)', 
    'hsl(7,66%,49%)'
  ];
  for (let colour of palette) {
    observer.next(colour);
  }
  observer.complete();
}

colourPalette$.subscribe(console.log);

The observable function above produces data synchronously. That is, it assigns an array of string values to the constant palette (which is the data source). It then calls observer.next(colour) for each color in the palette, then calls the observer.complete() callback, and finally returns.

When we call next() in this observable instance, the JavaScript engine creates an execution context for the function and adds it to the callstack. No queues or event loop are involved.

Cold vs. Hot Observables

The observable could get its data from any source really. It could get data from various Web APIs, such as DOM events, Websockets, Fetch or Geolocation. It could loop over an iterable, or even send hard-coded values like we often do in blog posts and tutorials.

The code responsible for producing data for an observable is the actual producer part of the observable. It is important to highlight that we could define the producer within the observable function body or reference a producer that has been defined outside the observable body.

A cold observable contains the code to produce data, while a hot observable closes over it.

Let us take a closer look at cold and hot observables next.

Cold Observables

The characteristics of cold observables follow from data being produced as part of the observable function.

  • Cold observables won’t produce data until we subscribe. When we subscribe to an observable, it executes the observable function. Since the code for the producer is included within the observable function, it only runs when the observable function is called.
  • Cold observables are unicast. Each subscription executes the observable function and thus the code to produce data. For example, if the observable creates an instance of an object or a random value, each observer will get its own separate instance or unique value.

The observables we have created so far in this article are cold observables. Let us have a go at creating a few more, this time keeping in mind that the code for producing data is a part of the observable function.

Example 1: A cold observable using the Geolocation API to get the current location of the user’s device and emit the location to its observer.

import { Observable } from 'rxjs';

const location$ = new Observable(observer => {  
  let watchId;
  const success = position => {  
    observer.next(position);  
  };
  const error = err => {  
    observer.error(err);  
  };
  const geolocation = `navigator.geolocation;`
  if (!geolocation) {  
    observer.error('Geolocation is not supported by your browser');  
  } else { 
    watchId = geolocation.watchPosition(success, error);  
  }
  return () => geolocation.clearWatch(watchId);
});

Data: The current position of the user’s device.

Producer: navigator.geolocation.watchPosition().

Code explanation:
The Geolocation API allows the user to provide their location to web applications if they so desire. For privacy reasons, the user is asked for permission to report location information.

navigator.geolocation.watchPosition() takes a success callback, an optional error callback and options.

When watchPosition() has successfully located the user’s device position, it will call the success callback and pass in the position. We emit the user’s position in the success callback. watchPosition() will execute the success callback each time it has an updated position. Therefore, the observable function will continue emitting the updated position.

On the other hand, there could be an error, such as the Geolocation API doesn’t exist on the user’s browser or the user denied permission to report their location information. We notify the user of the error by calling observer.error(err).

location$ is a cold observable since it defines its producer within the observable. It will only start producing and emitting values when we subscribe to it. Each observer will create a new watch. When an observer unsubscribes, it will only unregister its own success and error handlers.

Example 2: A cold observable instance where the observable function creates a random number using the JavaScript built-in Math object.

import { Observable } from 'rxjs';

const randomNumberCold$ = new Observable(observer => {  
  const random = Math.random();  
  observer.next(random);  
  observer.complete();  
});

Data: a random number.

Producer: Math.random().

Each observer gets a separate random value since each subscription executes Math.random():

randomNumberCold$.subscribe(console.log); // 0.8249378778010443
randomNumberCold$.subscribe(console.log); // 0.36532653367650236

Hot Observable

Hot observables emit data that was produced outside the observable function body.

The data is generated independently of whether an observer subscribes to the observable or not. The observable function simply accesses the data that is already produced (outside the function) and emits the data to observers.

All the observers will get the same data. Thus, a hot observable is said to be multicast.

For example, here’s the random number example rewritten as a hot observable.

const random = Math.random();
console.log(random); // 0.05659653519968999 

const randomNumberHot$ = new Observable(observer => {  
  observer.next(random);  
  observer.complete();  
});

The random number is generated independently of our subscriptions to randomNumberHot$. You’ll notice that we haven’t subscribed to observable yet.

Each observer randomNumberHot$ gets the same random number because Math.random() is only executed once.

randomNumberHot$.subscribe(console.log); // 0.05659653519968999

Built-in Observable Creation Functions in RxJS

So far in this article, we have created observables from scratch. That is, we used the new operator on the observable constructor and passed the observable function as an argument. We defined the body of the observable in the observable function.

However, we have hard-coded values in the observable function. How can we make the observables customizable and reusable?

You’re probably thinking, Hey, functions are customizable and reusable—we should use functions. Well, that’s a brilliant idea. We can create functions that accept parameters, create a new observable based on these parameters, and return the observable instance.

The good news is that RxJS provides observable creation functions for most tasks so we don’t need to write them ourselves.

Let us look at some of the commonly used observable creation functions provided by RxJS:

  • from() expects an array, an array-like object, a promise, an iterable object or an observable-like object as its parameter. And it returns an observable that emits the items from the given input as a sequence of values.
from([5, 50, 100]).subscribe(console.log);
// 5
// 50
// 100
  • of() expects multiple parameters and creates an observable that emits each parameter as a value, then completes.
of([5, 50, 100], [10, 100, 200]).subscribe(console.log);
// [5, 50, 100]
// [10, 100, 200]

You may also be interested to learn about generate() and range().

Events

  • fromEvent() expects a target and event name as its parameters and returns an observable that emits the specified event type from the given target.
import { fromEvent } from 'rxjs';

const drag$ = fromEvent(document, 'drag');
drag$.subscribe(console.log);
const drop$ = fromEvent(document, 'drop');
drop$.subscribe(console.log);

You may also be interested to learn about fromEventPattern().

Timers

  • The interval() observable creation function returns an observable that emits the next number in the sequence at the specified interval.
import  { interval } from 'rxjs';

const seconds$ = interval(1000);
seconds$.subscribe(console.log);

const minutes$ = interval(60000);
minutes$.subscribe(console.log);

You may also be interested to learn about timer().

Creating Observables Dynamically

  • defer() allows us to create an observable only when the observer subscribes.

Combining Observables

You may also be interested to learn about splitting an observable using the partition() function.

Please refer to the RxJS docs for detailed explanations of the observable creation functions. If curious, you can also look at the implementation for a few of these functions.

Tune in to the Next Part

Next time we’ll talk about the process of subscribing to an observable, and unsubscribing vs. completing.
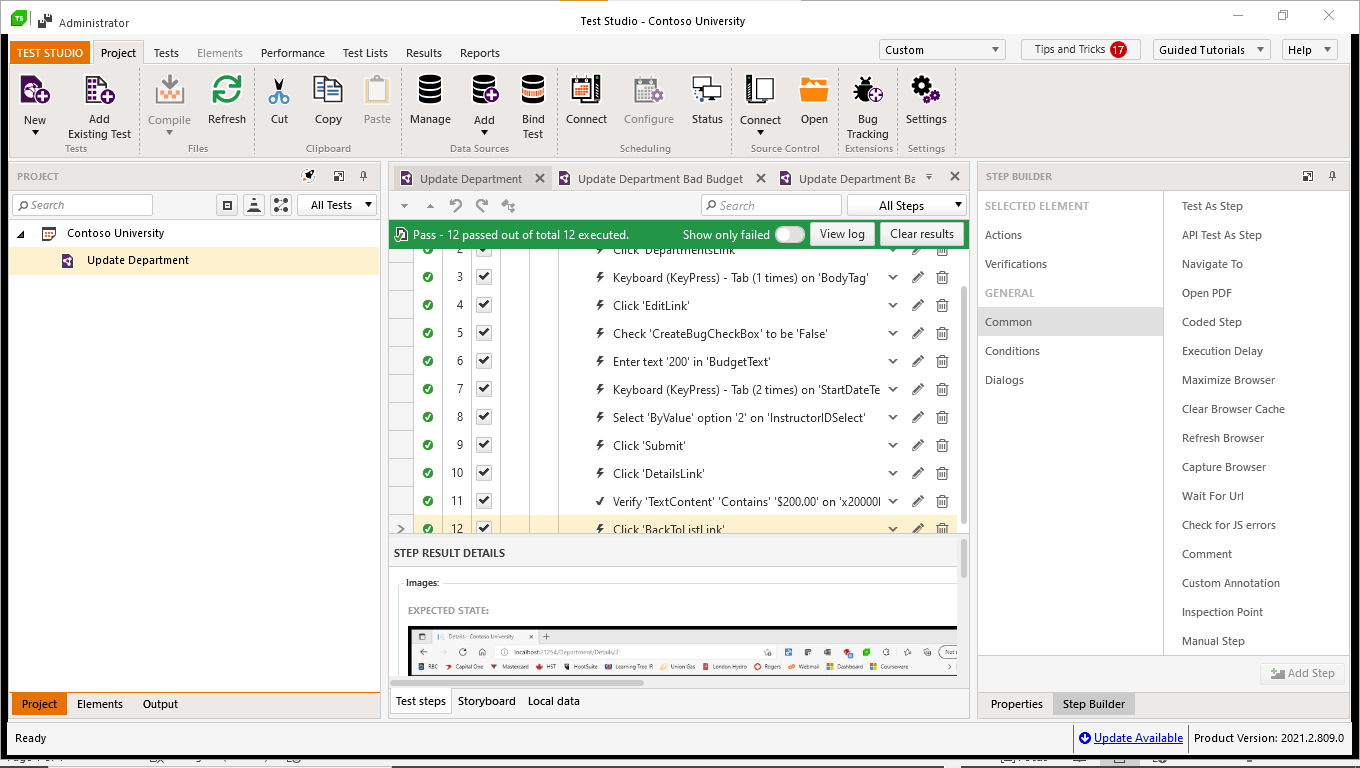
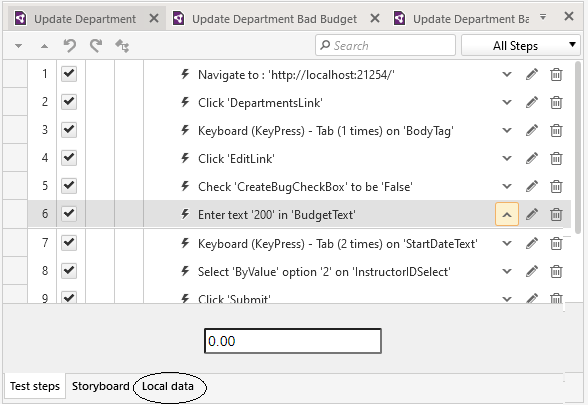
Just Announced: Telerik & Kendo UI R1 2022 Release Webinars Feb. 1-3

$
0
0

Save your seat for the Telerik and Kendo UI R1 2022 release webinars!

We are happy to announce that the first release of 2022 for Telerik and Kendo UI is coming on January 19, bringing you major updates across all .NET and JavaScript UI libraries and productivity tools. There’s a lot of punch added to your favorite tools, so hurry up and save your seat for the Telerik and Kendo UI R1 2022 release webinars!

Join our developer advocates and product teams for the live R1 2022 release webinars and Twitch demo sessions to see the full set of new components and major updates across all libraries and tools!

Once you check out what we have in store for each product (hint: find the details in the webinar pages linked below), you will probably notice a common thread in our last few releases. It started with the release of the Telerik and Kendo UI Kits for Figma in R3 2021, and continues in 2022. We are making sure that our web libraries not only save you a ton of time, but they can also serve as your solid foundation to create, maintain and make the most of your company’s very own design system, no matter how big your team is.

Find out what’s new in your favorite tools! You can register for more than one webinar.

Kendo UI R1 2022 Release Webinar

Tuesday, February 1, 11:00 am – 1:00 pm ET

Kendo UI R1 2022 release webinar

The webinar will cover all updates across KendoReact and Kendo UI for Angular, Vue and jQuery. Here are some of the highlights we will go over:

  • 25+ new components across the board to build powerful web apps
  • More tools and features to simplify the collaboration between developers and designers: expanded Figma design kits (new components added) and theme improvements
  • Native Angular 13 support
  • New sample applications
  • And more!

Save Your Seat

Telerik .NET Web, Desktop & Mobile Products Webinar

Wednesday, February 2, 11:00 am – 1:00 pm ET

Telerik Web, Desktop & Mobile R1 2022 release webinar

Discover all updates across Telerik UI for Blazor, UI for ASP.NET Core, UI for ASP.NET MVC, UI for ASP.NET AJAX, UI for WPF, UI for WinForms, UI for WinUI, UI for Xamarin and UI for .NET MAUI. Here are some of the highlights we will go over:

  • Telerik UI for Blazor—now the only Blazor UI library with 90+ truly native components
  • NET 6 Official and Visual Studio 2022 support so you can immediately start playing with the latest technology
  • REPL Playgrounds launched: New browser-based tools for Blazor and ASP.NET Core developers to write, run, save and share code snippets
  • Growing .NET MAUI & WinUI suites—and the largest on the market
  • Plenty of new components and advanced features across the board to build powerful apps
  • More tools and features to simplify the collaboration between developers and designers: Expanded Figma design kits (new components added) and theme improvements for the .NET web UI libraries
  • And more!

Save Your Seat

Telerik Reporting, Automated Testing, Mocking and Debugging Tools Webinar

Thursday, February 3, 11:00 am – 1:00 pm ET

Telerik Productivity Tools R1 2022 release webinar

This webinar will cover updates across Telerik Reporting, Test Studio, JustMock and Fiddler Everywhere. Here are some of the highlights we will go over:

  • Enjoy the new Report Assets Manager & React Report Viewer for Telerik Reporting
  • Automated tests in Docker containers for Test Studio Dev Edition
  • Improved performance for the JustMock Profiler
  • .NET 6 and Visual Studio 2022 support
  • And more!

Save Your Seat

Join Us on Twitch

Join the live demo sessions on Twitch to see the newly released components and features in action and get ideas on how to use them in your projects. Chat with the team and get your questions answered on the spot!

Twitch Sessions:

  • Monday, January 24 I 10:00 am ET I .NET Desktop & Mobile Products
  • Tuesday, January 25 | 10:00 am ET I .NET Web Products
  • Wednesday, January 26 I 10:00 am ET I React
  • Thursday, January 27 I 10:00 am ET I Angular
  • Friday, January 28 I 10:00 am ET I Test Studio, Reporting & Fiddler

Add the Twitch sessions to your calendar.

And the Best Part About the Release Webinars?

The live webinars and Twitch sessions are a great opportunity for you to ask questions before and during the webinars. We’ll be waiting to hear from you on Twitter—just use the #heyTelerik and #heyKendoUI hashtags. Another great option is the live chat during our release sessions on CodeItLive, our Twitch channel.

Sign up today to make sure you don’t miss these great events with our experienced developer advocates:

  • Ed Charbeneau, Microsoft MVP, speaker, author of “Blazor: A Beginner’s Guide” and host of Blazing into Summer week of Blazor events
  • Sam Basu, Microsoft MVP, speaker, DevReach co-organizer and author of numerous articles on Xamarin.Forms
  • Alyssa Nicoll, Google Developer Expert and Angular Developer Advocate
  • Kathryn Grayson Nanz, Developer Advocate with a passion for React, UI and design
  • Carl Bergenhem, Kendo UI Product Manager, speaker and host of many JavaScript events

See you soon!

Customizing the React Rich Text Editor: KendoReact Tutorial

$
0
0

Need a great React Rich Text Editor? The KendoReact Editor should be on your shortlist! You know it’s feature rich, but how customizable is it? Let’s find out.

Showing content to our users is only half the battle—in most situations, an application also needs to handle user input content as well.

For your more standard inputs, like Text Boxes, Range Sliders, Switches, Color Pickers and other elements you might find in a form, the KendoReact Inputs library has you covered.

However, sometimes your users need to be able to do a lot more with their content, including formatting (like bolding, coloring, changing the alignment, etc.), or embedding images, creating tables for data, using bulleted or numbered lists, linking content … basically, full-on word processing. For that, you’ll want the KendoReact Editor.

The KendoReact Rich Text Editor has a long list of awesome features (and I highly encourage you to check them out in detail in our docs)—but, in the interest of writing a blog post and not The Next Great American Novel, we’re going to focus on the features that allow you to customize the Editor.

Defining Input Rules

Input rules allow you to modify the user’s input as they’re creating it, by matching their input with a set of rules you’ve created using regex.

For example, in our docs, we have a set of great input rules we’ve created to match Markdown syntax. This allows us to do things like convert hash characters (###) into h# headings, backticks (`) into code blocks, and dashes (-) into bullets for a bulleted list. You could also use custom input rules to do small quality-of-life improvements, like converting double dashes (--) into a proper em dash (—), or triple dots (...) into actual an ellipsis (…).

In fact, it would be totally possible to swap out any specific word for another one, creating your own custom autocorrect, which we’ll do in the example below. All that to say—the sky (or, maybe just your regex knowledge) is the limit on creating your own custom input rules!

Here, I’ve created a custom rule that looks for the string “hello” and changes it to “hi.” To do so, I made sure I had imported ProseMirror (an external engine that we used to help create the Editor), then defined inputRule, which will return any rules we write. Any custom rules you want to add to your Editor should be returned by inputRules! To create a new rule, you just use new InputRule, then open parenthesis and define the rule by setting the input you’re looking for and the input you’d like to replace it with, separated by a comma.

const inputRule = (nodes) => {
  return inputRules({
    rules: [
            new InputRule(/hello$/, 'hi'),
            new InputRule(/*define your rule here */)
        ],
  });
};

After that, we just make sure that, onMount, we load those input rules as part of our plugins list, and then return the updated EditorView. That makes sure that the React Rich Text Editor renders with our new input rules in place.

const onMount = (event) => {
  const state = event.viewProps.state;
  const plugins = [...state.plugins, inputRule(state.schema.nodes)];
  return new EditorView(
    {
      mount: event.dom,
    },
    {
      ...event.viewProps,
      state: EditorState.create({
        doc: state.doc,
        plugins,
      }),
    }
  );
};

It’s just that easy! I recommend that you don’t follow in my footsteps by replacing random words as the user is typing—rather, consider how your users normally create content and what you could do to automate their most common needs to make their lives easier. Remember that changing content automatically can be a double-edged sword—it’s useful when we’re able to predict our users’ needs correctly, but can create a frustrating user experience when we’re not. Make sure you’re implementing these rules alongside lots of user testing and validation!

Customizing Tools & Creating New Ones

Because every app is different and every userbase is different, every React WYSIWYG editor needs to be different, too. Will your users be primarily creating lists? Writing essays? Inputting code snippets? Depending on what you plan to do with the content afterward, you might not want your users to be able to change the text color or embed images.

Every component we create is made to be highly flexible because we understand that not every problem can be answered with the same solution. Ultimately you, as the developer, know what’s best for your userbase—and you should be able to customize every component you use to give your users the tailored and intuitive experience they deserve.

That means that in our React Rich Text Editor, you get to decide which tools appear in the toolbar above the WYSIWYG panel—include the ones you need, and leave out the ones you don’t. To take it even a step beyond that, you can also customize any of the tools in our existing suite, or create your own totally new tools and put them in the toolbar alongside ours if there’s something you need to allow your users to do that’s unique to your application. Add your own buttons, dropdowns, toggles—whatever you need, we’ve got you covered.

In this example, we’ve customized the existing font-size dropdown selector. And once again, I’m giving an excellent “do as I say, not as I do” example, because here I’m only offering my users two font sizes: 10pt and 50pt. Go big or go home, I say.

To do this, we create a new file, which I’ve called myFontSize.jsx. There, we import EditorTools and EditorToolsSettings, and then use EditorToolsSettings.fontSize to make adjustments to the Font Size tool. In this case, we define an object that includes as many items as we want to appear in the dropdown, as well as the text that will appear to the user and the value that will be applied to the font-size style.

const fontSizeToolSettings = {
  ...EditorToolsSettings.fontSize,
  items: [
    {
      text: '10',
      value: '10pt',
    },
    {
      text: '50',
      value: '50pt',
    },
    {
        text: /* Your dropdown text here */
        value: /* Your font-size value here */  
    }],
};

Then to implement the changes we made to the font size tool settings, we create and export a new component that will take the place of the old font size tool, but with our customizations applied:

const CustomFontSize =
  EditorTools.createStyleDropDownList(fontSizeToolSettings);

const MyFontSizeTool = (props) => <CustomFontSize {...props} />;

export default MyFontSizeTool;

And then back in the file where we’re using our React Text Editor, we can just import MyFontSizeTool and call it in the Editor tool list, just like any pre-existing tool!

<Editor
  tools={[MyFontSizeTool]}
/>

With this, you can create a toolbar full of totally custom tools, adjust our existing tools, or use any combination of those alongside our existing suite of tools. Whether you’re looking for a fully featured word processing component, or a streamlined user-friendly text editor with only a few necessary tools, the KendoReact Rich Text Editor fits the bill.

What you see isn’t what you get with the React Rich Text Editor—there’s so much more under the surface!

Our Editor is deceptively simple—intuitive and easy to use on the user side, but with depths of customization and configuration for developers hidden below. The sky is truly the limit with this component, and our extensive docs and support resources are there to support you every step of the way.

Ready to give it a shot? Try the whole suite of components free for 30 days, and see if our Rich Text Editor is just your type (get it??).

Viewing all 4338 articles
Browse latest View live


<script src="https://jsc.adskeeper.com/r/s/rssing.com.1596347.js" async> </script>