Quantcast
Channel: Telerik Blogs
Viewing all 4336 articles
Browse latest View live

Adding a Dark Mode to Your KendoReact Application

$
0
0

Whether your team is just looking to quickly implement an out-of-the-box dark mode, or looking to create a fully custom dark mode theme, KendoReact gives you the tools to customize our components to your heart’s content!

So, you want to add a dark mode to your application using KendoReact? You’re not alone! Dark mode is hugely popular for many reasons. It’s easier on the eyes, saves battery on mobile devices and laptops, looks sleek and can be a great accessibility feature if configured correctly. It’s always nice to be able to offer another feature to your users—and, with as popular as dark mode has become, more and more users are coming to expect it as part of an application’s default offerings!

KendoReact is highly customizable and themeable, including (but not limited to) the option to add dark mode to your app. In fact, there are several different ways to achieve this goal, depending on the level of design customization you’re interested in making to your dark mode implementation. We’ll look at all the options, and you can decide which will be the best fit for your team and application.

KendoReact Theming

Before we dive into the options, let’s talk through how KendoReact defines various terms related to theming and customization:

  • Design themes are an updated set of styles that will alter the look and feel of all components, changing the margin, padding, border radius and other physical elements of the components. KendoReact offers three beautiful themes (Bootstrap, Material and Default) that you can apply to the full library of 100+ components to change the look and feel to best suit your application. Alternatively, you can create your own theme!

  • Swatches are a set of predefined SASS variables that will alter the color palette of the KendoReact themes, changing which colors are designated as primary, secondary, etc. This does not change the structure of the components, but only the colors applied to them. KendoReact offers multiple pre-made swatches for each theme, or you can create your own!

So, to recap, if you’re looking to change how the components structurally look (e.g., “The legacy part of our application uses Bootstrap, and we still want everything we’re building now to look consistent”), then you want a theme. If you’re looking to change the colors of the components (e.g., “When the user clicks this toggle, it should shift the color scheme into dark mode”), then you want swatches.

Method 1: Use Our Pre-Made Dark Mode Swatches

Maybe you don’t have a designer on your team, or you’re not a big fan of playing around with CSS. Or, hey, maybe you’re just busy! No matter the reason, we’ve got your back with the beautiful dark mode swatches already included as part of KendoReact. Between all our available themes, there are 14 possible pre-existing dark mode swatches created by our designers, available for you to pick and choose from!

To take advantage of these existing swatches, just head over to the KendoReact Theme Builder, choose your theme, and then use the dropdown next to the theme name on the preview and adjustment page to apply a pre-made swatch. Once you’ve found a swatch you like, click the download button in the top right corner.

You’ll be prompted to enter a name for your new theme and swatch combo, and then the styles you picked will be downloaded in a zip file that includes a .SASS file, a compiled .CSS file and a .JSON file. Choose the file that best suits your method for style management, and then you can just drop that file into your app and see the styles applied—without the need for you to edit a single line of CSS.

KendoReact theme builder screenshot showing available swatches

Method 2: Adjust or Create a Swatch Using the Theme Builder

The KendoReact Theme Builder is good for more than just downloading pre-made swatches, though. If you looked at one of our swatches and thought, “This would be perfect if that orange was just a little more red,” then good news—the Theme Builder can do that, too!

If you have existing design assets that include your brand colors, you can customize a swatch to apply to the KendoReact components, ensuring your app is always 100% on brand. Using the inputs in the left-hand sidebar, you can adjust the colors in the Theme Colors section and see them automatically update on the preview components to the right. This allows you to quickly check whether the all the colors work well together, or see if a color is being used somewhere you might not have anticipated.

Screenshot of Theme Colors editor in Theme Builder

You can use this tool to make small tweaks to a pre-existing swatch, or to create something unique! Once you’re happy with your custom dark mode swatch, you can download and apply it just the same as if it were one of our pre-made ones.

Method 3: Use the Figma Kits to Create a Fully Custom Design System

If you’ve got the resources on your team to create and maintain a full design system, then we’ve got the tools to help you apply that design language to your React application! Did you know that we offer Figma Kits that you can use for free (even if you don’t have a license) to fully customize the look and feel of the KendoReact component suite? If your designers want to make changes that go beyond just picking the main colors, the Figma Kits are there to enable them to make as many changes as they like.

Then, you can use the Unite UX UI component styles builder (licensed separately from the UI libraries) to easily adjust and export the styles. Unite UX is a powerful tool that you can leverage to enable your team—no matter the size—to build their own design system quickly and easily.

The design tokens in our Figma Kits are set up to match exactly with the SASS variables used in the KendoReact components, so when you use this tool together with the Unite UX Figma Plugin, you can export files for your full design system that can be dropped directly into your application—and they’ll just work! How often to you get to say that about any kind of engineering project?

Method 4: Edit the SASS Variables by Hand

If you’re the do-it-yourself type, then it’s also a totally valid option for you to edit the SASS variables yourself! This is not our recommended method, mostly just because it’s so much more time-consuming. The tools we’ve created allow you to adjust and preview your styles (either in the Theme Builder or in Unite UX) before exporting a file that we’ve specifically engineered to work perfectly with the styling in each KendoReact component. But, that doesn’t mean you have to do it that way.

If you prefer to get in there and write the code yourself, we’ve provided this list of all our variables for you to edit as you see fit. The linked example here is for the Default theme, but you can find lists for the other three themes as well. You can also find all the available variables for customization of our major components as well—here’s the one for customizing buttons, for example.

Which Method Is Right for Your Team?

Whether your team is just looking to quickly implement an out-of-the-box dark mode, or looking to create a fully custom dark mode theme, KendoReact gives you the tools to customize our components to your heart’s content! After all—it’s your application! It should look exactly how you imagine it. Change up the themes for a totally different look and feel, or just swap out some swatches to create new color palettes—whatever you need and whichever method you choose, know that the KendoReact team is here to support you.


New Release: Fiddler Everywhere 3.0 Is Here!

$
0
0

We are wrapping up the end of the year with a significant Fiddler Everywhere release! The new 3.0 version comes with long-awaited features such as HTTP/2, WebSocket support and much more!

Let’s dive deeper into the flavorful array of new features and enhancements in this release.

New HTTP/2 Support (Beta)

HTTP/2 is a significant revision of the HTTP network protocol. As the man-in-the-middle, Fiddler Everywhere can now capture HTTP/2 traffic that the client requests and can visualize it for you. Are you worried about supporting different protocol versions? Not to worry, Fiddler Everywhere 3.0 handles requests and translation between the two endpoints if the server cannot react with the same protocol version.

This new feature is impressive because you can now inspect HTTP/2 traffic with Fiddler Everywhere, send HTTP/2 requests from the Composer, and apply Rules to all sessions including those using HTTP/2 communication. To ensure you are using this option, you should check the “Enable HTTP/2 support” box under the Connections tab in the Settings dialog. Otherwise, Fiddler Everywhere will force the connection to go through HTTP/1.1 by default.

No matter if you are inspecting System traffic, Preconfigured Browser traffic or traffic from mobile devices, you will see an indication of the HTTP protocol version in the Live Traffic grid:

  • HTTP/2 – if the captured session uses a full HTTP/2 connection
  • HTTP/2 + HTTP/1.1 – if the client requested HTTP/2 connection, but the server does not support the maxed version of the protocol requested

Fiddler Everywhere - HTTP/2 Support

You will notice that the feature is currently marked as Beta. We wanted to get the power it offers in your hands, yet we have plans to polish its functionalities to deliver the ultimate debugging experience for you.

New WebSocket Support

With this release, a highly requested feature that we are adding to Fiddler Everywhere is support for WebSocket communication. The application can now capture information transferred between the client and the server through a single ongoing connection created. This is useful in situations where you want to inspect data sent back and forth in chat applications or live-update websites.

Since the communication is duplex and is happening over a single connection, this will result in only one session visible in the Live Traffic grid with a distinctive icon next to it. When reviewing the session in the Inspectors tab, you will see information from the initiated Handshake and the Messages transferred between the two parties before the connection was closed. While the connection is running, any updates from either the client or the server will appear in the same WebSocket session.

Fiddler Everywhere - WebSocket Support

Each row represents a message sent from one of the parties. Each column indicates the consecutive number of the frame, the sender, the message type, its size and time, and a preview of the message itself. Clicking on the rows will give you additional metadata about the messages. You can use the column filters available from the three dots to see specific messages.

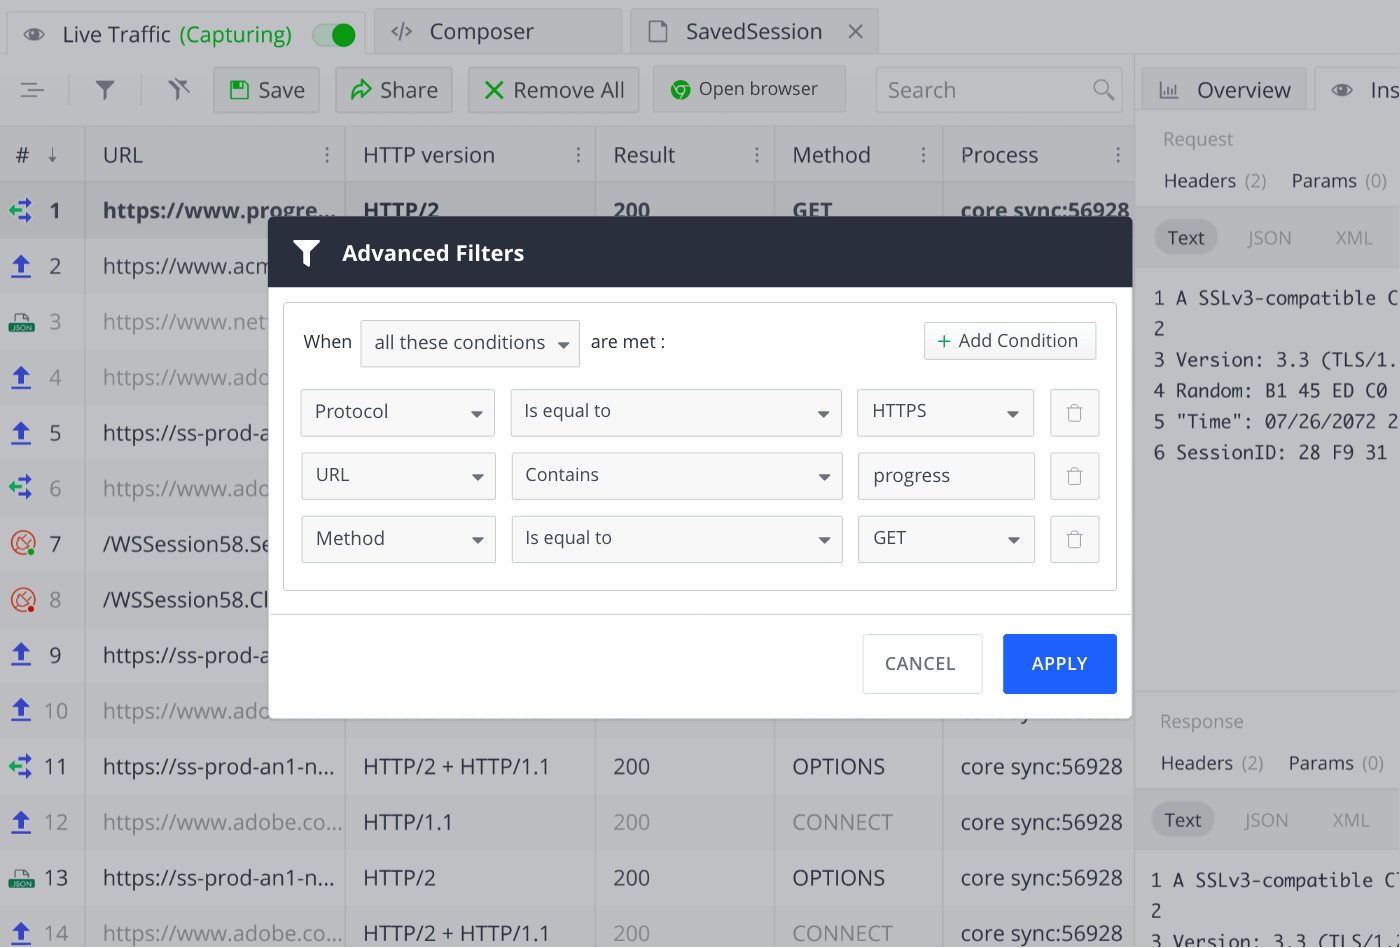
New Advanced Filters

The Advanced Filters option is fully revamped and offers a better user experience to easily apply complex filtering to your sessions list. In terms of functionality, the Advanced Filters are extended and follow the approach of defining the match conditions and the statement based on the traffic to be filtered.

Until now, the filter functionality was limited, and you could apply a filter only based on the Request and Response Headers. With the new release, you can choose from Protocol, Status, IP, URL, Cookie, Body and many more values in addition to the Request and Response Headers. This allows you to build one or multiple complex conditions that will filter the data according to your explicit requirements.

Fiddler Everywhere - Advanced Filters

See the complete list of values that you can match in this documentation article and incorporate the powerful feature to quickly narrow down traffic and find the problematic session. Remember that you can always clear the filtering, which will display all the previously hidden requests due to the applied filters. Also, note that the Advanced Filters option can work on newly captured traffic in the grid and on Saved and Shared sessions.

New Getting Started Experience

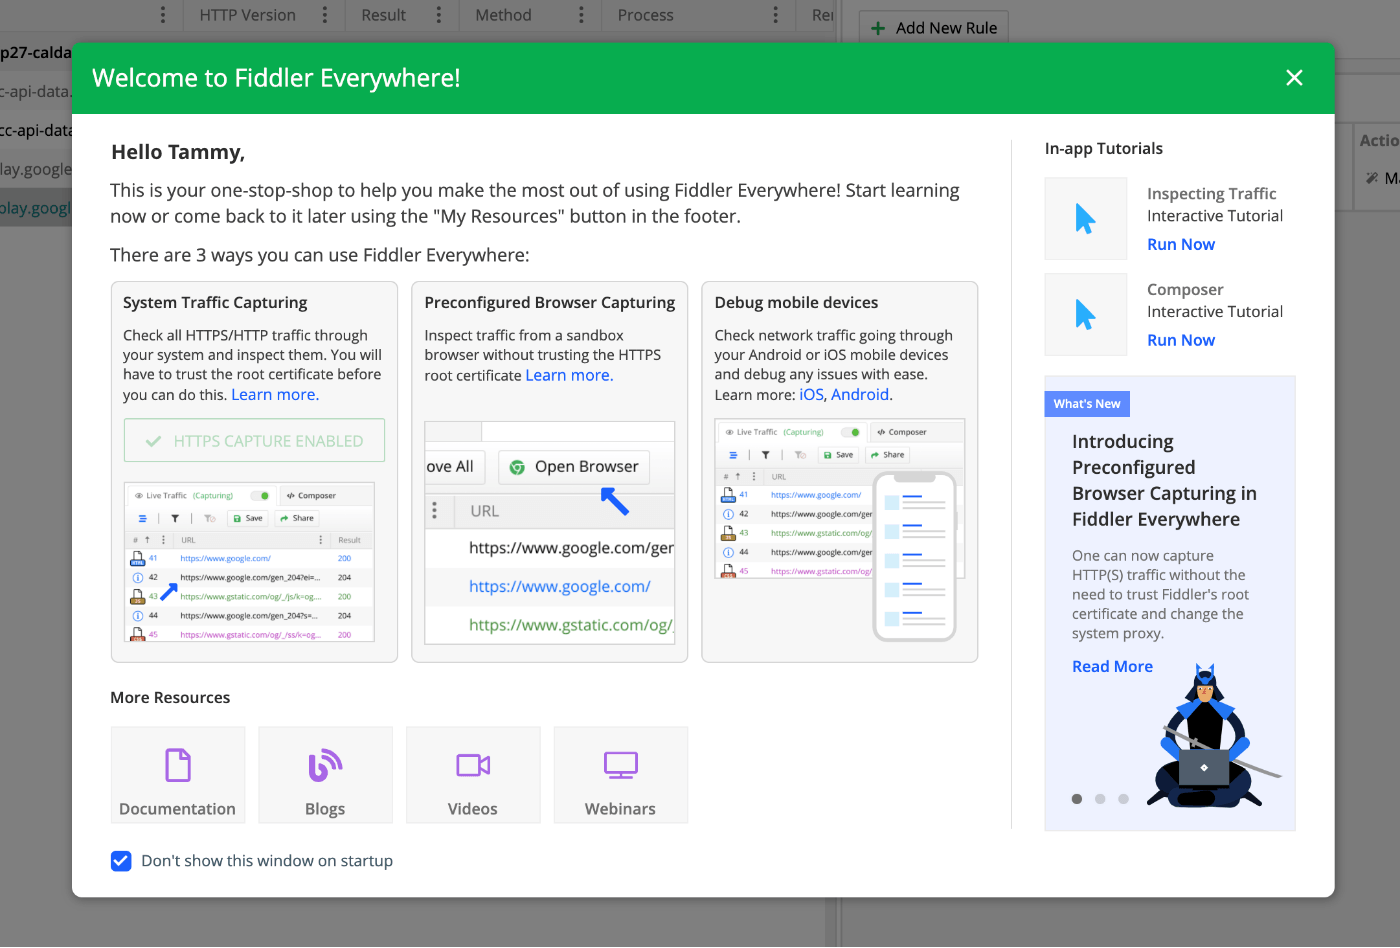
Fiddler Everywhere is now adapted to provide a faster onboarding experience for everyone, whether you are starting up the application for the first time or a power user. We have redesigned the dialog that pops up upon initial launch or after an update to be more informative and actionable.

Inside the dialog, you will see information instructing you how to configure your environment to capture HTTPS traffic.

Fiddler Everywhere - New Getting Started Experience

You are presented upfront with the required steps and setups based on the desired approach you want to go with—System Traffic Capturing, Preconfigured Browser Capturing or Mobile Devices Debugging. “My Resources” can be easily accessed anytime from the left bottom corner.

New Tray Icon

The new System Tray Icon is a feature that provides enhanced convenience. The tray icon aims to help you quickly manage actions and decide on the application’s state via a shortcut. You can use the tray icon on all operating systems—Windows, macOS and Linux.

The tray icon is configured to detect if Fiddler Everywhere has set itself as the system proxy successfully. Clicking on it allows you to enable or stop the traffic capturing by indicating the respective state with a different view.

In addition, you can also choose to Quit the app when you are not using it or even take it out from a minimized state. The last option is helpful when you might be working on multiple screens and need to display the app quickly.

Fiddler Everywhere - New Tray Icon

Thank You

We want to thank you for actively sharing your feedback and suggestions, and we urge you to continue doing so in the Fiddler Everywhere Forum or through the in-product feedback form!

In the meantime, be sure to check out Fiddler Everywhere 3.0 for yourself. New to Fiddler Everywhere? Take advantage of its 30-day trial. If you are already an active user, launch your Fiddler Everywhere application to update to the latest version and implement the new features in your workflow.

'defineComponent' in Vue 3 Is Pure Magic! Do You Know How It Works?

$
0
0

I am sure you have already seen that defineComponent is the key word for TypeScript in Vue 3—but do you know how it works? Let’s take a peek behind the curtain and see where the magic happens!

Imagine the situation: It is the end of a long coding day and all your logic is working perfectly—like a brand-new Ferrari with a V12 engine and only 4 miles on it. But, there’s still that one nasty TypeScript error that doesn’t want to go away, and it’s breaking the build no matter what you try! I’ve been there, and if you’ve felt this way too, please accept this hug from me.

i-feel-you meme two hugging

TypeScript support in Vue 2 was not good enough to use—there were many missing cases and many hacky workarounds. In Vue 3, on the other hand, we have the amazing defineComponent method that makes it very easy to move existing projects to TypeScript—so easy that even your cat could do it for you.

cat in glasses sitting in front of a computer

To TypeScript or Not?

Whether or not you like TypeScript, I’m going to try to convince you that it is one of the greatest new features in Vue 3. Its superpower is to save you time by catching errors and providing fixes before you run code. This actually means that you test while coding.

It also makes it possible to instantly use lots of tools that can increase productivity, like VueDX, Vetur or the amazing Volar for example. Once you set it up, you will be able to use all kind of autocompletions of modules, global components configurations and quick type fixes, and all this will be achieved without the need to even build our project.

I will try to reveal all the information I found about TypeScript in Vue 3 in the lines below—so you can feel much more familiar with it and can think of it as an option when starting a new Vue CLI project.

What Is The Main Idea Behind It?

If you peek at the official Vue 3 documentation, you will notice that there plenty of examples that explain how to use TypeScript in many different scenarios. The coolest part is that in order to have all this working, you don’t have to remember to include different kinds of interfaces for the component. All you have to do is wrap the object of the component setting in a defineComponent function. Having this option provides the ability to instantly embrace TypeScript in even larger codebase projects.

This is exactly the approach that keeps proving that Vue is the easiest JavaScript framework to get started with, isn’t it?

What Would We Do Without 'defineComponent'?

If we had to add the types without the defineComponent function, we would need to add a complicated combination of interfaces before each of our components depending on its content, as it is done in the imaginary example in the code below:

const myComponent: DefineComponent<
  PropsOrPropOptions = {},
  RawBindings = {},
  D = {},
  C extends ComputedOptions = ComputedOptions,
  M extends MethodOptions = MethodOptions,
  Mixin extends ComponentOptionsMixin = ComponentOptionsMixin,
  Extends extends ComponentOptionsMixin = ComponentOptionsMixin,
  E extends EmitsOptions = Record<string, any>,
  EE extends string = string,
  PP = PublicProps,
  Props = Readonly<ExtractPropTypes<PropsOrPropOptions>>,
  Defaults = ExtractDefaultPropTypes<PropsOrPropOptions>
= {
}

That was not pretty code for everyday usage, was it? That exactly is one of the reasons why the anti-TypeScript community exists. Not only that, but we would always have to choose a different interface declaration for each component based on the following five significant Vue declaration cases. If it is:

  1. A setup function
  2. An object format with no props
  3. An object format with array of props
  4. An object format with object props
  5. A custom option definition

That would be a horrible experience, wouldn’t it!? And that is exactly why defineComponent is here!

How Is It Implemented?

The concepts behind defineComponent bring us back to the roots of JavaScript—the pure functions and TypeScript function overloading. To make it easy for users, all the logic is hidden behind one name: defineComponent.

We always pass any object and return the correctly typed object. All the cases for different objects that could create a Vue component are handled in separate overloads. The exact code for its implementation could be found in the GitHub repository here, but I’ll try to explain each overload below:

If you are not familiar with function overloads, think of them as many functions with the same name, just different parameters (by number or type) that still have the same return type.

The first overload is dealing with the case when we create the component from a setup function:

// overload 1: direct setup function
defineComponent({
    setup (props, ctx) {
    return {…}
}
});

The second one is the case when the props are defined as an empty object:

// overload 2: object format with no props
defineComponent({
    props: {},
    
});

The third one is the case when the props of the component are defined as array of strings and defineComponent is expecting props as an interface of a collection—Readonly<{ [key in PropNames]?: any }>. Here is how it should look:

// overload 3: object format with array props declaration
defineComponent({
props: ['postTitle'],
});

The fourth one is the case when the props are defined as an array of strings and the function is expecting props of type PropsOptions extends Readonly<ComponentPropsOptions>, as shown below:

overload 4: object format with object props declaration
defineComponent({
props: {
  title: String,
  likes: Number
}

The “last but not the least” option is to pass an object or type unknown or an object with defined setup and name:

// implementation, close to no-op
defineComponent({
setup: function,
name: ‘some name’
});

As you see, all these cases are responsible for different scenarios, yet the return type is always the same: a defineComponent interface with all the types you need to apply for the props, data and the other settings that are needed for the component. Yet another piece of evidence that the best solutions are usually the simplest ones.

Deeper Precision

Using defineComponent is extremely helpful and allows you to grab your project and join the dark forces of TypeScript world—yet if you want to have correct types on all the properties that could be used in the component, you may need to add a bit more love.

Below is the cheat sheet piece of code that I personally use to peek from time to time at how to add types correctly in a Vue component:

export default defineComponent({
  name: 'TypescriptExamples',
  props: {
    name: {
      type: String,
      required: true
    },
    id: [Number, String],
    success: { type: String },
    callback: {
      type: Function as PropType<() => void>
    },
    book: {
      type: Object as PropType<Book>,
      required: true
    },
    metadata: {
      type: null // metadata is typed as any
    },
    bookA: {
      type: Object as PropType<Book>,
      // Make sure to use arrow functions
      default: () => ({
        title: 'Arrow Function Expression'
      }),
      validator: (book: Book) => !!book.title
    },
    bookB: {
      type: Object as PropType<Book>,
      // Or provide an explicit this parameter
      default(this: void) {
        return {
          title: 'Function Expression'
        }
      },
      validator(this: void, book: Book) {
        return !!book.title
      }
    }
  },
  setup(props) {
    const result = props.name.split('') // correct, 'name' is typed as a string
    const year = ref(2020)
    const yearsplit = year.value.split('')// => Property 'split' does not exist on type 'number'
    const stringNumberYear = ref<string | number>('2020') // year's type: Ref<string | number>
 
    stringNumberYear.value = 2020 // ok!
    const modal = ref<InstanceType<typeof MyModal>>()
    const openModal = () => {
      modal.value?.open()
    }
    const book = reactive<Book>({ title: 'Vue 3 Guide' })
    // or
    const book1: Book = reactive({ title: 'Vue 3 Guide' })
    // or
    const book2 = reactive({ title: 'Vue 3 Guide' }) as Book
 
    const handleChange = (evt: Event) => {
      console.log((evt.target as HTMLInputElement).value)
    }
    return {
      modal, openModal,
      book, book1, book2,
      handleChange
    };
},
  emits: {
    addBook(payload: { bookName: string }) {
      // perform runtime validation
      return payload.bookName.length > 0
    }
  },
  methods: {
    onSubmit() {
      this.$emit('addBook', {
        bookName: '123'
     //   bookName: 123 // Type error!
      })
 
    //  this.$emit('non-declared-event') // Type error!
    }
  }

Writing Tests With Typescript like a Pro

My favorite part about using defineComponent and TypeScript in Vue 3 is adding tests to the project. It is a true game changer in that area and even makes the process delightful because it provides those awesome autocompletions that help cover all the use cases when writing tests.

Even better, TypeScript also reduces the overall number of tests that are needed because the types are checking most of the possible configurations statically.

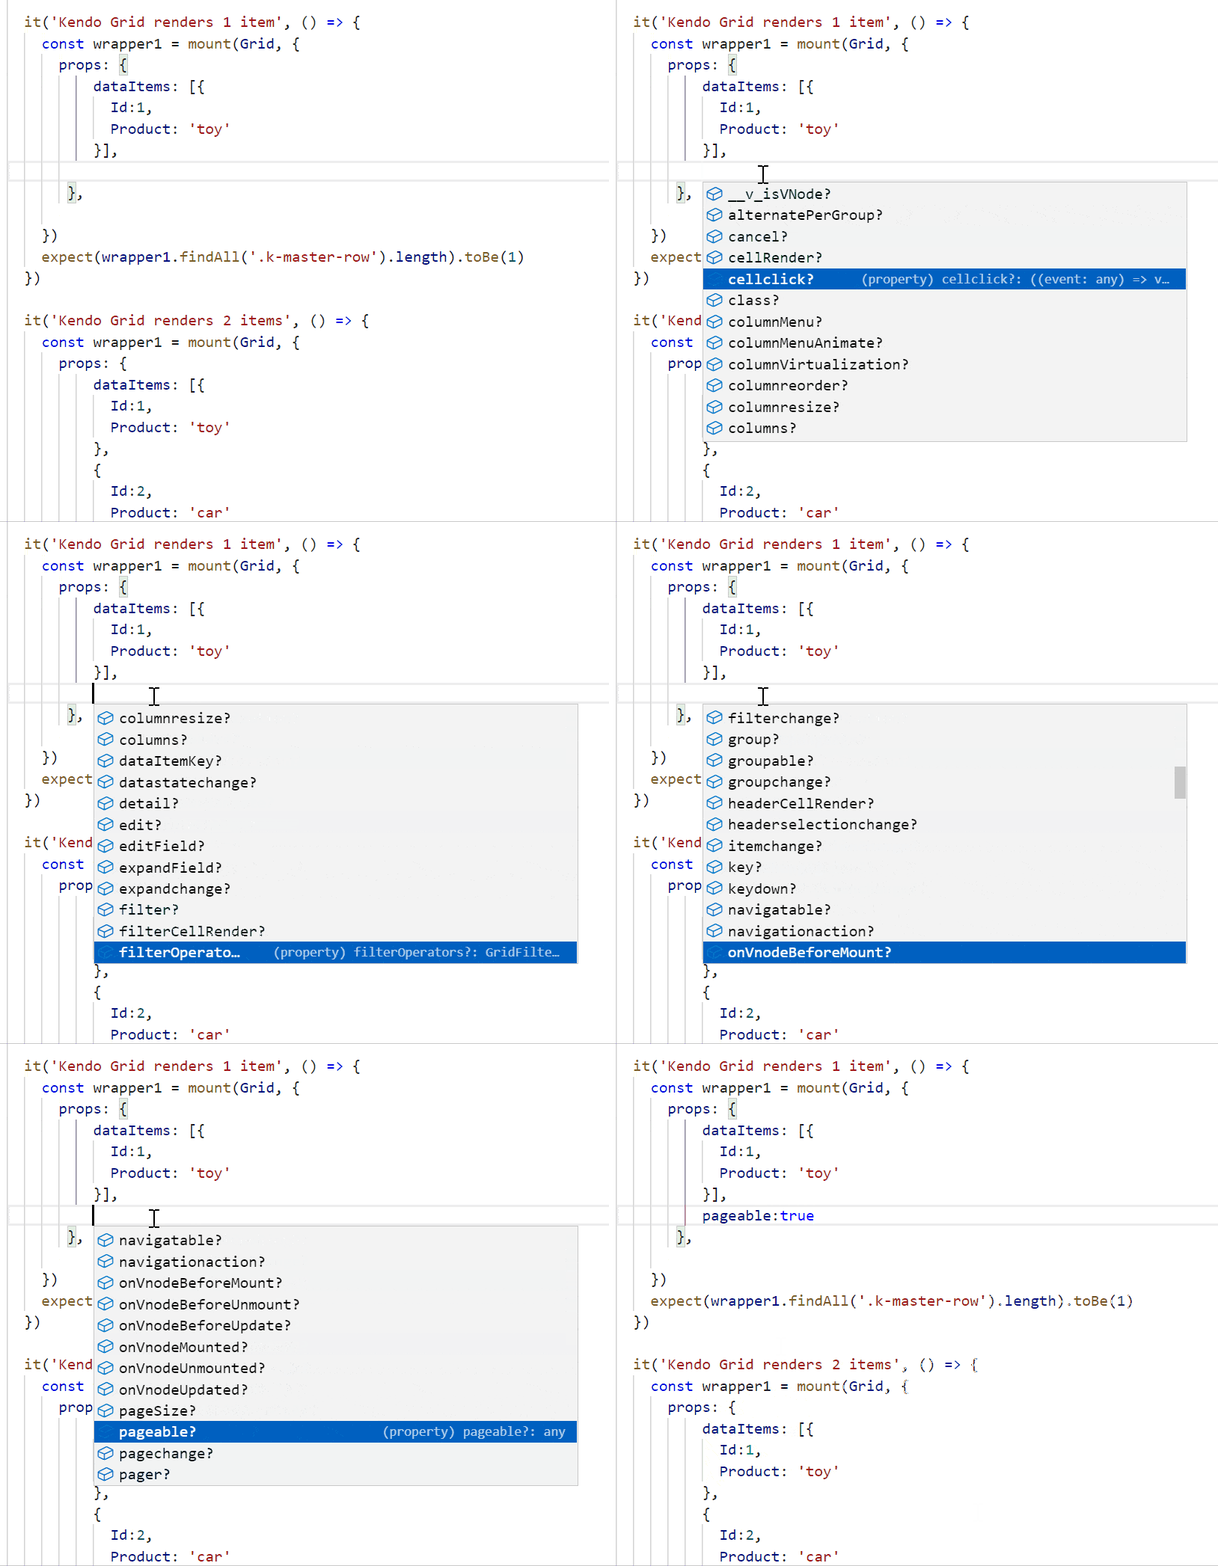
Here is an example how a simple test-writing process would look like when we want to test a simple Vue 3 component with a Kendo Native Grid in it.

testtypescript

And here is the code:

it('Kendo Grid renders 1 item', () => {
   const wrapper1 = mount(Grid, {
     props: {
         dataItems: [{
           Id:1,
           Product: 'toy'
         }]
      },
       
   })
   expect(wrapper1.findAll('.k-master-row').length).toBe(1)
})
 
it('Kendo Grid renders 2 items', () => {
   const wrapper1 = mount(Grid, {
     props: {
         dataItems: [{
           Id:1,
           Product: 'toy'
         },
         {
           Id:2,
           Product: 'car'
         }]
      },
       
   })
   expect(wrapper1.findAll('.k-master-row').length).toBe(2)
})

You can check other similar examples with all the Kendo UI for Vue components in our repository here.

My next blog will cover state management techniques when editing Grid items, so stay tuned for that.

Will You Use TypeScript in Vue?

Now that you have read all this, you can decide if using TypeScript in your current Vue project is right for you. Personally, I already know I’m going for it!

Thanks for reading so far! For more Vue tips or Kendo UI for Vue news, follow me on Twitter at @pa4oZdravkov.

Happy TypeScript and Vue coding!

Here We Are: WinUI Report Viewer for Desktop

$
0
0

The Progress Telerik Reporting family has grown since R3 2021—a new WinUI Report Viewer that can be embedded in WinUI3 desktop applications is now available.

I am sure that you have heard about the Telerik day-zero support for WinUI. This is a long story written by our great developers that started more than a year ago. The first family member was the DataGrid for WinUI component. After it, bit by bit, adding a component after component, the Telerik UI for WinUI family has grown together with the Microsoft WinUI Library. Get to know it by downloading the Telerik WinUI demos.

Having a stable and extensive set of Telerik UI for WinUI controls for UWP and Desktop, what is the next logical step? If you thought about a WinUI ReportViewer, you are right! Delivering a ReportViewer for WinUI seemed an easy task, having in mind all the various Telerik Report Viewers we have already. The list of supported platforms is broad—ASP.NET Core, Blazor, Angular, WPF, Winforms, etc. And here is a little secret from the kitchen—they all share the same engine below the surface.

Wanna know the story of delivering a WinUI ReportViewer? Sure, let’s start. But, oh, two little things you should know first—it was introduced with the R3 2021 release. And tooltips over a report’s content were freshly added with the R3 2021’s Service Pack.

Introduction to WinUI

If this is the first time you are hearing about WinUI or you get confused about its versions, here is a brief intro.

The Windows UI Library is a native UX framework for both Windows desktop and UWP applications. It is based on the Fluent Design System. There are two generations of WinUI under active development—WinUI 2 and WinUI 3. While WinUI 2.x is a control library on top of UWP shipped as a standalone NuGet package, WinUI 3.0 is an entirely new framework that aims to replace the UI and application framework of UWP. WinUI 3.0 is shipped with the Windows App SDK (formerly known as Project Reunion).

Telerik WinUI products aim to target the latest stable version of Windows App SDK.

Telerik ReportViewer for WinUI—The Beginning

It all started with the UI.

The designers followed the outstanding UX experience that we deliver with our other report viewers. First, we created the “skeleton” with the following parts—navigation, document map, report area, parameters area and zooming bar.

Part 1: Navigation

What is a report viewer without a navigation bar?!

Having such, you can navigate through the pages of the report or the history of the visited reports. You can also customize the page settings, print or export the report, and toggle whether the document map and the parameters area are visible.

For the needs of our report viewer, we used the MS CommandBar with custom content for the AppBarButtons and AppBarToggleButtons to be left-aligned. Also, a new set of path icons was provided by the designers, as some of the needed icons were missing in the predefined WinUI symbol icons set and in the Segoe MDL2 Assets icons.

ReportVIewer animated gif showing the built-in themes

Part 2: Report Area

The MS TreeView has an attractive design fitted very well for the document map, whereas the parameters area is a custom control—ReportParametersControl—which changes its template depending on the type of the parameter.

The report area has two views—an interactive template and a print preview template. Switching between the logical and the physical page rendering happens by toggling the print preview button in the command bar.

Below the report, there is a zoom which together with the drill-down and the drill-through functionalities makes the report interactive. The zooming feature was developed with the Telerik LayoutTransformControl and the Telerik RangeSlider, which both could be of great help to a developer.

A small, yet crucial Telerik component was used to lay out all these parts of the report area—the GridSplitter.

Part 3: Finishing Touches

No look seems finished without a little spark.

In the scope of the report viewer’s UX, these were the overlays with informative messages and tooltips over the buttons and inside the reports.

I think here is the part where I tell you that the report viewer supports all six built-in themes – Light, Dark and four High Contrast themes (High Contrast #1, High Contrast #2, High Contrast Light and High Contrast Black).

What Is in the Back

As mentioned earlier, our Report Viewer is built with both Microsoft and Telerik UI for WinUI components.

The binaries that come with the viewer are:

  • one for the functional part (Telerik.ReportViewer.WinUI.dll)
  • one for the theming (Telerik.ReportViewer.WinUI.Themes.dll)

The functional part depends on the Reporting engine for rendering the reports. Reports are rendered as standard XAML controls through the Telerik Reporting XAML rendering mechanism, adjusted for the specifics of WinUI.

The WinUI Report Viewer can utilize the report generation engine in several ways:

  • as an embedded report engine (in the WinUI application itself)
  • by hosting it remotely utilizing the REST reports service
  • by using the Report Server—a server-based platform that provides storage for reports and enhances their management

A side note is that the WinUI framework is in active development, and we will continue to add features along with the framework advancement.

What To Expect Next?

Depending on the demand of our customers, we will cover all functionalities that we already have for the other platforms. A search engine with results highlighting and tooltips client-side events are some of the features that will come next.

Theme It as You Need It

The Telerik ReportViewer for WinUI benefits from the UserThemeResources markup extension provided by Telerik. Its aim is to allow the developers to easily override the resources used in the default themes.

It exposes three static properties—DarkResourcePath, LightResourcePath and HighContrastResourcePath. All refer to the URI path to the resource dictionary containing the theme resource definitions for the respective theme. If no value is set for either, the default Dark theme will be used. Eager to try it? Let’s do it together.

Step 1: Open the Demo Solution

Since R3 2021 SP1 we ship a dedicated solution containing two WinUI projects—a project containing the demo code and a separate Windows Application Packaging Project that is configured to build the app into an MSIX package.

It can be found under the following path:

C:\Program Files (x86)\Progress\Telerik Reporting R3 2021\Examples\CSharp

Make sure to set the package project as a startup one.

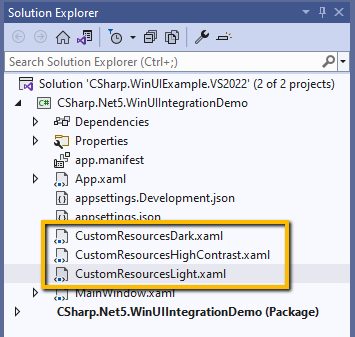
Step 2: Add Custom Resource Dictionaries for Each Theme

resource-dictionaries

We will mimic the three Office2019 palettes from the Telerik UI for WPF suite—Light, Dark and High Contrast. How? By adding custom values of the following brushes in each of the resource dictionaries.

CustomResourcesDark.xaml:

<ResourceDictionary
    <SolidColorBrush x:Key="TelerikReportViewer_Background" Color="#FF0F0F0F"/>
    <SolidColorBrush x:Key="TelerikReportViewer_BorderBrush" Color="#FF606060"/>
    <SolidColorBrush x:Key="TelerikReportViewer_CommandBarBackground" Color="#FF3C3C3C" />
</ResourceDictionary>

CustomResourcesLight.xaml:

<ResourceDictionary
    <SolidColorBrush x:Key="TelerikReportViewer_Background" Color="#FFDFDFDF"/>
    <SolidColorBrush x:Key="TelerikReportViewer_BorderBrush" Color="#FFACACAC"/>
    <SolidColorBrush x:Key="TelerikReportViewer_CommandBarBackground" Color="#FFF1F1F1" />
</ResourceDictionary>

CustomResourcesHighContrast.xaml:

<ResourceDictionary
     <SolidColorBrush x:Key="TelerikReportViewer_Background" Color="#FF000000"/>
     <SolidColorBrush x:Key="TelerikReportViewer_BorderBrush" Color="#FFFFFFFF"/>
     <SolidColorBrush x:Key="TelerikReportViewer_CommandBarBackground" Color="#FF000000" />
</ResourceDictionary>

Step 3: Plug the UserThemeResources Resource

Add the UserThemeResources definition in the application resources and customize the demo’s background:

<ResourceDictionary>
    <telerik:UserThemeResources x:Key="themeResourceInitializer"
                       DarkResourcesPath="ms-appx:///CustomResourcesDark.xaml"
                       LightResourcesPath="ms-appx:///CustomResourcesLight.xaml"
                       HighContrastResourcesPath="ms-appx:///CustomResourcesHighContrast.xaml" />
    <ResourceDictionary.ThemeDictionaries>
        <!-- Default or Dark -->
        <ResourceDictionary x:Key="Default">
            <SolidColorBrush x:Key="DemoBackgroundBrush" Color="#FF3C3C3C" />
        </ResourceDictionary>
 
        <!-- Light -->
        <ResourceDictionary x:Key="Light">
            <SolidColorBrush x:Key="DemoBackgroundBrush" Color="#FFF1F1F1" />
        </ResourceDictionary>
 
        <!-- HighContrast is used in all high contrast themes -->
        <ResourceDictionary x:Key="HighContrast">
            <SolidColorBrush x:Key="DemoBackgroundBrush" Color="#FF000000" />
        </ResourceDictionary>
    </ResourceDictionary.ThemeDictionaries>
 
    <ResourceDictionary.MergedDictionaries>
        <XamlControlsResources xmlns="using:Microsoft.UI.Xaml.Controls" />
 
        <!-- Telerik dictionaries here -->
        <ResourceDictionary Source="ms-appx:///Telerik.WinUI.Controls/Themes/Generic.xaml"/>
        <ResourceDictionary Source="ms-appx:///Telerik.ReportViewer.WinUI.Themes/Themes/Generic.xaml"/>
    </ResourceDictionary.MergedDictionaries>
</ResourceDictionary>

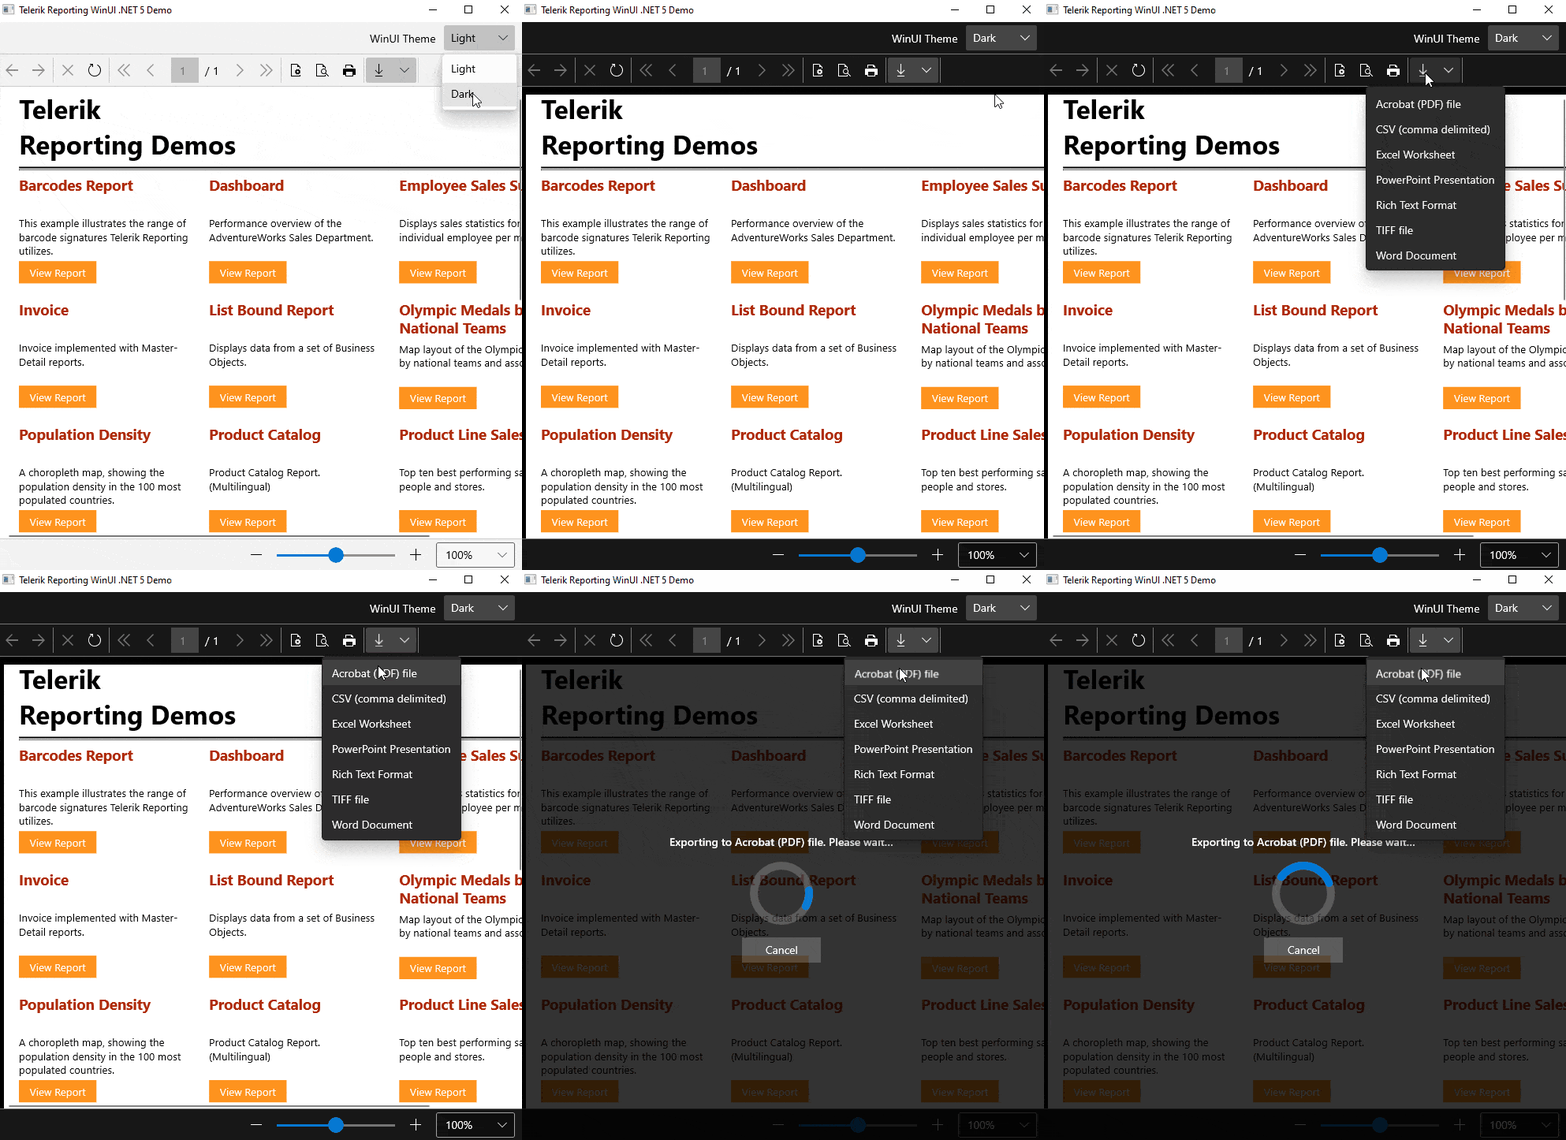
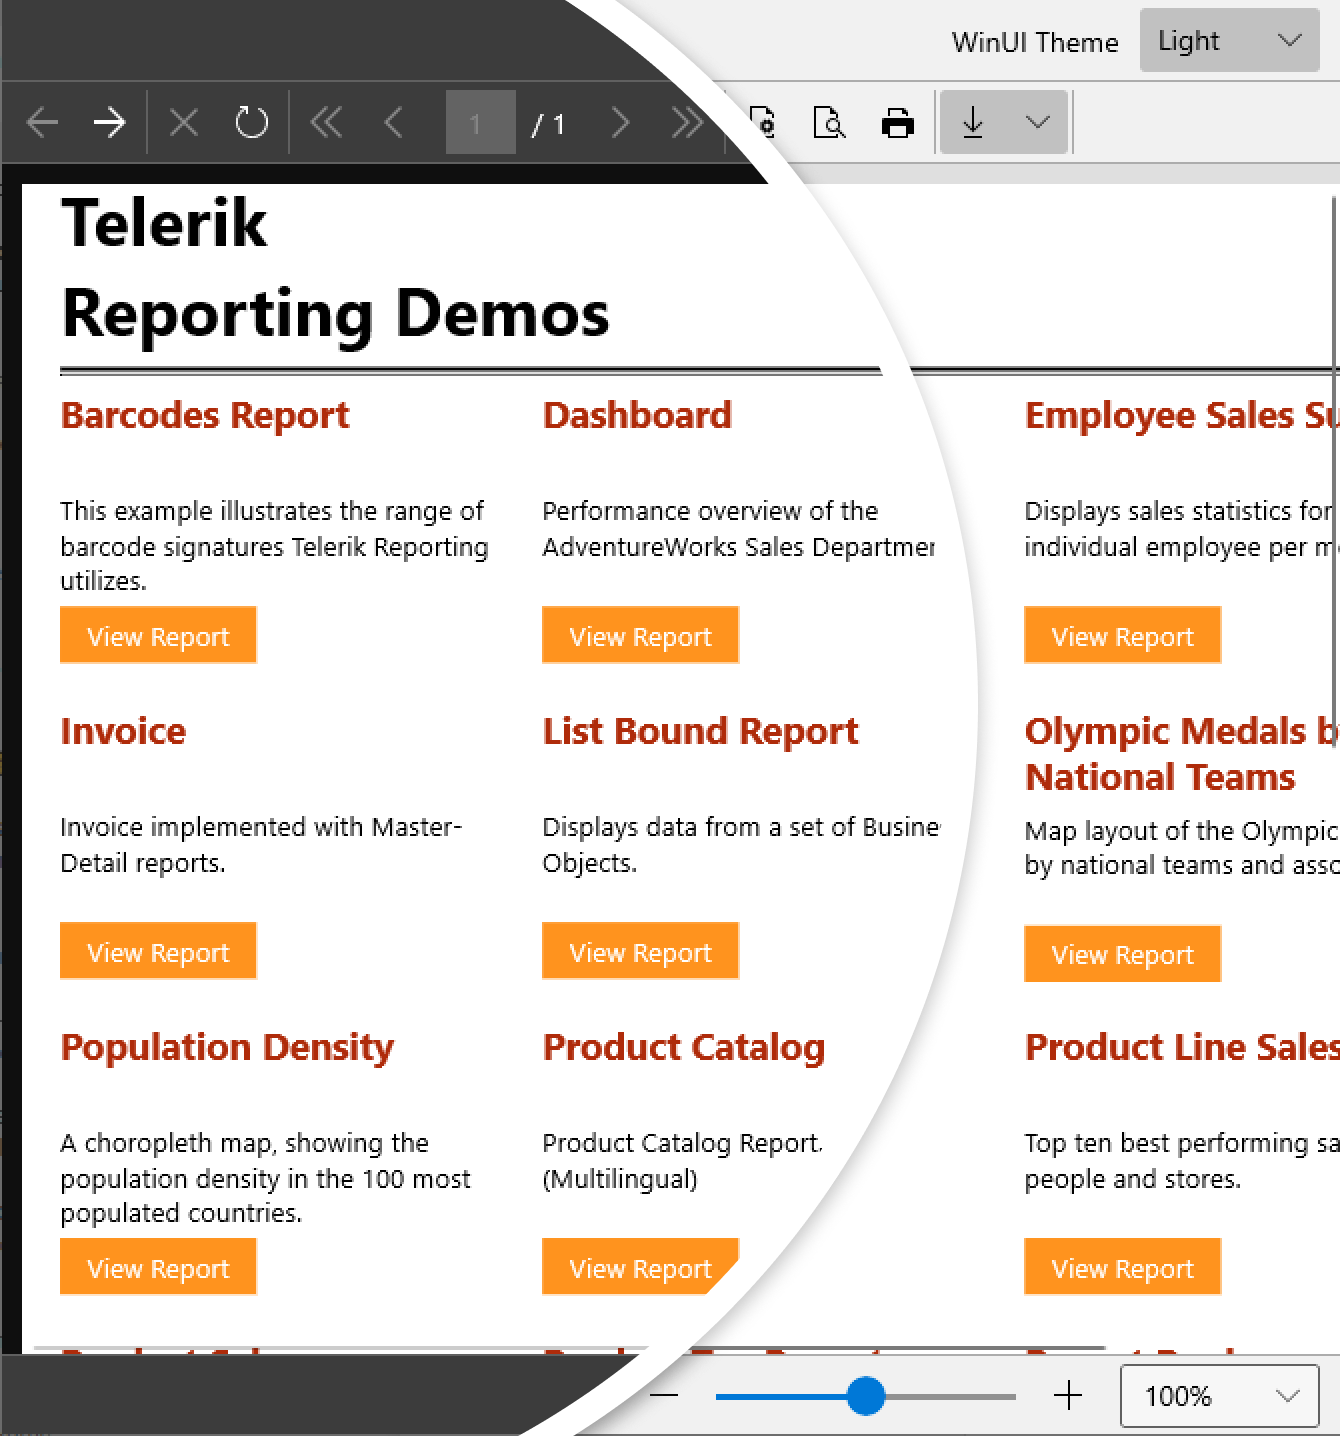
Ta-da! We Have a Custom Theme for the ReportViewer

ReportViewer with Light and Dark custom themes

Try It & Share Your Feedback

New to Telerik Reporting and/or Telerik UI for WinUI? No worries. You can learn more via the Telerik UI for WinUI and Telerik Reporting product pages. Do not wait to try them out—get a free trial now:

The Telerik UI for WinUI controls are already production-ready for Win32 applications. Telerik Reporting is a complete and mature .NET embedding tool for web and desktop applications.

One last thing to keep in mind—the licenses about Telerik UI for WinUI and Telerik Reporting are different individual products. You can purchase both with one of our two best product bundles—DevCraft Complete or DevCraft Ultimate.

We would love to hear what you think, so should you have any questions and/or comments, please share them below.

.NET 6 Has Arrived: Here Are a Few of My Favorite Things

$
0
0

In this article, let’s explore .NET 6 features like Hot Reload, minimal APIs, HTTP Logging and Blazor improvements.

For the second straight November, .NET developers have received an early holiday gift: a new release of the .NET platform. Last month, Microsoft made .NET 6 generally available—and hosted a virtual conference to celebrate its new features.

What were the goals of .NET 6? If you look at themesof.net, you can quickly see the themes of the .NET 6 release, which include some of the following:

  • Appeal to net-new devs, students and new technologists
  • Improve startup and throughput using runtime exception information
  • The client app development experience
  • Recognized as a compelling framework for cloud-native apps
  • Improve inner-loop performance for .NET developers

We could spend the next 10 blog posts writing about all the new .NET 6 improvements and features. I’d love to do that, but I haven’t even started shopping for the holidays.

Instead, I’d like to show off some of my favorite things that I’ll be using on my .NET 6 projects. Most of these changes revolve around web development in ASP.NET Core 6 since this site focuses on those topics.

Hot Reload

Way back in April, I wrote here about the Hot Reload capability in .NET 6. We’ve come a long way since then, but I felt the same as I do now: This is the biggest boost to a .NET web developer’s productivity over the last few years. If you aren’t familiar with Hot Reload, let’s quickly recap.

The idea of “hot reload” has been around for quite a few years: You save a file, and the change appears almost instantaneously. Once you work with hot reloading, it’s tough to go back.

As the .NET team tries to attract outsiders and new developers, not having this feature can be a non-starter to outsiders: It’s table stakes for many developers. The concept is quite popular in the frontend space, and .NET developers have been asking for this for a while. (Admittedly, introducing hot reload to a statically typed language is much more complex than doing it for a traditionally interpreted language like JavaScript.)

With .NET 6, you can use Hot Reload to make changes to your app without needing to restart or rebuild it. Hot Reload doesn’t just work with static content, either—it works with most C# use cases and also preserves the state of your application as well—but you’ll want to hit up the Microsoft Docs to learn about unsupported app scenarios.

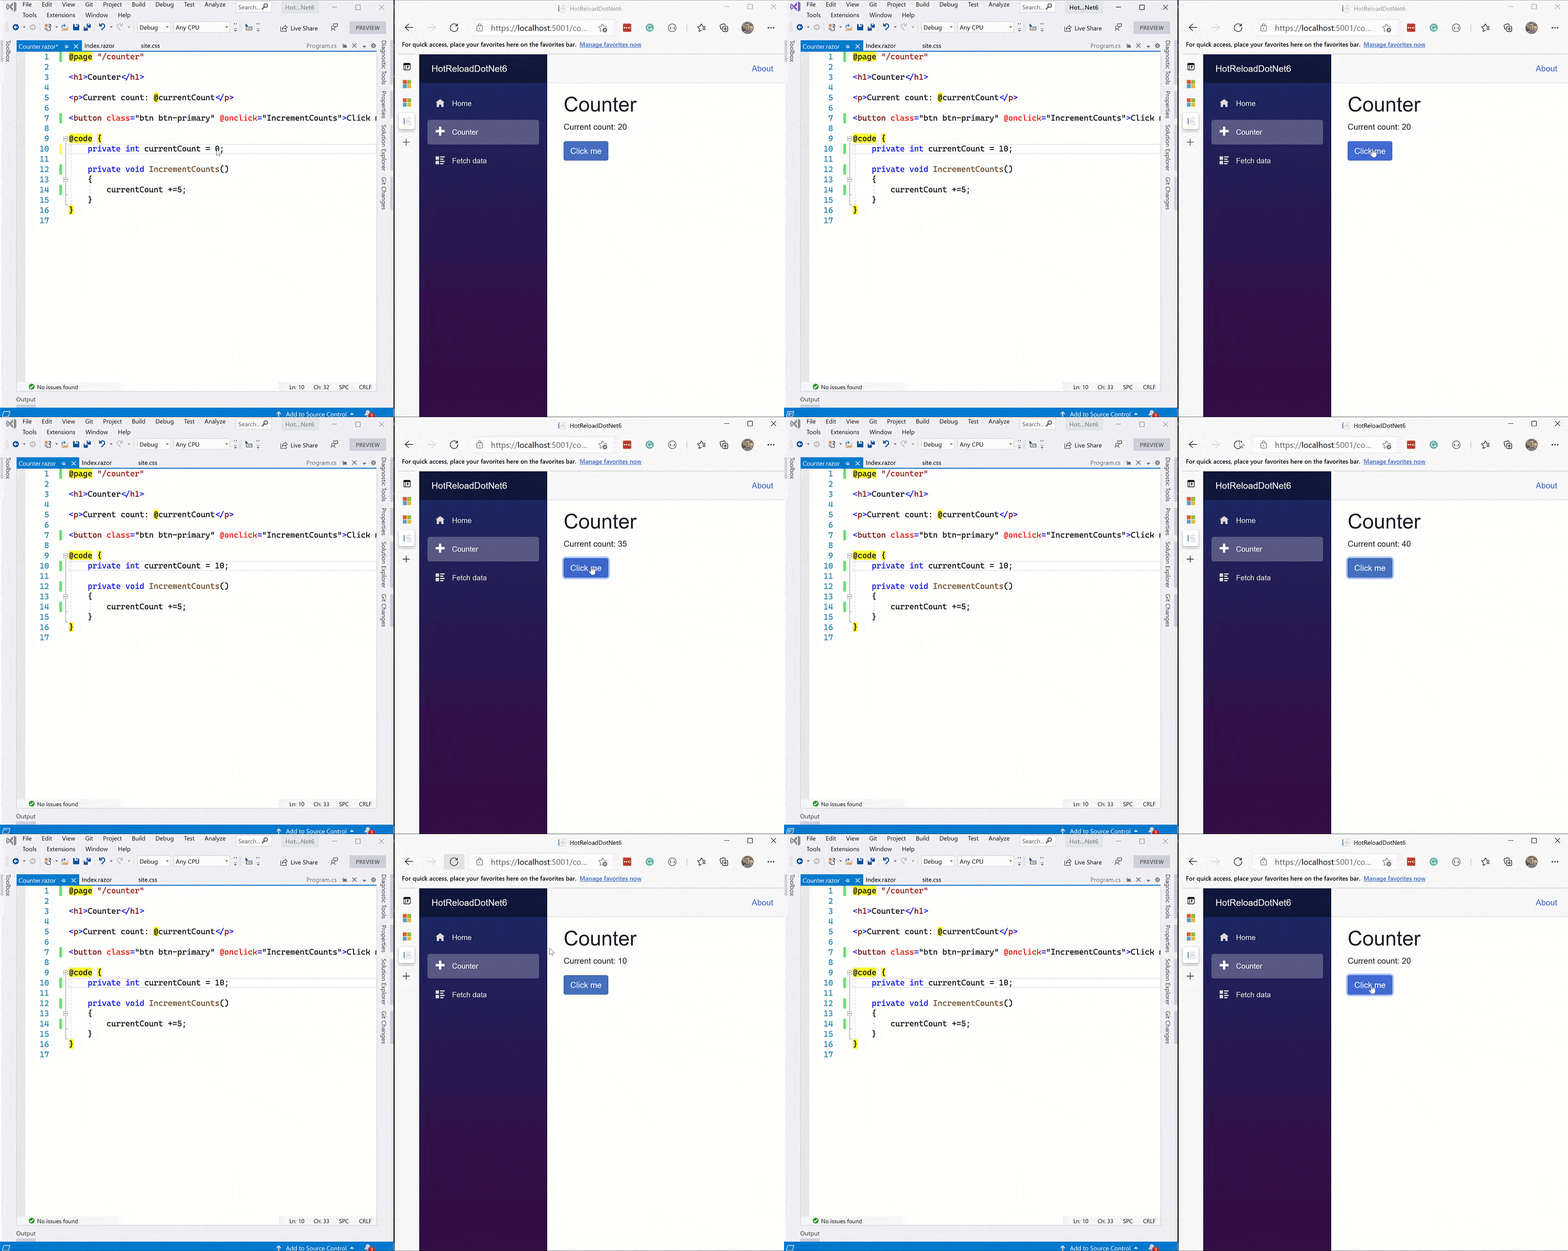
Here’s a quick example to show how the application state gets preserved in a Blazor web app. If I’m in the middle of an interaction and I update the currentCount from 0 to 10, will things reset? No! Notice how I can continue increasing the counter, and then my counter starts at 10 when I refresh the page.

Hot Reload preserve state

You can leverage Hot Reload in whatever way you prefer: Powerful IDEs like JetBrains Rider and Visual Studio 2022 have this capability. You can also utilize it from the command line if you prefer (yes, we do). It’s important to mention that this works for all ASP.NET Core Web apps.

Minimal APIs

Have you ever wanted to write simple APIs in ASP.NET Core quickly but felt helpless under the bloat of ASP.NET Core MVC, wishing you could have an Express-like model for writing APIs?

The ASP.NET team has rolled out minimal APIs—a new, simple way to build small microservices and HTTP APIs in ASP.NET Core. Minimal APIs hook into ASP.NET Core’s hosting and routing capabilities and allow you to build fully functioning APIs with just a few lines of code.

Minimal APIs do not replace building APIs with MVC—if you are building complex APIs or prefer MVC, you can keep using it as you always have—but it’s an excellent approach to writing no-frills APIs. We wrote about it in June, but things have evolved a lot since then. Let’s write a simple API to show it off.

First, the basics: Thanks to lambdas, top-level statements, and C# 10 global usings, this is all it takes to write a “Hello, Telerik!” API.

var app = WebApplication.Create(args);
app.MapGet("/", () => "Hello, Telerik!");
app.Run();

Of course, we’ll want to get past the basics. How can I really use it? Using WebApplication, you can add middleware just like you previously would in the Configure method in Startup.cs. In .NET 6, your configuration takes place in Program.cs instead of a separate Startup class.

var app = WebApplication.Create(args);
app.UseResponseCaching(); 
app.UseResponseCompression(); 
app.UseStaticFiles();

// ...

app.Run();

If you want to do anything substantial, though, you’ll want to add services using a WebApplicationBuilder (again, like you typically would previously in the ConfigureServices method in Startup.cs):

var builder = WebApplication.CreateBuilder(args);
builder.Services.AddSingleton<MyCoolService>();
builder.Services.AddSingleton<MyReallyCoolService>();

builder.Services.AddSwaggerGen(c =>
{
    c.SwaggerDoc("v1", new() {
        Title = builder.Environment.ApplicationName, Version = "v1" });
});

var app = builder.Build();

// ...

app.Run();

Putting it all together, let’s write a simple CRUD API that works with Entity Framework Core and a DbContext. We’ll work with some superheroes because, apparently, that’s what I do. With the help of record types, we can make our data models a little less verbose, too.

using Microsoft.EntityFrameworkCore;

var builder = WebApplication.CreateBuilder(args);
builder.Services.AddDbContext<SuperheroDb>(o => o.UseInMemoryDatabase("Superheroes"));

builder.Services.AddSwaggerGen(c =>
{
    c.SwaggerDoc("v1", new() {
        Title = builder.Environment.ApplicationName, Version = "v1" });
});

var app = builder.Build();

app.MapGet("/superheroes", async (SuperheroDb db) =>
{
    await db.Superheroes.ToListAsync();
});

app.MapGet("/superheroes/{id}", async (SuperheroDb db, int id) =>
{
    await db.Superheroes.FindAsync(id) is Superhero superhero ?
    Results.Ok(superhero) : Results.NotFound();
});

app.MapPost("/superheroes", async (SuperheroDb db, Superhero hero) =>
{
    db.Superheroes.Add(hero);
    await db.SaveChangesAsync();

    return Results.Created($"/superheroes/{hero.Id}", hero);
});

app.MapPut("/superheroes/{id}",
    async (SuperheroDb db, int id, Superhero heroInput) =>
    {
        var hero = await db.Superheroes.FindAsync(id);
        
        if (hero is null)
           return Results.NotFound();

        db.Update(heroInput);
        await db.SaveChangesAsync();

        return Results.NoContent();
    });


app.MapDelete("/superheroes/{id}",
    async (SuperheroDb db, int id) =>
    {
        var hero = await db.Superheroes.FindAsync(id);
        if (hero is null)
            return Results.NotFound();

        db.Superheroes.Remove(hero);
        await db.SaveChangesAsync();
        return Results.Ok();
    });

app.Run();

record Superhero(int Id, string? Name, int maxSpeed);

class SuperheroDb : DbContext
{
    public SuperheroDb(DbContextOptions<SuperheroDb> options)
        : base(options) { }

    public DbSet<Superhero> Superheroes => Set<Superhero>();
}

As you can see, you can do a lot with minimal APIs while keeping them relatively lightweight. If you want to continue using MVC, that’s your call—but with APIs in .NET, you no longer have to worry about the overhead of MVC if you don’t want it. If you want to learn more, David Fowler has put together a comprehensive document on how to leverage minimal APIs—it’s worth checking out.

Looking at the code sample above, it’s easy to wonder if this is all a race to see what we can throw in the Program.cs file and how easy it is to get messy. This can happen in any app—I don’t know about you, but I’ve seen my share of controllers that were rife for abuse.

It’s essential to see the true value of this model—not how cool and sexy it is to write an entire .NET CRUD API in one file, but the ability to write simple APIs with minimal dependencies and exceptional performance. If things look unwieldy, organize your project as you see fit, just like you always have.

Simplified HTTP Logging

How often have you used custom middleware, libraries or solutions to log simple HTTP requests? I’ve done it more than I’d like to admit. .NET 6 introduces HTTP Logging middleware for ASP.NET Core apps that log information about HTTP requests and responses for you, like:

  • Request information
  • Properties
  • Headers
  • Body data
  • Response information

You can also select which logging properties to include, which can help with performance too.

To get started, add this in your project’s middleware:

public void Configure(IApplicationBuilder app, IWebHostEnvironment env)
{
    app.UseHttpLogging();

    // other stuff here, removed for brevity
}

To customize the logger, you can use AddHttpLogging:

public void ConfigureServices(IServiceCollection services)
{
    services.AddHttpLogging(logging =>
    {
        logging.LoggingFields = HttpLoggingFields.All;
        logging.RequestHeaders.Add("X-Request-Header");
        logging.ResponseHeaders.Add("X-Response-Header");
        logging.RequestBodyLogLimit = 4096;
        logging.ResponseBodyLogLimit = 4096;
    });
}

If we want to pair this with a minimal API, here’s how it would look:

using Microsoft.AspNetCore.HttpLogging;

var builder = WebApplication.CreateBuilder(args);
builder.Services.AddHttpLogging(logging =>
{
    logging.LoggingFields = HttpLoggingFields.All;
    logging.RequestHeaders.Add("X-Request-Header");
    logging.RequestHeaders.Add("X-Response-Header");
    logging.RequestBodyLogLimit = 4096;
    logging.ResponseBodyLogLimit = 4096;
});

var app = builder.Build();
app.UseHttpLogging();

app.MapGet("/", () => "I just logged the HTTP request!");

app.Run();

Blazor Improvements

.NET 6 ships with many great updates to Blazor, the client-side UI library that’s packaged with ASP.NET Core. I want to discuss my favorite updates: error boundaries, dynamic components and preserving pre-rendered state.

Error Boundaries

Blazor error boundaries provide an easy way to handle exceptions within your component hierarchy. When an unhandled exception occurs in Blazor Server, it’s treated as a fatal error because the circuit hangs in an undefined state. As a result, your app is as good as dead, it loses its state, and your users are met with an undesirable An unhandled error has occurred message, with a link to reload the page.

Inspired by error boundaries in React, the ErrorBoundary component attempts to catch recoverable errors that can’t permanently corrupt state—and like the React feature, it also renders a fallback UI.

I can add an ErrorBoundary around the @Body of a Blazor app’s default layout, like so.

<div class="main">
    <div class="content px-4">
        <ErrorBoundary>
            @Body
        </ErrorBoundary>
    </div>
</div>

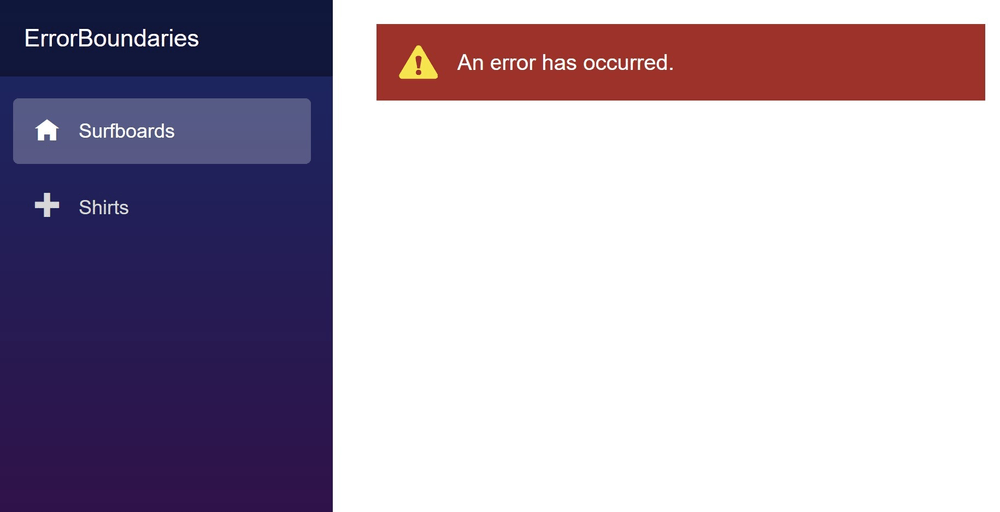
If I get an unhandled exception, I’ll get the default fallback error message.

error boundary message: An error has occurred

Of course, you can always customize the UI yourself.

<ErrorBoundary>
    <ChildContent>
        @Body
    </ChildContent>
    <ErrorContent>
        <p class="custom-error">Woah, what happened?</p>
    </ErrorContent>
</ErrorBoundary>

If you’d like the complete treatment, check out my post from earlier this summer. It still holds up (even the MAUI Man references).

Dynamic Components

What happens if you want to render your components dynamically when you don’t know your types ahead of time? It previously was a pain in Blazor through a custom render tree or declaring a series of RenderFragment components. With .NET 6, you can render a component specified by type. When you bring in the component, you set the Type and optionally a dictionary of Parameters.

<DynamicComponent Type="@myType" Parameters="@myParameterDictionary" />

I find dynamic components especially valuable when working with form data—you can render data based on selected values without iterating through a bunch of possible types. If this interests you (or if you like rockets), check out the official documentation.

Preserving Pre-rendered State

Despite all the performance and trimming improvements with Blazor WebAssembly, initial load time remains a consideration. To help with this, you can prerender apps from the server to help with its perceived load time. This means that Blazor can immediately render your app’s HTML while it is wiring up its dynamic bits. That’s great, but it also previously meant that any state was lost.

Help has arrived. To persist state, there’s a new persist-component-state tag helper that you can utilize:

<component type="typeof(App)" render-mode="ServerPrerendered" />
    <persist-component-state />

In your C# code, you can inject PersistComponentState and register an event to retrieve and ultimately persist the objects. On subsequent loads, your OnInitializedAsync method can retrieve data from the persisted state—if it doesn’t exist, it’ll get the data from your original method (typically a service of some sort).

To see it in action, check out the Microsoft documentation.

C# 10 Updates

Along with .NET 6, we’ve also got a new version of C#—C# 10. It ships with some great new features, like file-scoped namespaces, global usings, lambda improvements, extended property patterns, null argument checks and much more. Check out Joseph Guadagno’s blog post for more details, as well as Microsoft’s blog post.

Accessibility Test–Driven Blazor Components

$
0
0

Using test-driven development with a focus on accessibility improves the quality of Blazor components.

Blazor’s component model is one of the framework’s greatest strengths. Creating components in the framework feels intuitive and creative—most of the time things “just work.” Combine the component architecture with a rich set of tools for testing and you’ll find Blazor offers a productive developer experience that feels unmatched by anything before it. While that last bit may sound sensationalized, my latest experiment makes it feel justified.

In an effort to learn more about accessibility on the web, I decided to experiment with an idea. I set out to build a component using test-driven development (TDD), but this time with an emphasis on accessibility. While I don’t feel this is a particularly unique idea, I was hard-pressed to find resources or guidance on the subject. However, I was able to find some generic examples of best practices to guide the way.

When the experiment was finished, I had a completed example that was thoroughly tested to specification. The best part was how much I learned about accessibility, keyboard navigation and unit testing components. In this article I’ll describe the key concepts and findings from the process and how to apply them in your next application.

Tools Used

Blazor has a quite extensive testing ecosystem which includes: bUnit, xUnit, Visual Studio and others. Since Blazor is written using .NET, some of these tools have evolved over the life of the platform, while others like bUnit were newly created for testing Blazor components exclusively.

bUnit is a testing library for Blazor Components. Its goal is to make it easy to write comprehensive, stable unit tests.

Directly quoting the bUnit website, “bUnit is a testing library for Blazor Components. Its goal is to make it easy to write comprehensive, stable unit tests.” bUnit is developed by .NET community member Egil Hansen, and the project is the de facto standard of component unit testing for Blazor.

bUnit works along with popular test frameworks such as: xUnit, NUnit and MSTest. These frameworks set up the test environment, while bUnit focuses on rendering and navigating components and their rendered markup.

In this experiment we’ll be using xUnit and bUnit, with the addition of a third helper library called FluentAssertions. FluentAssertions isn’t necessary here, but it greatly enhances readability of the test code by providing an easy-to-follow syntax when writing assertions.

Installation, setup instructions and documentation are easy find and follow on the bUnit website. Once the test project is created and configured, bUnit tests are written as Razor components. This C# in markup experience brings an ease of use factor to component testing by nearly eliminating the need to escape from HTML while composing tests.

Let’s take a look at a simple test scenario in the code below. Tests can be executed with Visual Studio or the CLI dotnet test command. We’ll take a simple component that renders an h3 tag with text, and we’ll call this component under test Example.razor.

Example.razor

<h3>Example</h3>

To test the component, we’ll create a test fixture called Example_Tests.razor. It too will use the .razor extension so it can utilize the razor syntax. We can optionally inherit from TestContext, which gives us quick access to test APIs.

Next, we’ll use xUnit to define a Fact, a type of test method. Then the component under test (cut) is rendered by bUnit using the Render method. Once rendered, we can assert the component’s markup was rendered correctly by calling MarkupMatches.

Example_Tests.razor

@inherits TestContext
@code {

    [Fact]
    public void ShouldRunTests()
    {
        var ctx = Render(@<Example/>);
        ctx.MarkupMatches(@<h3>Example</h3>);
    }
}

This is the basic premise of testing with bUnit. Later on we’ll be using more advanced techniques to assert specific HTML attribute values and trigger component events. For example, we can use bUnit and FluentAssertions to validate a button’s id using the statement below.

// Does this div have the expected id?
cut.Find("div").Id.Should().Be(value);

Now that we’re ready to write tests, we’ll need to define our component’s specification.

Component Specification

Creating a specification for a component with a focus on accessibility is the most important part of the process. The spec is going to dictate everything that will happen next, so it should be as detailed as possible.

The real challenge here is finding expert guidance if you (like me) are not an accessibility expert. Using semantic elements and ARIA attributes incorrectly can actually do more harm than good, so it’s important to be aware of the nuances of assistive technologies and how they interpret HTML tags and attributes.

A good place to start if you’re learning about accessibility is WAI-ARIA Authoring Practices by the W3C Working Group. In this document you’ll find the specs for an accordion component, which are used in this experiment. The specs outline a detailed plan for implementing proper role, property, state and tabindex attributes, as well as keyboard support. The following tables are included on the Authoring Practices site.

Role, Property, State and Tabindex Attributes

Role or Attribute Element   Usage
h3
  • Element that serves as an accordion header.
  • Each accordion header element contains a button that controls the visibility of its content panel.
  • The example uses heading level 3 so it fits correctly within the outline of the page; the example is contained in a section titled with a level 2 heading.
aria-expanded="true" button Set to true when the Accordion panel is expanded, otherwise set to false.
aria-controls="ID" button Points to the ID of the panel which the header controls.
aria-disabled="true" button If the accordion panel is expanded and is not allowed to be collapsed, then set to true.
region div Creates a landmark region that contains the currently expanded accordion panel.
aria-labelledby="IDREF" div
  • Defines the accessible name for the region element.
  • References the accordion header button that expands and collapses the region.
  • region elements are required to have an accessible name to be identified as a landmark.

Keyboard Support

Key Function
Space or Enter When focus is on the accordion header of a collapsed section, expands the section.
Tab
  • Moves focus to the next focusable element.
  • All focusable elements in the accordion are included in the page Tab sequence.
Shift + Tab
  • Moves focus to the previous focusable element.
  • All focusable elements in the accordion are included in the page Tab sequence.
Down Arrow
  • When focus is on an accordion header, moves focus to the next accordion header.
  • When focus is on last accordion header, moves focus to first accordion header.
Up Arrow
  • When focus is on an accordion header, moves focus to the previous accordion header.
  • When focus is on first accordion header, moves focus to last accordion header.
Home When focus is on an accordion header, moves focus to the first accordion header.
End When focus is on an accordion header, moves focus to the last accordion header.

Our Experiment

To get an idea of what is being built and tested in this experiment, see the interactive Blazor REPL embedded below. This example represents the completed component to spec written in Blazor.

With the specification outlined, the next step is to create a test file. I personally like to use the convention ComponentName_Tests.razor, but feel free to use a practice you like. For this example, we’ll use AriaAccordion_Tests.razor. Inside the new test, we’ll set up a test fixture then copy the spec right inside as comments.

AriaAccordion_Tests.razor

@inherits TestContext
@code {

    // Attribute Tests
    
    // Element that serves as an accordion header.
    // Each accordion header element contains a button that controls the visibility of its content panel.
    // The example uses heading level 3 so it fits correctly within the outline of the page; the example is contained in a section titled with a level 2 heading.
    
    // aria-expanded="true" button
    // Set to true when the Accordion panel is expanded, otherwise set to false.
    
    ... specs continued
    
    // End
    // When focus is on an accordion header, moves focus to the last accordion header.
}

Rendering Tests

As with any TDD process, there’s a bit of a chicken-and-egg moment where tests need to be defined, yet there’s nothing to test. Depending on how test-driven your process is, you may want to write some tests before any components are defined.

Currently we have an empty test fixture with 13 accessibility specs. These specs alone aren’t enough to get started—we’ll also need some basic markup to render. At this point, we have enough information to write an expected markup test before moving on to more targeted tests. It’s a bit of a balancing act as we abstract the component and its subcomponents away to reach some basic functionality.

It’s a bit of a balancing act as we abstract the component and its subcomponents away to reach some basic functionality.

Let’s begin with the basic HTML structure provided in the spec. Using the HTML, we’ll create two components—AriaAccordion and AccordionPanel. The components are added to the project to serve as basic building blocks. Their usage is outlined in the snippet below.

Component Usage

<AriaAccordion>
  <AccordionPanel Title="My Title A">
    <p>My Content for panel A</p>
  </AccordionPanel>
  <AccordionPanel Title="My Title B">
    <p>My Content for panel B</p>
  </AccordionPanel>
</AriaAccordion>

See a fully interactive example below using Telerik REPL for Blazor.

Our first unit test will validate the initial render state of the component. For this we’ll write a test that uses Render and MarkupMatches.

[Fact]
public void FirstRenderMarkupCorrect()
{
    var cut = Render(@<AriaAccordion>
                     <AccordionPanel Title="P1">
                       <p>P1 Content</p>
                     </AccordionPanel>
                     <AccordionPanel Title="P2">
                       <p>P2 Content</p>
                     </AccordionPanel>
                   </AriaAccordion>);
                
    cut.MarkupMatches(
    @<div class="Accordion">
    <h3>
        <button class="Accordion-trigger">
            <span class="Accordion-title">P1
                <span class="Accordion-icon"></span>
            </span>
        </button>
    </h3>
    <div class="Accordion-panel">
        <div>
            <p>P1 Content</p>
        </div>
    </div>
   ... second panel's html
</div>);

Now that we have a working test and components, we can begin adding features.

Attribute Tests

When writing our tests, we’ll work on items in an order that makes sense logically. In the case of our accordion, we need functionality to expand and collapse panels before other features can be considered. Let’s begin with the spec for aria-expanded since it correlates directly with the feature we need to implement first.

For this spec, we’ll first update our FirstRenderMarkupCorrect test to include the default state for two panels when they are first rendered. This will ensure a new accordion renders in the expected default state before changes are applied. The MarkupMatches assertion is updated so the first button has the attribute aria-expanded="true", and the second panel has the attribute hidden.

cut.MarkupMatches(@<div class="Accordion">
    ... first panel's html
    <button class="Accordion-trigger" aria-expanded="true">
    ... second panel's html
    <div class="Accordion-panel" hidden> ...);

With the default state covered, we can then focus on the feature. In the test below we’ll use a convenience method to render two panels to a cut. Next, we’ll find both buttons in the accordion, then use the Click method to simulate a button click on the UI. Last, the two buttons are used and their aria-expanded attributes are retrieved. The attributes’ values are asserted with Should().Be("value").

 
// aria-expanded="true/false" button
[Fact(DisplayName = 
    "Set to true when the Accordion panel is expanded, otherwise set to false.")]
public void AriaExpanedAttribute()
{
    var cut = RenderAccordionWithTwoPanels();
    var button1 = cut.Find("h3:nth-of-type(1) > button");
    var button2 = cut.Find("h3:nth-of-type(2) > button");

    button2.Click();

    button1.GetAttribute("aria-expanded").Should().Be("false");
    button2.GetAttribute("aria-expanded").Should().Be("true");
}

A screen reader will assume the element has no expanded state if the attribute is missing.

With these tests in place we can begin implementing the feature in the component. In the case of the aria-expanded attribute, I made an interesting observation. By convention, Blazor will omit attributes when their value is false. This is helpful for most attributes that are implicitly “truthy.” For example, the hidden and disabled attributes when rendered imply true, and false when they do not exist. However, with aria-expanded this is not the case—a screen reader will assume the element has no expanded state if the attribute is missing.

To resolve this issue, we must instruct Blazor to always render a value. Consider the following example where the first statement produces no attribute, while the second produces aria-expanded="false".

aria-expanded="@IsExpanded"
aria-expanded="@IsExpanded.ToString().ToLowerInvariant()"

IsExpanded = false;

While hidden isn’t a line item included in the spec, it is implied by the HTML/CSS provided. To validate the feature, we’ll add a test similar to aria-expand. In this test we’ll get the AccordionPanel components. Next, we’ll find the second button and invoke a click. After the button is clicked, the hidden attribute should be rendered only on the second panel’s div element. We can assert this using HasAttribute with the fluent assertion Should().BeTrue/BeFalse().

[Fact(DisplayName = 
    "Set hidden to true when the Accordion panel is collapsed, otherwise set to false.")]
public void ClickingExpandShouldToggleHiddenAttribute()
{
    var cut = RenderAccordionWithTwoPanels();
    var panels = cut.FindComponents<AccordionPanel>();
    
    panels[1].Find("button").Click();

    panels[0].Find("div").HasAttribute("hidden").Should().BeTrue();
    panels[1].Find("div").HasAttribute("hidden").Should().BeFalse();
}

A fair amount of new component code is required to pass the tests. Once tests are passing, the component begins to perform some basic operations. An interactive sample can be seen below.

Keyboard Navigation Tests

This section of testing will ensure the accordion component is easily navigated with a keyboard. One of the most important aspects of web accessibility is keyboard accessibility. Users with motor needs rely on a keyboard. This includes people with limited use of their hands and users with modified keyboards or other hardware that mimics the functionality of a keyboard. Low-vision users also often use a keyboard for navigation.

The first spec is a point of interest. The spec defines interaction for a Space or Enter key press when an accordion header has focus. In the browser, the default behavior of buttons and some inputs is to trigger an onclick event. Because this is the inherent behavior and we haven’t added code to handle these keys specifically, they will perform their default action.

In addition, bUnit is operating with rendered markup, and default browser behaviors like this aren’t unit-testable. Instead of writing a unit test, we should defer this test to browser-based functional UI testing with a tool like Telerik Test Studio.

Similar to Space and Enter, the Tab and Shift + Tab specs call out for default browser behavior. Defaults seem like something we can simply ignore—however, we should still defer to functional tests to cover these items. While we don’t intend to modify these behaviors, there is still a potential for our code or markup to unintentionally interrupt the default action.

One such example is when the tabindex attribute is used. Even correct usage of tabindex can cause side effects that impact UI navigation of neighboring components.

Even correct usage of tabindex can cause side effects that impact UI navigation of neighboring components.

The next set of keyboard specs are not default behavior and need further development to implement. The up arrow and down arrow keys are used to navigate accordion headers and perform a “looping” behavior when the top and bottom of panels are focused. Since we’ll be attaching an onkeydown event handler for these items, they can be tested with bUnit.

In addition, we’ll be setting focus to an element—but this comes with a caveat. Because bUnit is testing a rendered component, focus behaves differently. Instead of checking if an element is focused, we’ll need to check if the element was given focus. The JSInterop.VerifyFocusAsyncInvoke helper in bUnit will provide a mechanism for asserting if focus was given to an element reference.

// Down Arrow
[Fact(DisplayName = 
    "When focus is on an accordion header, Down Arrow moves focus to the next accordion header.")]
public void DownArrowNavigation()
{
    var cut = RenderAccordionWithTwoPanels();
    var panels = cut.FindComponents<AccordionPanel>();
    var button1 = panels[0].Find("button");
    var button2 = panels[1].Find("button");

    button1.KeyDown(Key.Down);

    // Was Focus called, did it contain an argument for the correct element?
    JSInterop.VerifyFocusAsyncInvoke().Arguments[0].ShouldBeElementReferenceTo(button2);
}

Next we test the looping behavior when the last item is in focus.

[Fact(DisplayName = 
    "When focus is on last accordion header, Down Arrow moves focus to first accordion header.")]
public void DownArrowNavigationLoops()
{
    var cut = RenderAccordionWithTwoPanels();
    var panels = cut.FindComponents<AccordionPanel>();
    var button1 = panels[0].Find("button");
    var button2 = panels[1].Find("button");

    button2.KeyDown(Key.Down);
    
    // Was Focus called, did it contain an argument for the correct element?
    JSInterop.VerifyFocusAsyncInvoke().Arguments[0].ShouldBeElementReferenceTo(button1);
}

For brevity the up arrow tests are not shown since they’re nearly identical to the down arrow tests.

The last tests are for home and end keyboard navigation. These tests are also similar to the up/down arrow tests, however the setup is modified. To avoid any false positives, we’ll need more accordion panels to test. If we only use two items, it’s possible that our logic gives focus up or down by a single item instead of skipping directly to the first or last item. We’ll also invoke keydown on a middle element to ensure elements are skipped when the focus event is called.

// Home
[Fact(DisplayName = 
    "When focus is on an accordion header, Home moves focus to the first accordion header.")]
public void HomeNavigation()
{
    var cut = RenderAccordionWithFourPanels();
    var panels = cut.FindComponents<AccordionPanel>();
    var button3 = panels[2].Find("button");
    var button1 = panels[0].Find("button");

    button3.KeyDown(Key.Home);
    
    // did button 3 skip focus to button 1?
    JSInterop.VerifyFocusAsyncInvoke().Arguments[0].ShouldBeElementReferenceTo(button1);
}

For brevity the end key tests are not shown since they’re nearly identical to the home key tests.

Using these tests, we can write the remaining component code. Once keyboard navigation is complete, the component is fully functional. Since we have full test coverage for our component, refactoring can be done without the worry of breaking functionality.

This example represents the completed component to spec, including keyboard navigation, written in Blazor.

Final Thoughts

Through this process we saw that a well-defined specification can greatly improve the test story for our components. By defining accessibility specs up front, we can test our components for many accessibility features using TDD. When tests incorporate an accessibility-first approach, we can be confident components will meet the standards set in the specifications. Unit testing provides an isolated test with rapid verification, which is performed without running the application.

The process outlined here does have some weaknesses. First, an expert should be involved in drafting the spec for HTML, ARIA and keyboard navigation features. Incorrect usage of the aforementioned can cause flaws in the UI. In addition, test coverage should include browser-based functional testing. Functional tests further enhance the test coverage by ensuring the browser’s behaviors are as expected.

One final observation that came from this process is how complex accessibility is. Components should be built with a deep knowledge of accessibility so applications can be used by all users. If an you are not an expert and your team doesn’t have access to one, then an alternative is to use off-the-shelf components like Telerik UI for Blazor that already incorporate keyboard and accessibility features.

5 Reasons To Choose the KendoReact Form Library

$
0
0

We’ve put together a list of the top 5 reasons to choose the KendoReact Form. Check them out, and see if we could have the answer to all your form-related woes.

Adding a form to your web app feels like it shouldn’t be all that hard, right? Throw a <form> tag around a few <input> tags, slap a submit button at the bottom and call it a day! But of course, when you get into the weeds of form creation, it always turns out to be a larger task than you had originally thought.

Depending on the complexity of your form, you could easily lose hours, if not full days on the project ... which is why finding a form library to do the heavy lifting for you has become such a popular solution for frontend developers. In fact, if you do a quick search for form libraries, you’ll see there are tons of them out there—this is a problem that developers have tried to solve over and over, for years now. With that abundance of options, how do you choose the form library that’s right for your React application?

Well, we on the KendoReact team could be a little biased, but we’re also confident in what we’ve built—and we’re sure that the KendoReact Form library will check all the boxes you’re looking for. So you could spend the next day or so researching, installing and comparing various React form libraries ... or, you could try KendoReact and get back to writing code.

We’ve put together a list of the top five reasons to choose the KendoReact Form. Check them out, and see if we could have the answer to all your form-related woes.

5. Ease of Styling

Here’s a little bit of fun web trivia for you: Which came first, the form or the styling? If you guessed forms, you’re correct—forms were introduced as part of HTML2 in 1995, while Cascading Style Sheets weren’t released until the end of the following year and still had several more years before they were well-supported in browsers and not just officially W3C recommended. So next time you’re shaking your head and wondering why it’s so dang hard to customize a radio button, remember that, from a modern development perspective, they’re kind of antiques! It’s a bit like looking for the SD card slot on an 8-track player.

The common approach these days is to skip using the default HTML elements entirely and simply create your own. But, if you’ve ever tried to do that, you know that the “simply” in that last sentence is a little misleading. Form controls are complex, and rebuilding one from the ground up to be fully customizable and accessible takes time. We do it anyway, because having forms that look beautiful and match the rest of our application is important—but with the KendoReact Form, you can skip the “hard work” part and get right to the “looking beautiful” part.

All KendoReact components are designed with UX as the priority, so your users never have to struggle to figure out how a less-common input works. And, of course, they’re all fully theme-able, so you can either choose one of our five lovely pre-made themes, or create your own custom theme with our Figma Kits and apply it quickly and easily to the entirety of your application—forms included. Leaving you free to party like it’s 1999.

4. Built-in Multi-Step Forms

If you’ve got a lot of information to gather from your users, one of the best UX patterns you can use of is to break that flow up into multiple stages. Whether you call it a Wizard, a Stepper, or just a good ol’ fashioned Multi-Step Form, it’s an incredibly useful tool to leverage for your application. This approach can help a long form feel shorter by removing the “endless scroll” feeling, giving your users a visual representation of how much they have to complete, and organizing your form into groups of similar questions.

For really long forms, you might even consider allowing the user to save their progress and come back when they have time to finish. It’s a great way to create a more positive user experience, as well as increase the chances that they actually complete your form.

The KendoReact Form library includes support for multi-step forms right out of the box—by combining our React Stepper component with our React Form, you can easily break your form into as many stages as needed! Check out this demo of Multi-Step Forms with KendoReact, and see just how easy it is to set up. It’s so magical, you might just understand why some folks call them Wizards.

3. Variety of Inputs

Let’s be frank: A form library is only as good as the number of inputs it can offer you.

If you need even one input that isn’t included in a given library, it’s a dealbreaker. The only thing more painful than just using vanilla HTML forms is attempting to get two different third-party form libraries or (even worse) a bunch of unrelated individual input components from different libraries to all play nicely together. No, thank you. If that’s the ticket that gets assigned to you, it’s going to be the kind of sprint when you start suddenly realizing you have PTO you need to use before it expires.

Dodge the pain (and the ticket dodging), by making sure you commit to a library that has all the form elements you could ever need, and then some. Even if you think you’ve found a library that meets the needs of your application today, you also want to be sure it will meet the needs of your application tomorrow, next year and five years from now.

And—oh, what’s that you say? KendoReact has more than 20 different input components? Including less common ones, like a React MultiColumn Combo Box, a Color Gradient selector and a React Text Editor? Wow, you really know your stuff! You’re right: KendoReact offers all the inputs you could think of, and then some. There’s nothing worse than committing to a library, and then realizing it doesn’t actually do everything you need it to. Make sure you’re committing to a library that’s able to support your application, however it grows!

2. Accessibility

Forms are crucial for developers to get right when it comes to accessibility, since we’re collecting important user information. When a user is unable to complete a form or unable to provide accurate information because the inputs are inaccessible, we’ve not only failed our user by making them deal with a tedious and frustrating experience—we’ve also compromised the reliability and accuracy of the data we’re collecting. That’s a lose-lose for literally everyone involved.

Earlier, I was a little unkind towards the default HTML form elements—they’re antiquated, they’re not easily styled, they’re boring, etc. But I do have to give credit where credit is due, and you know what those default elements do well? Accessibility. Which is why so many developers choose to use them, in spite of their other shortcomings. Accessibility is paramount in forms, so we’ll often fall back on ol’ reliable vs. taking a risk.

With KendoReact Form, you no longer have to feel like you’re making a choice between style and accessibility. Each KendoReact component is not only stylish, but also created following the WAI-ARIA specification, to ensure that they’re all fully accessible. We take accessibility extremely seriously, because we believe that every user deserves a web experience that’s intuitive and inclusive.

1. Consistency

Consistency matters in two different, but equally important contexts: to your users and to your developers.

For your users, it’s important to consider the visual consistency in your application. Ensuring that all your components look similar and function in similar ways allows your users to more quickly learn their way around your software. They can begin to anticipate where things will be and how certain things will look, and this lets them move faster and get more done with less frustration. This is especially important with forms—if you’re using multiple different third-party input components, or some combination of a library and building your own, your users will feel the difference. Each new element you introduce is a new thing they have to navigate successfully in order to get you the information you need ... and if it gets too hard, they simply won’t bother.

The other (less considered) part of consistency is consistency in your code. In a way, your developers are also users—they need to be able to navigate around your application’s codebase quickly and easily, to learn where things will be and how they’ll be structured, in order to get more done with less frustration. Every time you add a new dependency to your project, you increase the complexity for your developers: Onboarding gets longer, refactoring gets harder, and even just creating new features gets more time-consuming.

You can minimize this pain point for both parties by standardizing on one library, and (you guessed it) KendoReact is a great one to choose. With a consistent look and feel for over 100 components, your users will feel the difference immediately. And once your developers have learned how KendoReact works, creating new features is a breeze! Save time, energy and frustration for everyone involved in your application by getting consistent with your tooling.

Conclusion

So, are you convinced? Ready to leave the old ways behind and make your forms easier, more intuitive and more accessible with the KendoReact Form?

You don’t have to take my word for it. Explore our docs, check out our other resources and try it yourself—it’s free for the first 30 days. Just be warned—building forms this easily and quickly is addictive, and you might have trouble going back to how you were working before!

Sands of MAUI: Issue #36

$
0
0

Welcome to the Sands of MAUI—newsletter-style issues dedicated to bringing together latest .NET MAUI content relevant to developers.

A particle of sand—tiny and innocuous. But put a lot of sand particles together and we have something big—a force to reckon with. It is the smallest grains of sand that often add up to form massive beaches, dunes and deserts.

Most .NET developers are looking forward to .NET Multi-platform App UI (MAUI)—the evolution of Xamarin.Forms with .NET 6. Going forward, developers should have much more confidence in the technology stack and tools as .NET MAUI empowers native cross-platform solutions on mobile and desktop.

While it is a long flight until we reach the sands of MAUI, developer excitement is palpable in all the news/content as we tinker and prepare for .NET MAUI. Like the grains of sand, every piece of news/article/video/tutorial/stream contributes towards developer knowledge and we grow a community/ecosystem willing to learn and help.

Sands of MAUI is a humble attempt to collect all the .NET MAUI awesomeness in one place. Here's what is noteworthy for the week of December 6, 2021:

.NET Podcast App

.NET Conf 2021 was a massive success—great .NET content from Microsoft folks and speakers from all around the world. One of the key demo apps during the .NET Conf keynotes was a modern .NET Podcast app—a showcase of .NET MAUI and Blazor working together on top of .NET 6.

James Montemagno wrote up a .NET Conf Recap post pointing to some wonderful session recordings and behold—the .NET Podcast app now open sourced. This took some coordination and is a great showcase of a full-featured .NET MAUI app with Blazor and Azure Container Apps goodness baked in—a nicely architected codebase for developers to explore.

DotNetPodcasts

.NET MAUI Community Standup

Maddy Montaquila and David Ortinau hosted the latest .NET MAUI Community Standup with an epic beginning and with special guest THE Jonathan Dick. On the cards was pointers to .NET Conf goodness around .NET MAUI/Blazor/C# and recapping exciting community blog updates.

David and Jon dug deep into Xamarin.Forms—the present reality that isn't shabby at all with latest service release and lots of community PRs. Next up was what we're all waiting on to close out the year strong—the next .NET MAUI release, aka Preview 11, due out soon. There is much to be excited about—Multi-Window support, Layout improvements, new controls/Handlers and performance tuning.

The next wave of tooling update riding out with Visual Studio 17.2 is scheduled to bring in Visual Diagnostics—a web DOM like view/selection of UI elements within a running .NET MAUI app and changing properties on the fly. David and Jon also did a lot of honest Q/A—the future looks productive for .NET MAUI developers.

MauiStandup

Customizing .NET MAUI Controls

Both Xamarin.Forms and .NET MAUI provide abstraction over native UI across platforms—developers get to write C#/XAML that gets rendered as native controls on each respective platform. What if you wanted to customize the look and feel or some behavior of the native UI, perhaps on a per platform basis? This is where the evolution to .NET MAUI really makes a difference.

In Xamarin.Forms, one would have to write custom Effects or worst case, a whole custom renderer overriding a native platform implementation—this was not for the faint-hearted.

.NET MAUI makes native UI customizations easy with the new Handler architecture, which provides hooks to tap into native control behavior. Gerald Versluis produced a video on customizing .NET MAUI controls with Handlers and Mappers—an encore after some APIs changed with latest .NET MAUI Previews.

Gerald talks through how to override the Handler implementations through specific Mappers, with PrependToMapper, ModifyMapper or AppendToMapper methods—thus providing developers full flexibility as to how/when to customize control behavior.

CustomizeControls

Angular with.NET MAUI

Blazor Hybrid apps with .NET MAUI is a great story—brings in the goodness of web to native mobile/desktop apps. However, what if you had investments in JavaScript, like in modern frontend apps with JS SPA frameworks? All this talk of modernizing desktop apps with web code got you thinking if your JS code can make it over the bridge if you give up NodeJs or JSX dependencies?

For modern frontend apps written with Angular/React/other SPA frameworks, PWA and Electron present two lucrative ways to bring the goodness over to desktop audiences. However, Blazor gets to use the BlazorWebView on top of .NET MAUI—and shouldn't a WebView component be able to render any web content?

A curious developer tried just that—would it be possible to render a fully compiled Angular web app inside a .NET MAUI app through the BlazorWebView? Do a full build of an Angular app and you essentially get HTML, JS and CSS—BlazorWebView does not care and is happy to render.

MauiAngular

.NET MAUI Community Toolkit Unpacked

Been hearing the buzz about .NET MAUI Community Toolkit but haven't given it a spin yet? Brandon Minnick produced a short video from .NET Conf giving you the essential rundown of .NET MAUI Community Toolkit and how to get started using it.

.NET MAUI Community Toolkit is an open source toolkit meant to augment the .NET MAUI developer experience with Extensions, Behaviors, Converters, UI Elements and more—nothing stopping you from being more productive.

MauiToolkit

That's it for now.

We'll see you next week with more awesome content relevant to .NET MAUI.

Cheers, developers!


Create Data Matrix Barcodes Quickly and Easily With Telerik UI for Xamarin

$
0
0

With the R3 2021 release of Telerik UI for Xamarin, we’ve added a new component to the Barcode family, namely Data Matrix.

Barcodes can be found everywhere—no matter whether it is on the shipping package in logistics, on an invoice in accounting or on a component parts in industrial factories. They are widely used to help quickly share specific information.

With the R3 2021 release of Telerik UI for Xamarin suite, we’ve expanded our Barcode control to include a new Data Matrix component. Together with the QR Code and PDF417, DataMatrix is among the most popular two-dimensional barcode symbologies. DataMatrix is also available in our UI for WinUI, UI for WPF and UI for WinForms suites.

XamarinBarcode_DataMatrix

General Info on Data Matrix

Data Matrix is a very efficient, two-dimensional (2D) barcode symbology consisting of black and white “cells,” or dots, arranged in either a square or rectangular pattern, also known as a matrix. The information to be encoded can be text or numeric data. With a usual data size from a few bytes up to 1,556 bytes (or up to up to 2,335 alphanumeric characters), DataMatrix barcode is one of the smallest barcodes while encoding the same data as other barcodes.

Every Data Matrix is composed of two solid adjacent borders in an “L” shape (called the “finder pattern”) and two other borders consisting of alternating dark and light “cells” or modules (called the “timing pattern”). Within these borders are rows and columns of cells encoding information. The finder pattern is used to locate and orient the data matrix while the timing pattern provides a count of the number of rows and columns in the matrix.

XamarinDataMatrix_Structure

Data Matrix Advantages

What are the specific benefits of Data Matrix over other 2D barcodes?

  • Occupies less space: Data Matrix has the ability to encode large amount of data in a small area.
  • High fault tolerance: Data Matrix code includes an error-correction algorithm, making it able to reconstruct up to 30% of a damaged code image.
  • Readability even with low contrast: A contrast of only 20% can be sufficient to successfully read the barcode.
  • Read easily: It can be read in any position (0-360°).

Configuration

As always, we have ensured to provide you with various configuration options, so you get the exact DataMatrix barcode you need.  Let’s quickly go through the list of the available settings:

Encodation

The Encodation property determines the type of content encoded by the DataMatrix barcode. It’s important to choose the proper encodation, as this reduces the barcode size and improves readability. Possible options are ASCII, Text and C40. Details on each of these can be found in our documentation here: Data Matrix Symbology Encodation.

Symbol Size

Although the most popular DataMatrix is square, similar to the QR code, you also have the option to define it as a rectangle. This is controlled through the SymbolSize property. In addition to the shape, you can choose whether the size should be automatically determined by using “SquareAuto” or “RectangleAuto,” or manually define it by using values such as Square32x32 or Rectangle16x48.

XamarinDataMatrix_Shape

Text Encoding

The TextEncoding property defines character encoding used to encode the barcode contents. By default, it is set to UTF-8, which uses more bits per character and may increase the size of the barcode image. TextEncoding is of type System.Text.Encoding and you can check the available values in MS Docs: System.Text.Encoding Class.

Let’s See It in Action

Let’s add a simple DataMatrix barcode to the Xamarin.Forms page.

  1. Add a reference to the Telerik.UI.for.Xamarin NuGet package from the Telerik NuGet Server.
  2. Register the required for the Barcode namespace:

    xmlns:telerik="clr-namespace:Telerik.XamarinForms.Barcode;assembly=Telerik.XamarinForms.Barcode"
  3. Add the RadBarcode definition to the page with the DataMatrix symbology applied:

    <telerik:RadBarcode x:Name="dataMatrix">
        <telerik:RadBarcode.Symbology>
            <telerik:DataMatrix Encodation="Ascii"
                         SymbolSize="SquareAuto" />
        </telerik:RadBarcode.Symbology>
    </telerik:RadBarcode>
  4. Set the information that needs to be encoded through the Data Matrix.  For our example, I will encode some information on the Telerik UI for Xamarin product:

    string productName = "Product Name: Telerik UI for Xamarin";
    string productPage = "Product Page: https://www.telerik.com/xamarin-ui";
    string documentation = "Documentation: https://docs.telerik.com/devtools/xamarin/";
    string release = "Recent Release: R3 2021";
              
    dataMatrix.Value = $"{productName}\n{productPage}\n{documentation}\n{release}";
  5. Check the result in Android emulator:

    XamarinDataMatrix_Example

    Try It Out and Share Your Feedback

    The R3 2021 release is available for download in customers’ accounts. If you are new to Telerik UI for Xamarin, you can learn more about it via the product page. It comes with a 30-day free trial, giving you some time to explore the toolkit and consider using it for your current or upcoming Xamarin development.

    We would love to hear what you think, so should you have any questions and/or comments, please share them in our Telerik UI for Xamarin Feedback Portal.

Angular Basics: Introduction to Processes and Threads for Web UI Developers

$
0
0

Instead of doing everything in a single process on a single thread, modern browsers have a multi-process architecture. What does this mean for developing in JavaScript, which is single-threaded?

We often hear “main thread” mentioned when learning about optimizing JavaScript code for performance.

JavaScript is single-threaded. Only one thing can happen at a time, on a single main thread and everything else is blocked until an operation completes. — MDN

It took me a while to realize that the main thread we’re talking about belongs to a process in the browser that is specifically responsible for rendering web page and running anything that affects rendering (JavaScript and user input events). Modern browsers have a multi-process architecture with separate processes that take care of different parts of the browser.

Being aware of processes and threads also helped me see that Web APIs introduce asynchronous tasks in our applications. When we call Web APIs such as fetch(url).then(cb) or setTimeout(cb, delay), they do not run on the main thread of the renderer process. For example, fetch() runs on a network thread in the browser process.

Using the Web Workers API we can run CPU-intensive tasks on a background thread of the renderer process. Additionally, we can use the requestIdleCallback() API to queue time-consuming, low-priority tasks to run on the main thread of the renderer process when the browser would otherwise be idle.

When programming with JavaScript, we mostly don’t have to think about threads. However, a basic understanding of threads and processes helps clear some of the mysteries of asynchronous programming in JavaScript. Therefore, in this article we will talk about processes, threads, the responsibilities of the main thread of the renderer process, and its interaction with other the other browser processes and threads.

On the left side of a needle eye is white thread. On the right, a rainbow of threads.

Photo credit: John Anvik on Unsplash.

Before we can talk about processes and threads, we need to look at the difference between compiled and interpreted languages.

Compiled vs. Interpreted Programming Languages

Programming languages are high-level human-readable languages that need to be converted to low-level binary code and machine code that computers can execute. Programming languages can be categorized into compiled or interpreted languages.

What is the difference between the two?

Compiled Languages

Applications written with compiled languages are compiled to produce machine code that is executed directly by the operating system. The application is compiled using a compiler. Compiling an application is often referred to as the “build” step. The build step produces an executable file containing the machine code.

The executable file is packaged and made available to the users so they can install it on their devices.

For example, Google Chrome is an application written with a compiled language (mainly C++).

Google Chrome application icon

When we run the Chrome application, for example by clicking on the icon, the operating system on our device creates a process to execute the application.

Interpreted Languages

An interpreted language uses an interpreter to parse the application code, translate it into instructions the interpreter can understand and then execute the instructions. The interpreters themselves are programs (written in assembly language or high-level language).

JavaScript is an interpreted language used to build web applications. Browsers such as Google Chrome have a JavaScript Engine that has an interpreter to translate the JavaScript code and execute it.

Now we know that compiled applications are compiled to produce machine code that is executed directly on the user’s computer, whereas interpreted applications are parsed, translated and executed by an interpreter. Let us see how processes and threads fit into the picture next.

Processes and Threads

Process

When we run an application that was written with a compiled language (for example, by double-clicking on its executable file), the operating system starts a process.

Starting a process means that the operating system does the following things:

  • Loads the application’s binary code into memory
  • Allocates a block of memory for the application to keep its state (a heap)
  • Starts a thread of execution

Thus, a process is an instance of the application in execution. It includes the application’s bytecode in memory, a heap and a thread. The heap stores the application’s state, while the thread is the actual flow of execution through the binary code.

An application can create additional threads to execute parts of the instructions.

A process can also ask the operating system to create child processes to control separate parts of the application. The operating system allocates separate memory space to each process. Processes do not share resources—instead, they communicate with each other using a mechanism called Inter-Process Communication (IPC).

Thread

As we mentioned earlier, a process can create additional threads. We refer to the main thread of execution as the main thread, and to the threads created to execute parts of the program as background threads.

Threads represent independent execution contexts within a process. In a multi-threaded process, each thread has its own stack, stack pointer, program counter and thread-specific registers to keep track of its execution.

Now that we have a general overview of processes and threads, let us talk about the multi-process architecture used by browsers with the aim to see where web applications fit in.

Modern Browsers Have a Multi-Process Architecture

Browsers are built using compiled languages. Instead of doing everything in a single process on a single thread, modern browsers have a multi-process architecture.

Browsers create multiple processes, each responsible for a different part of the browser’s functionality. The processes in turn create multiple threads to run programs concurrently.

A multi-process architecture provides the browsers with better:

  • Security—each process has its own memory and resources accessible only by the threads within the process
  • Stability—if a process is running slowly or becomes unresponsive , it can be restarted without affecting other processes ‍♀️

Let us look at Google Chrome for an example. When we open a Chrome browser, we run the Chrome application. The operating system creates a process — this is Chrome’s main process which Chrome aptly calls the browser process.

The browser process creates further child processes to control various parts of the browser. Following are some of the processes in Chrome:

  • Browser process
  • Renderer process
  • GPU process
  • Plugin process
  • Extensions process
  • Utility process

The process names are reflective of their functions. Please refer to “Inside look at modern web browser” by Mariko Kosaka for a beautifully illustrated and detailed explanation of the processes in Chrome.

As web developers, we are especially interested in the renderer process and its interaction with the main browser process.

The browser process controls the “browser” part of the application including the address bar, bookmarks, back and forward buttons. It also handles the invisible, privileged parts of a web browser such as network requests and file access.

While the renderer process controls the actual rendering of the web page. — Mariko Kosaka

Great! Now we know that the renderer process is responsible for rendering web pages. Let us take a closer look at what rendering actually means and how the renderer process does it.

The Renderer Process

Rendering happens in a sandboxed process so if an evil website exploits a security vulnerability in the rendering code, the sandbox keeps the damage contained. The browser itself is safe and the other tabs are safe.

In order to talk about the role of the renderer process, let us first talk about what rendering is.

What is Rendering?

Rendering is the process of turning HTML content into pixels. — Steve Kobes

An HTML document contains a web application’s code (HTML elements, text content, embedded content such as images, CSS and JavaScript). The rendering process turns the HTML document into a web page that users can see on their screen and can interact with. The HTML document in a Angular application may look something like this:

// index.html

<!DOCTYPE html>  
<html>  
  <head>  
    `<link rel="stylesheet" href="styles.css" media="print" onload="this.media='all'">`  
    <style>  
      /* critical css style rules */  
    </style>  
    `<link href="https://fonts.googleapis.com/icon?family=Material+Icons" rel="stylesheet">`      
  </head>  
  <body>  
    <app-root></app-root>  
    <script src="runtime.js" defer>  
    <script src="polyfills.js" defer>  
    <script src="vendor.js" defer>  
    <script src="main.js" defer>  
  </body>  
</html>

When we visit a website, the browser process gets the site’s HTML document from the cache or service worker, or makes a network request to the server hosting the website.

The browser process then sends the HTML document to the renderer process to render the web page.

Rendering a page involves:

  • Performing the critical rendering path
  • Loading JavaScript, interpreting JavaScript to binary code, and executing the binary code
  • Painting the actual pixels on the screen

The renderer process uses a rendering engine to carry out the steps in the rendering path. Let us take a closer look at the rendering engine and the critical rendering path next.

Rendering Engine

Browsers use rendering engines to render web pages.

A rendering engine is a software that:

  • Implements the specs of the web platform
  • Carries out the critical rendering path
  • Embeds the JavaScript engine

Examples of rendering engines include Blink (Chrome), Gecko (Mozilla) and WebKit (Apple).

Critical Rendering Path

The rendering engine goes through a sequence of steps called the critical rendering path to transform an HTML document (HTML, CSS and JavaScript) into the pixels drawn on the user’s screen.

The rendering engine does the following steps during the critical rendering path:

  • Parses the HTML and starts building the Document Object Model (DOM)
  • Requests external resources (stylesheets, scripts, images, etc.)
  • Parses the styles and builds the CSS Object Model (CSSOM)
  • Computes styles for the visible nodes in the DOM tree and creates a render tree that contains the computed styles
  • Determines the visual geometry (width, height and position) of the elements based on the viewport size (and orientation for mobile devices)
  • Paints the pixels on the screen

We can categorize rendering into two parts:

  1. Rendering the application’s home page when the application first loads
  2. Updating the rendering as the application runs, in response to user interaction, navigation, scrolling, etc.

The initial render starts from scratch. From parsing the HTML document, creating all the data structures (DOM, CSSOM, render tree, layout tree, etc.), painting the whole page, and downloading, processing and executing JavaScript, then finally registering the event listeners to make the page interactive.

While the application is running, the JavaScript code can update the document content, structure and styles using the DOM API. The rendering engine updates the rendering to reflect the changes made by JavaScript.

I really recommend watching Life of a Pixel by Steve Kobes (2019, 2018) for an in-depth look at the rendering pipeline in Blink (Chrome’s rendering engine). This talk is truly amazing, and you will be delighted at the amount of learning you will take away from it.

JavaScript Engine

Since JavaScript is an interpreted language, we need an interpreter to convert JavaScript code into machine code and then execute it.

Browsers have a JavaScript engine that encompasses a parser, an interpreter and an optimizer. Most major browsers have their own implementation of the JavaScript engine. Chromium’s JavaScript engine is called V8.

As we mentioned earlier, the browser’s rendering engine embeds its JavaScript Engine. For example, Chrome’s rendering engine (Blink) creates an instance of V8 (the JavaScript engine) — an instance of V8 is called an Isolate.

Anything that interacts with the DOM needs to run on the main thread to avoid synchronization issues. Since JavaScript can modify the content, structure and styles of elements on the web page using the DOM API, it makes sense that JavaScript runs on the main thread of the renderer process.

As we saw earlier, the application’s scripts are loaded during the critical rendering path. Once the scripts are loaded, the JavaScript engine uses its various components to parse, interpret, execute and optimize the JavaScript.

Using Chrome as an example, the JavaScript engine does the following tasks:

  • The parser parses the JavaScript to create an AST.
  • The interpreter (Ignition) has a bytecode generator that walks the AST and generates a stream of bytecode.
  • The interpreter executes the bytecode, one bytecode at a time.
  • The optimizing compiler (TurboFan) generates optimized code.

Please refer to Life of a Script to learn details about how JavaScript is loaded, parsed, compiled and optimized in Chrome.

Now we see that when we say JavaScript is single-threaded because it runs on a single main thread, we’re talking about the main thread of the renderer process. We know that the browser’s rendering engine runs on the main thread of the renderer process, the rendering engine creates an instance of the JavaScript engine, and the JavaScript engine creates a JavaScript callstack to keep track of the execution of the application’s JavaScript.

I want to point out here that the JavaScript callstack is not the same as the stack created by the operating system for the main thread. I naively thought so at the start and was quite confused.

Renderer Process Main Thread

I’m sure we are quite aware of the importance of the main thread of the renderer process by now. We know that the rendering engine and the JavaScript engine both run on the main thread of the renderer process. Thus, the main thread does most of the work in the renderer process.

The main thread:

  • Carries out the critical rendering path
  • Stores the DOM, CSSOM, render tree, layout tree and other data structures created during the critical rendering path
  • Exposes the DOM API to the application’s JavaScript
  • Updates rendering
  • Responds to user inputs (accepts events from input devices and dispatches those events to the elements that should receive them)
  • Interprets and executes the application’s JavaScript (except workers)

The main thread has an event loop that orchestrates running JavaScript, updating rendering and responding to user inputs. A thread can only run one task at a time. Therefore, while the main thread is running JavaScript, it cannot update the rendering or respond to user input. It is important that our application’s JavaScript does not block the main thread—a function that takes too long to run blocks the main thread until it finishes executing.

As we see the renderer process does not actually paint the actual pixels on the screen. So who does?

Painting the Pixels on Screen

Talking about painting pixels makes me think of this song from Disney’s Alice in Wonderland :

We’re painting the roses red.
We dare not stop,
Or waste a drop,
So let the paint be spread.

As Steve Kobes explains in his talk , Life of a Pixel, browsers use the graphics library provided by the underlying operating system to paint the actual pixels on the user’s screen. Most platforms use a standardized API called OpenGL. There are also newer APIs such as Vulkan.

However, renderer processes are sandboxed for security to keep the user’s device safe from web applications and keep other processes safe from exploitations of any security vulnerabilities in the renderer process. Therefore, the programs running on the renderer process cannot make system calls to request services from the operating system.

The renderer process communicates with the GPU process to paint the actual pixels on the user’s device using the graphics library. The browser trusts the code running on the GPU process since it is its own code, therefore the GPU process can make system calls.

Web APIs

Web APIs allow web applications to access the user’s files, microphone, camera, geolocation, etc. with the user’s permission.

Web APIs are built into the web browsers. Web APIs expose data from the browser and surrounding computer environment. — MDN

Examples of Web APIs include:

  • DOM API
  • setTimeOut()
  • Fetch API
  • Client-side storage APIs
  • Device APIs
  • Media APIs

While the DOM API methods run synchronously, the other Web API methods run asynchronously.

For example, if we call document.createElement() the JavaScript engine sequentially adds the method’s execution context on the JavaScript callstack even if the callstack is not empty.

Whereas, if we call the setTimeout() which is a Web API, the renderer process asks another process (perhaps the browser process) to start the timer, and when the specified time has passed, the browser process queues the callback we sent setTimeout() so that it can run on the main thread of the renderer process.

The browser uses callback queues (also called job queues, task queues or message queues) and a microtask queue, to queue the callbacks that are ready to run on the main thread. An event loop executes the callbacks waiting in the queue when the JavaScript callstack becomes empty.

Worker Threads

Finally, we have arrived at worker threads. What are worker threads?

Browsers provide us with the Web Workers API so that we can offload CPU-intensive operations in our web applications from the main thread to background threads of the renderer process. These background threads are also called worker threads or workers.

We use the Worker interface, available on the global window object, to create a Web Worker. (The browser exposes a global window variable representing the window in which the script is running to JavaScript code. The window object includes items that are globally available.)

The JavaScript engine creates a new worker thread and loads the named script to run in parallel to the main thread. The DOM API, CSSOM and other data structures created during the critical rendering path exist on the main thread. Therefore, scripts running in the worker threads cannot access the DOM API.

// main.js

if (window.Worker) {  
  const myWorker = new Worker('worker.js');

  myWorker.onmessage = function(e) {  
    console.log(e.data);  
  }  
}

The main thread and worker thread communicate by posting messages to each other using the postMessage() method. And they respond to messages via the onmessage event handler. The message event has a data attribute that contains the message.

// worker.js

const result = doCpuIntensiveWork();  
postMessage(result);

function doCpuIntensiveWork() {}

Scripts running in the worker thread are already within the worker space so they can access postMessage() directly.

Please refer to MDN to learn more about Web Workers and the Angular docs to learn how to create workers in Angular.

Summary

In this article, we saw that browsers are built using compiled languages. Instead of doing everything in a single process on a single thread, modern browsers have a multi-process architecture. The multi-process architecture allows browsers to provide web applications the necessary security and stability.

We learned that browsers use a rendering engine to render pages. The rendering engine implements the specs of the web platform, carries out the critical rendering path, and embeds a JavaScript engine. JavaScript is an interpreted language—therefore, the JavaScript engine includes an interpreter that translates the JavaScript code into binary code. The JavaScript engine creates a JavaScript callstack to keep track of the execution of the JavaScript code.

The main thread of the renderer process is responsible for rendering web pages and runs anything else that affects rendering to avoid synchronization issues. JavaScript and user input events can affect rendering by manipulating the DOM or styles. Therefore, in addition to carrying out the critical rendering path, the main thread runs JavaScript (except workers) and accepts events from input devices, and dispatches those events to the elements that should receive them. The event loop orchestrates running these tasks on the main thread.

Web APIs introduce asynchronous tasks to our application. Asynchronous tasks run on other threads depending on the Web API being called (background thread of the renderer process or a thread in another process). We pass callbacks to the Web API call or to a promise returned by the call. When the asynchronous task finishes running, it adds the callback together with the result to a queue in the main thread. The event loop executes the queued callbacks on the main thread of the renderer process when the JavaScript callstack is empty, thus ensuring that synchronous code runs before asynchronous code.

I hope you found that learning about processes and threads, and taking a closer look at the renderer process and its interaction with the other processes in the browser helps you understand the synchronous and asynchronous nature of the code in our frontend applications.

Resources

  1. Life of a Pixel (2018, 2019, 2020)
  2. Life of a Process
  3. Philip Roberts: Help, I’m stuck in an event-loop.
  4. SmashingConf London—Jake Archibald on “The Event Loop”
  5. Chromium’s Multi-process Architecture
  6. Chrome University
  7. How Blink works

Telerik & Kendo UI December 2021 Update

$
0
0

Check out what’s new this month in our Kendo UI and Telerik UI products.

If you’ve been paying attention since our R3 2021 update, we have had big news in October and November. Today, we’ll share even more goodies with you for our December update!

Table of Contents

  1. Telerik UI for Blazor
  2. Telerik UI for ASP.NET Core & Telerik UI for ASP.NET MVC
  3. Kendo UI for Angular
  4. Kendo UI for Vue
  5. KendoReact
  6. Kendo UI for jQuery

Telerik UI for Blazor

New Dialog UI Component

Telerik UI for Blazor Dialog Component custom themes

In addition to the existing predefined dialog options, we added a standalone Telerik Blazor Dialog UI component so you have an out-of-the-box solution for building both simple and complex UI popups.

The Dialog comes handy for displaying information to the user and provides multiple options for customization such as width, height, title, visibility, content and action button templates, close on overlay click and more.

Data Grid & TreeList Component Enhancements

Grid Export to Excel Customization Options
Telerik UI for Blazor Grid Export Selected Columns Only - allows user to choose which columns to export

In the current release, we included a set of Excel export customization options for the Grid component. You can now define which data items or columns to be included in the exported file (via the OnBeforeExcelExport event), control the exported columns’ width, have seamless support for exporting enum values, and trigger Excel and CSV export programmatically (via the newly exposed methods in the API).

Data Grid & TreeList SearchBox Enhancements
Telerik UI for Blazor Data Grid Clear SearchBox

The data grid search box input and filter criteria can now be easily cleared up by using the X-icon in the box, Esc key or programmatically.

Data Grid & TreeList Enhanced Editing
We improved the UX of editing large Blazor data grids (including the ones with a high number of columns and rows and those with horizontal or vertical virtualization). Now, regardless of the position of an edited cell or where users are navigating to, the data grid ensures the particular cells are visible, on focus and selected so that they can work with them seamlessly.

The editing enhancement is also available for the TreeList component and can be viewed in the dedicated demos.

Data Grid & TreeList Enhanced Validation
In both the Telerik Blazor Grid and TreeList components, we added two features: disabling the built-in validation and exposing the option to developers to build a custom one (different than the default DataAnnotationValidator).

The two features are available with the GridValidationSettings/GridCustomValidatorTemplate tag for the Grid component, and with TreeListValidationSettings/TreeListCustomValidatorTemplate for the TreeList.

TabStrip UI Component Enhancements

Telerik TabStrip Persist Content - in a weather app, tabs show for Sofia, London, Paris

Another heavily used component in Blazor apps received a boost of features in the 2.30.0 release—the TabStrip! We exposed two new parameters: PersistTabContent, which determines whether the content of tabs is persisted when changing tabs, and Visible, which allows you to easily control the visibility of each of the tabs.

Validation Mode in Input Components

Telerik UI for Blazor Input Validation Options - showing list of errors and highlighting fields where errors are present

To make validation smooth and convenient for any use case, we introduced a new enum parameter ValidateOn in all Telerik Blazor input components, such as Date & Time Pickers, TextBox, Numeric TextBox, MaskedTextBox and TextArea. The ValidateOn parameter allows you to configure whether to trigger validation on change, blur or while typing, so with these out-of-the-box options, you can pick and set the best option for each scenario.

New Features in Charts

Telerik UI for Blazor Line Chart Dash Property

We exposed several chart properties requested via the dedicated Feedback Portal, which will allow you to easily customize the data visualization graphics. The new features for the Line Chart and Stock Chart components include configuration of the area background color and opacity, line width and dash type.

Telerik UI for ASP.NET Core & Telerik UI for ASP.NET MVC

Following November, which was all about the official support for .NET 6 and Visual Studio 2022, this month the Telerik .NET web family of products brings another set of new components, features and VS Code updates.

New PivotGrid Component

Last month, we announced the release of the new and improved PivotGrid UI component in our Kendo jQuery offering, and this month we are happy to share that it is available in our Telerik UI for ASP.NET Core & MVC libraries! While at the time of its initial release the PivotGridv2 may have fewer features and less functionality than the original PivotGrid, the plans are, in the next few releases, to continue to expand its functionality until it reaches full parity with the original (and even exceed it).

Telerik UI New PivotGrid Component

You can immediately take advantage of the new PivotGridv2, which was built from the ground up and has an updated design to ensure the performance and user experience are as good as they can be. If you are already using the existing PivotGrid, have no fear—nothing will change with this update. We will continue to keep both components existing side by side until we see evidence that most users have migrated to the new component.

Try out the new PivotGrid component and take a spin at the demos showing how to sort, filter, render custom content using templates, and export to PDF.

See the New Pivot Grid component demos for UI for ASP.NET Core or UI for ASP.NET MVC.

Data Grid UI Component Enhancements

As with almost every release, in the December update of Telerik UI we gave a little love to the Grid. You as a developer and your applications’ end users can enjoy the following new features:

Grid Multi-Column Sorting via CTRL + Click
Telerik Data Grid Multi-Column Sorting - clicking on column headers allows you to sort by ascending/descending, and you can add primary, secondary, etc. priorirty column to sort by

In this release, we expanded the sorting options for the Grid and added more ways to interact with it. End users can now perform sorting over multiple columns when pressing the CTRL button. When clicking on a column header without the CTRL button pressed, the Grid will revert to sorting by a single column.

For an in-depth look at the enhanced sorting, head on over to the Grid demo for ASP.NET Core and ASP.NET MVC.

Fit All Columns Width to Content
Using the new autoFitColumns method, you can render a sleek Grid with a minimum possible width for all or selected columns so that their underlying text fits nicely without empty spaces or wrapping.

Grid Rows Drag & Drop
Telerik Data Grid Reorder Rows drag and drop

The MVC and Core data grids now provide built-in functionality that allows end users to reorder single and multiple rows by dragging and dropping them within the Grid and between two Grids.

Support for Non-String Fields in Grid’s Search Panel
Telerik Grid Search by Numeric Value

The Grid’s Search Panel now allows search and filtering for non-string column values.

Editor UI Component Enhancements

Undo & Redo Commands
Telerik Editor Undo and Redo Commands

The Editor UI component for ASP.NET Core and MVC offers multiple tools for interacting with its content, such as rich-text and table formatting, and in this release we added the Undo and Redo built-in commands, further enhancing the component’s capabilities.

Visual Studio Code Extension Update
Visual Studio Code Extension for Telerik UI for ASP.NET Core

Telerik UI for ASP.NET Core brings a refreshed and improved Visual Studio Code extension! You can enjoy the updated UX, configure the .NET framework version (including .NET 6.0), and set project themes plus color swatches with a couple of clicks at project creation.

You can also jump-start a new project with predefined pages (Grid, Chart, Form and more) or the new Admin Dashboard project template with pre-built layout and functionality. Rearrange the layout as it fits your needs, and simply plug in your data and bind it to the components—including Grid, Tile Layout, Drawer, Calendar, Form, various Chart types, Card and more.

Kendo UI for Angular

New Components

Barcode Component
Food items shown with barcodes

With this update, we are officially introducing the Kendo UI for Angular Barcode component. The name gives it away, but the main focus of this component is to create and render valid barcodes within your Angular applications.

The Angular Barcode comes with support for several 1D barcode types that can be defined through the available configuration options, and the barcodes can be rendered either as an SVG or Canvas element. Additionally, these Barcodes can be exported in PDF or PNG formats.

To see what you can do with the new Angular Barcode component, check out the Kendo UI for Angular Barcode documentation.

QR Code Component
QRCode-Overview shows URL, location, email in QR codes of different colors

The new Kendo UI for Angular QR Code component makes adding any type of QR Code to your Angular applications a breeze. With built-in support for encoding and error correction, as well as the ability to add overlays for custom logos or QR Code types like the Swiss QR Code, this new Angular component should fit any QR code requirements you may have. These Angular QR Codes can be rendered both as SVG and Canvas elements, and can be exported to various formats like PDF or PNG.

Here’s a direct link to the Kendo UI for Angular QR Code component documentation.

Enhancements

Angular 13 Support
Angular 13 was released in the beginning of November 2021, and Kendo UI for Angular has had official support since Day Zero. If your team is looking to upgrade to the latest and greatest within the Angular framework, you can safely update your Kendo UI for Angular references.

Gantt: Editing
Gantt-Tasks Editing - editing task window shows an event for validation with customer, with a start and end time, and a field for Progress showing 25%.

With the new editing capability, the Kendo UI for Angular Gantt continues to add high priority features that are needed in order to officially release v1 of the Gantt. With this editing feature, users can edit items directly in the TreeList part of the component using in-cell editing (individual cells are edited).

Additionally, the Gantt can be configured to use a built-in dialog to assist with editing, which can be accessed by interacting with the tasks rendered on the right-hand side of the component.

For more information, here’s a link to the Kendo UI for Angular Gantt Editing documentation section.

Gantt: Selection
Gantt-Selection-Single - selecting different phases and sub-phases highlights the same on the calendar chart

The Angular Gantt component also received the selection feature with this release. Selection works by interacting with the data structure on the left-hand side of the Gantt by selecting single rows or by clicking tasks on the right-hand side.

Here’s a quick link to the Kendo UI for Angular Gantt Selection docs and demos.

Editor: Select All & Print Tools
Editor-SelectAll button highlights all the content

Adding to an already impressive list of tools available within the Kendo UI for Angular Editor, this latest release includes the Select All and Print tools.

The Select All tool, as the name indicates, is a convenient tool for users to be able to select all content within the Editor using a tool in the toolbar, which is a very intuitive way to interact with the Angular Editor.

The Print tool lets users print out just the content of the Editor via a built-in tool of the component itself. This simplifies the printing process, as the Editor itself will know how to print content and does not require developers to write their own logic around printing.

For everything related to selection, head on over to the Kendo UI for Angular Editor Selection documentation section.

Editor: Image Resizing
Editor-ImageResize - using one of the corner drag handles, the user resizes an image in the editor

With this latest release, the Kendo UI for Angular Editor now supports the ability for images within the content area to be resized using drag handles. This is a big quality-of-life improvement to end users of the Editor as it gives an intuitive way to customize and interact with images within the Angular Editor.

To see image resizing in action, you can refer to the Kendo UI for Angular Editor Overview sample.

Chart: Improved Pan and Zoom
The Chart allows panning right and left, and zooming

While panning and zooming have been a part of the Kendo UI for Angular Charts for some time, with this latest update we have improved the behavior and performance of these interactions. This should lead to a more intuitive and more responsive Angular chart overall without any additional configuration needed.

For an in-depth look at this improved feature, head on over to the Kendo UI for Angular Chart Panning and Zooming documentation section.

Switch: Custom Size and Long Labels
Switch toggles off, labeled here as disabled, and on, labeled as enabled

The Angular Switch component provides an intuitive and sleek user experience for toggling between two values. Most often used to represent On/Off or True/False states, there may be requirements where the text displayed to the user does not fit into those two scenarios.

With this release, we included a documentation article and an example showing how to customize the Kendo UI for Angular Switch component to fit custom dimensions and how it allows for longer labels to be displayed within the component. This also becomes very useful for internationalization, where localized messages have strings that exceed the default dimensions.

To see just how you can add custom sizes and longer labels to the Switch component, you can refer to the Kendo UI for Angular Switch documentation right here.

Scheduler: Current Time Marker
In the Scheduler calendar, the current time is marked with a line across the schedule

Many folks out there use the Kendo UI for Angular Scheduler to not just schedule and manage events but also manage their daily calendars. This means the Angular Scheduler component is often the go-to tool for planning a day and knowing exactly when events are happening. A big quality-of-life feature is the Current Time Marker, which renders a distinct line across the event area of the Scheduler to indicate the current time.

While this has been available within the Angular Scheduler already, it was a bit of a hidden feature. So, with this update, we have thoroughly documented this feature to make it easier to find and enable the Current Time Marker.

Here’s a quick link to the Kendo UI for Angular Scheduler component documentation, where you can see this and more in action.

Kendo UI for Vue

New Components

ProgressBar Component
Progress bar fills with color from left to right, with the percentage named on the right

The new Kendo UI for Vue ProgressBar component provides a 100% native Vue UI component for displaying any time of progress. This component renders as a bar that can then be filled in order to show progress toward the completion of a process. Both the values of the completed process as well as the progress can be bound to individual variables. The Vue ProgressBar can be displayed in a vertical or horizontal fashion, and supports both left-to-right as well as a right-to-left direction for filling the ProgressBar.

For more information, you can refer to the Kendo UI for Vue ProgressBar documentation section.

Loader Component
Loader Overview showing loading animations: pulsing (two dots alternating in shrinking/growing in size), infinite-spinner (three dots in a triangle spinning and stretching out, sliding back in and spinning again) and converging-spinner (one dot growing, then splitting into four dots, spinning, then coming together into one dot again)

With the new Kendo UI for Vue Loader component, developers have a visually pleasing way to show that any portion of their Vue app is busy. This component can be used to show a loading indicator for a nice experience when data is loading in other Kendo UI components, or can be set for any other Vue components.

Head on over to the Kendo UI for Vue Loader component documentation for more information.

Drawer Component
vue-drawer-component-overview - mailbox showing the Inbox highlighted from the left-hand menu, with a message displayed on the right.

With this release, we added the Kendo UI for Vue Drawer component, which can be used as the side navigation element of any desktop or mobile component. This native Vue Drawer component can be configured to always be displayed, or hidden behind a hamburger menu and expand only when the user clicks on a specific button.

To see more about this component and how you can add it to your Vue apps, check out the Kendo UI for Vue Drawer component docs and demos.

Stepper Component
Vue Stepper shows six steps with small icons and labels, connected by a line. As the steps progress, the pink color fills across the gray.

The Kendo UI for Vue Stepper can be used to visualize the progress through a process by dividing said process into steps. Each step can contain any type of Vue components, so developers have full control of the content displayed for each step.

Additionally, developers can customize the look and feel of each step in the Stepper, can control whether or not to have a strict linear flow, and set validation to be done at each step before moving to the next step.

Here’s a quick link to the Kendo UI for Vue Stepper documentation.

DateRangePicker Component
vue-daterangepicker-component-overview - in a calendar view, a date range spanning two months is selected, with the start and end dates highlighted, and a text field for both at the top When users need to select a start and end date through a dropdown and picker interface, the new Kendo UI for Vue DateRangePicker is perfect. Through a component, users are met with two calendar elements side by side, where they can select a start and end date. The value of the range can easily be extracted from the component, letting developers act upon the range that users have selected.

For those interested, here’s a direct link to the Kendo UI for Vue DateRangePicker component documentation.

KendoReact

New Components

FlatColorPicker Component
flatcolorpicker-views - left view shows a grid of various colors available for selection; right view shows a more detailed option with a blue gradient to choose from, a color slider on the right, and RGB fields on the bottom

The new KendoReact FlatColorPicker component adds to the already numerous ways the UI library lets users select a color within React applications. This component differs from the React ColorPicker component by not being rendered within a popup or dropdown—instead the entire component is immediately rendered to the page.

To see more information, head on over to the KendoReact FlatColorPicker component documentation.

Drag & Drop Utilities
Draggable-Component-Overview

With this update, we took a good and hard look at what KendoReact can offer developers to help with adding drag-and-drop capabilities to their React applications, and we came up with an entirely new set of components and hooks that can be used to add this drag-and-drop interactivity.

These new features include the new DragAndDrop, Draggable and Droppable React components as well as the useDraggable and useDroppable hooks. Using these components in combination will let React developers achieve any and all requirements for drag-and-drop capabilities in their apps.

For more information on how to add drag and drop to your React apps, head on over to the KendoReact Drag & Drop documentation section.

Enhancements

ColorPicker: New Design
colorpicker-configuration detailed color selection tool shows a red gradient to choose from, a color slider and an opacity slider on the right, and RGBA fields on the bottom

With this update, the KendoReact ColorPicker component received a new and improved design. The React ColorPicker component was one of the earlier UI components added to KendoReact, and since its initial release we have received a lot of feedback around this component. With all this feedback, we took the time to update the design and rendering of the ColorPicker.

These changes include brand-new design with new UI elements and features. Specifically these features include the ability to switch from Gradient to Palette view within the same ColorPicker instance, a new color preview where you can easily compare old and new colors, and toggleable HEX and RGB inputs with opacity support.

You can see the new design in action by heading over to the KendoReact ColorPicker docs.

Grid: Column Virtualization with Multi-Column Headers
A big feature that was added to the KendoReact Data Grid with this update is the ability to have multi-column headers when virtualizing our React data table. Previously these two features did not work that well together, but with the 4.10.0 update, they can be seamlessly enabled in the same component.

For more information about using Multi-Column Headers with the Data Table, head on over to the KendoReact Data Grid documentation.

Sample Project: Full-Stack App Using the KendoReact Grid & ASP.NET Core
The KendoReact Data Table is an advanced component where the capabilities around displaying, updating and reorganizing data on the client are virtually endless. With these capabilities comes a lot of potential complexity, and one area that has not been fully documented is how to deal with the React Table requests on the server.

That is all about to change with this update, as we are introducing a full-stack sample application with the KendoReact Data Grid on the frontend and ASP.NET Core on the backend. Our hope is that developers will be able to reference this example when building their own applications, helping reduce the complexity of server communication with the Data Table component.

To check out this full-stack app with React and ASP.NET Core, head on over to the KendoReact Sample Application repository.

Sample Project: Full-Stack App Using the KendoReact Grid & Node.js
Like the item above, this full-stack application focuses on common features and interactions within the KendoReact Grid and how to handle these requests on the server side of things. This sample uses React on the frontend and Node.js (using Express.js specifically) on the backend, giving developers more hands-on examples for implementing one of the more powerful UI components in the KendoReact library.

For the source code to this React and Node.js full-stack app, you can check out the KendoReact Sample Application repository right here.

Various Components: Context Provider for Default Props
This feature may not be applicable to all KendoReact users, but it is still very exciting news to share. First for some context.

In general, KendoReact components are built using other KendoReact components—something that becomes very apparent when using more advanced components like the React Data Table. As we build these components, they can have multiple layers of these nested components which, if you are looking to customize a component extensively, can become difficult to manage as a KendoReact user.

To make the KendoReact components easier to customize when needed, we have been working with exposing React.Context to override properties of a deeply nested component. For this update, we have introduced the Props Context to the DateInputs, Inputs and DropDown packages. With this larger set of UI components supporting the new Props Context, we want to gather feedback from our users and understand how we can help extend this functionality to other packages and components in the future, so feel free to try this new feature out and let us know what you think!

For a direct link, you can refer to the DateInputs Prop Context article, the Inputs Prop Context article and the DropDown Props Context article in our documentation.

TileLayout: Define Keys to Avoid Re-Rendering
react-tilelayout-component-overview

The KendoReact TileLayout component is quickly becoming one of our more popular UI components, and with this popularity comes a lot of feedback. With this latest update, we are introducing built-in use of keys to help avoid re-rendering the TileLayout component when interacting with the items collection of the component. This will help improve the performance of this component out of the box, so many of your TileLayout users will see improvements just from upgrading to the latest and greatest package.

While this feature may be more of an under-the-hood update, you can get more information from the KendoReact TileLayout component docs.

TreeView: Custom Renderers
kendoreact-treeview-component-overview - accordion list shows third tier (nested grandchild) list item highlighted

Custom renderers let developers pass in their own React component to be in charge of rendering for a particular portion of a KendoReact UI component. With this release, the KendoReact TreeView now lets users pass in a custom component which will be in charge of rendering every node throughout the TreeView. This will give developers the ultimate flexibility and will ensure that the React TreeView can fit any design requirements.

To see how you can take advantage of the new custom renderer, head on over to the KendoReact TreeView Customization docs.

Menu: Custom Renderers
kendoreact-menu-component-items

The KendoReact Menu now officially supports a custom component to be in control over the look and feel of each menu, also called a custom renderer. This makes the KendoReact Menu component even more flexible and will help with implementing specific design and UX requirements with the menu component.

To see more about custom renderers in menus, head on over to the KendoReact Menu documentation.

PanelBar: Controlled Mode & Tab Mounted Options
PanelBar Improvements-Updated Design

The KendoReact PanelBar also received some updates with this release. Specifically, the KendoReact team added support for controlled mode, letting developers fully control the state of the PanelBar instead of relying purely on the uncontrolled mode.

Additionally, the team added more options around the PanelBar’s lifecycle—specifically when the tab has been mounted. This gives more opportunities for developers to customize and interact with the React PanelBar component.

Check out the KendoReact PanelBar component documentation here.

Editor: Improved Selection
Improved-selection - slider at the top allows you to adjust how long a section of text you are highlighing

With this update, the KendoReact Editor has added ways for developers to interact with whatever selection users have made within the React Editor’s content. This will allow for scenarios like automatically extracting the HTML from the Editor’s content upon selection, or extracting content when a user presses a button.

Here’s a direct link to the KendoReact Editor Selection documentation section.

Editor: Editor Resizing
Editor-Resizing - the whole editor can be resized

The KendoReact Editor can now allow users to resize the Editor once it has been rendered. Previously the Editor had a static height and width, but with this new resizing feature enabled, users will now see a drag handle when hovering over the edges of the component, giving them an intuitive user experience for resizing the Editor.

For more information, check out the KendoReact Editor Resizing sample.

Editor: Image Resizing
Image-Resizing - using one of the corner drag handles, the user resizes an image in the editor

Another update that the KendoReact Editor received with this update is for images in the Editor’s content to be resized. When this feature is enabled, users can click on an image to see a border with drag indicators, letting the user resize images to their heart’s content using a very natural user experience.

To see more about resizing images in the Editor, you can refer to the KendoReact Editor Image Resizing sample.

Kendo UI for jQuery

Enhancements

Editor: Undo & Redo Support
jQuery Editor undo redo buttons

As of this update, the Kendo UI for jQuery Editor now offers the ability for users to undo or redo changes to the content of the Editor component. This feature previously relied upon the browser’s built-in functionality for remembering content, which was not always reliable. With this update, the “stack” containing the changes is built into the jQuery Editor, which will be super helpful to users managing their content. This feature will also be available as a tool within the Editor toolbar to give physical buttons that users can interact with to undo or redo changes to content.

To see more about the Undo and Redo feature in the Editor, you can refer to the Kendo UI for jQuery Editor demos.

Stay Tuned

We will be bringing even more to our products next month when we will see the official R1 2022 release! In the meantime, if you have any ideas for a new component or new features you would like to see added, feel free to add them to our public feedback portals. Happy Holidays!
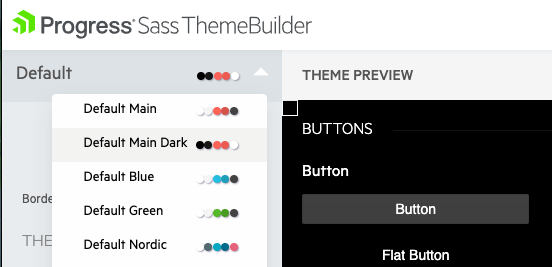
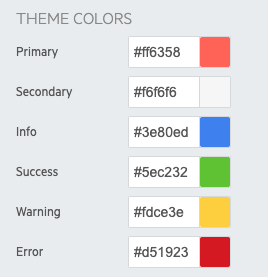
From Figma to React—Reusable Components

$
0
0

Delivering great user experiences across apps suggests strong collaboration between designers and developers and strictly following UI/UX requirements. Let’s see how to achieve this while standardizing building blocks and cutting time at each stage by converting Figma to React reusable components.

In the process of developing customer-facing applications, designers and developers have a common goal—delivering great apps customers love. But they work in different environments. Designers construct the UI and the user journey in their design tool of choice. Developers translate the UI and design into a fully working application using various technologies and tools.

Let’s face it—it is not uncommon that the implementation fails to hit the design intent. A missing shadow here and there, a color tone mismatch or a font size just a pixel away.

But what if, from the very start, designers and developers built perfectly matching UI on both sides? These matching building blocks would ensure that there is smoother team collaboration, built-in reusability and consistent user experience. Like a backbone system of standardized, ready-to-use components, it would minimize discrepancies, drastically cut development time, allow software teams to focus on the customer journey and functionality, and bring designers and developers closer to their common goal.

So, let’s set some context and dive into the process of how you can achieve this dreamed unified building blocks ecosystem with Figma and React.

The Context—Awesomeness Inc.

Let’s say I am part of the Awesomeness Inc. company. UI/UX folks, developers and the business made the decision to standardize all components and widgets used in our applications. This makes sense because it is scalable, maintainable, reusable, consistent and cheaper. And users always appreciate a good UX, consciously or not.

So, the task is clear. The main indicators for success we agreed on are consistency, reusability and time to develop.

For the purposes of this tutorial and for brevity, let’s just focus on the primary call-to-action (CTA) button. The same process could then be applied to the rest of the components.

Toolbox

As the title already suggests, the technology stack and toolbox I will be using includes Figma for building our awesome designs, and React for building awesome customer-facing web applications. Here is what I will need.

  • Figma – Figma is a free, cloud-based design tool that has been dominating the design world recently with its powerful features and easy collaboration for the entire team. If you have not checked it out yet, now is the time.

  • React – React is a component-based JavaScript library for building rich and dynamic user interfaces. Built by Facebook, React proved to be the tool of choice for thousands, if not millions, of web applications of all sizes.

To further facilitate the process and meet our success criteria, I will use three additional tools. They will allow me to drastically reduce the time it takes to develop, while maintaining high consistency and reusability, as this is what I aim for now.

  • KendoReact – KendoReact is a complete React UI suite that delivers ready-to-use, fully functional React components. It is a lifesaver when it comes to productivity. It also goes with the identical Kendo UI Kits for the designer in Figma, which will make both our lives easier. Check it out.

  • Unite UX – Unite UX is a two-part design-to-development collaboration tool. It helps your team to quickly transfer UI styles from Figma to your coded KendoReact library, compare the design and coded elements to make them match, and export the ready-to-use styled component library together with an auto-generated Storybook documentation for it.

  • Storybook – Storybook is an open-source tool for storing your coded UI library’s documentation, code reference and demos. One place for all developers to know what elements are in use in the application and not reinvent the wheel every time.

The Figma-to-React Journey

Now that we’ve decided on our toolset, let’s go through the complete process of creating Figma-to-React reusable components step by step.

Create Awesomeness Inc. Primary Button in Figma

Here, we have two approaches. The first one is to start from scratch in Figma. The second is to use the Kendo UI Kits for Figma as a starting point.

As we aim for fast results without compromising the outcome, the second choice is an easy pick. The Kendo UI Kits will bring several benefits.

First, the kits contain Figma reusable components for the whole KendoReact suite. Once we are ready with the button, we will have a good starting point to continue with the rest we need.

Second, the kits are built with the atomic design principle in mind. This means that more complex components consist of the basic ones—so once we are done with the button, the rest of the components that contain a button will inherit that design.

And third, we have a more holistic overview of the components as the kits include all components’ states. In that way, we can design the interaction states too, not just the static normal state.

So, let’s get some work done. First, we need to choose one of the three Kendo UI kits themes (based on which one looks closer to our end goal) and duplicate it. This project will store our Figma reusable components. I will go with the Material theme.

Telerik & Kendo UI Kit for Material Figma

Once opened in Figma, I will navigate to the “Components & Variants” page and locate the SOLID / PRIMARY button.

Kendo UI Kits use design tokens—variables for colors, effects or typography. Change style under a token, and all components that use this token will have the new style applied.

The solid primary button states’ background is set using the $primary and On Primary/White Overlay/$white-overlay-* color tokens. Change their solid colors to #AD44DF and check the result.

Changed_Tokens - primary state - different shades of purple

The last thing I’ll do is to change the border radius to 40 to get a nice, rounded button with an eye-catching background. To do this just once and apply it to each button, I would change the border radius of the “_Base Button” structural component.

Base_Button structural component corener set to 40

That’s it! We have designed the awesome primary button in no time. Now, it’s time to hand off the design to the developers to convert the Figma components to React.

Final_Buttons in an arrary of styles: normal, hover, active, selected, focused, disabled for primary and secondary

Handoff to Developers

This is the step where Unite UX comes in. I will export the ready design with the Unite UX plugin for Figma, which I have installed already.

I will navigate to “Export and handoff” from the menu. I will select just the Buttons frame for now as I’ve changed just it, confirm the automatically connected design tokens and styles, and create a new Awesomeness project.

UniteUX_Plugin export button

After the project is created and the design is exported to Unite UX, I will share it with the developers on the team, so they can do their bit of the work.

UniteUX_Plugin_Share - list of teammates to choose from for sharing

Transfer Design Intent from Figma to React Styled Components

At this point, we have this awesome primary button designed and specs shared with the developers. We can now start transferring the design from Figma to the real React components.

To help with that, I’ll move to the Unite UX cloud-based web application.

The Unite UX working space has two canvases. The one on the left shows the exported Figma design. I can inspect all Figma layers and their respective styles. No design tools are required—all the magic happens in Unite UX.

The one on the right contains the real KendoReact components that I need to style and match the design. As you can see, the smart features of Unite UX have already applied all of the styles for us. If there is something else, you can quickly and easily do it by using the copy-paste feature.

As Unite UX is fully visual, I don’t need to switch between dev tools and design tools, and there’s no manual writing of custom styles. I can just inspect the button in the design, copy the styles and paste them to the React component on the right. If you need to tweak here or there, use the property editors.

I will do this for all states and double-check the result in the comparison pane.

Styled_Button_Copy_Paste

When we have perfectly matching styles, it is time to incorporate them in the application or components library.

Apply Styles to React Components

To apply these styles to the React components, I will export from Unite UX.

UniteUX_Export

The output’s content consists of two packages.

  • Awesomeness package – This is a ready-to-use npm package containing all the styles and assets that would make the conversion from Figma to React components possible—CSS, SCSS and fonts.
  • Documentation – This is our React-based Storybook application—installation info, brief documentation, examples and code fragments reference in one place. When you need to check on a component, open this app, follow instructions, copy code and reuse. In this way, you ensure a fast and consistent process.

Now, let us get to the last step and use the awesome button you have just designed and styled. First, copy the Awesomeness package in your root project directory. Then, install the @progresss/kendo-react-buttons and awesomeness package as a local dependency.

Package_json

Import the index.(s)css file in your main React component (App by default). To use the component, just copy the Storybook code example and place it in your code.

Storybook

As an optional step, to further improve your Figma-to-React reusability success metric, you can abstract the button by wrapping it in a custom AwesomeButton component.

import React, { FunctionComponent, MouseEventHandler } from 'react';
import { Button } from '@progress/kendo-react-buttons';

type AwesomeButtonProps = {
  onClick?: MouseEventHandler<HTMLButtonElement>;
};

const AwesomeButton: FunctionComponent<AwesomeButtonProps> = ({ children, onClick }) => (
  <Button primary onClick={onClick}>
    {children}
  </Button>
);

AwesomeButton.defaultProps = {
  onClick: undefined,
};

export default AwesomeButton;

Summary

Aaaand that’s it. We’ve completed the Figma to React journey and met all our goals—short time to develop, consistency between Figma design and real React components, and high built-in reusability.

Try it out yourself.

Happy coding!

Your First Microservice in .NET 6

$
0
0

More than a buzzword, microservices are here to stay and are currently gaining popularity due to their acceptance in the systems development market. In this article, we’ll explore some valuable features available on the .NET platform and create our first microservice.

Results obtained recently show that the architecture based on microservices can be a great option when implementing new features.

This is due to the versatility of microservices, which, despite being relatively new, already present excellent results and their use has been growing exponentially, especially in recent years. With the evolution of the .NET platform, which is currently in its sixth version, implementing microservices has become even simpler.

In this article, we’ll spend a little time defining “microservices” and then we will create a microservice from scratch.

What Are Microservices?

Although there is no exact definition of what microservices are, based on what Martin Fowler, one of the biggest references on the subject today, says, microservices can be used to describe a way to design software applications composed of small sets of services that work and communicate with each other independently, consenting to a single concept. As well as its functioning, the implementation of microservices also happens independently.

Why Microservices?

We can say that microservices are the opposite of monoliths, and there is a lot of discussion about which would be ideal. There are many reasons to use monoliths, Fowler himself is an advocate of monoliths, but let’s focus on the advantages of using microservices.

Microservices make it easier to develop, test and deploy isolated parts of an application. Each microservice can be independently scaled as needed. Your implantation also is simple and does not need to have a dependence on other parts.

Each microservice uses its own database, reserved for its own scope, which avoids the many problems that can arise from two or more systems using the same database.

Obviously, microservices do not solve all problems and also have disadvantages. One of them is the complexity created by dividing a module into several microservices. Despite having some disadvantages, results obtained mainly in recent years show that systems with architectures based on microservices are achieving great results.

ASP.NET Core and Microservices

Like other development platforms, Microsoft has invested heavily to meet the requirements of an architecture based on microservices. Today .NET provides many resources for this purpose.

Microsoft’s official website has a lot of content about microservices-based architecture, including ebooks, tutorials, videos and challenges to help developers work with them.

With .NET 6, developing apps in a microservices architecture became even easier due to the new minimal APIs feature that simplifies many processes that were once mandatory but are now no longer needed.

Practical Approach

In this article, we will create a simple microservice, which performs a request in an API and return this data in the response.

Create the Project

To follow this tutorial, you need to download and install the .NET SDK (Software Development Kit), in version 6.

You can access the full source code at this link: Source Code.

The final structure of the project will be as follows:

Final structure

In your command prompt, run the following command to create your minimal API project:

dotnet new web -o UserManager -f net6.0

What do these commands mean?

  • The “dotnet new web” command creates a new application of type web API (that’s a REST API endpoint).
  • The “-o” parameter creates a directory named UserManager where your app is stored.
  • The “-f net6.0” command is to inform the .NET version that we will be using.

Now open the file “UserManager.csproj” generated at the root of the project with your favorite IDE—this tutorial uses Visual Studio 2022.

And then we have the following structure generated by the previous command. This is a standard minimal API framework in .NET 6.

Standard Structure Minimal API

Create the Microservice

The minimal API we created already contains everything we need to start implementing our microservice, which will have the following structure:

/Solution.sln
|
|---- UserManager.API.Default                       <-- Public API
|      |---- Program.cs                             <-- Dependency injection
|      |---- /Endpoints                                  
|      |     |---- UserEndpoints.cs                 <-- API Endpoints
|---- UserManager.Application                       <-- Layer for exposure of repository and services
|     |---- /Contracts                              <-- Contracts that are exposed to the customer
|     |     |---- /v1                               <-- Version
|     |     |     |---- /Users                      <-- Request and Response Classes
|     |     |     |     |---- /Response
|     |     |     |     |     |---- GetUsersResponse.cs
|     |---- /Services
|     |     |---- /v1                               <-- Version
|     |     |     |---- IUserConfigService          <-- Interface of service
|     |     |     |---- UserConfigService           <-- Service class

In Visual Studio rename the project from “UserManager” to “UserManager.API.Default”. Then, right-click on the solution name and follow the following sequence:

Add --> New Project… --> Class Library --> Next --> (Put the name: “UserManager.Application”) --> Next --> .NET 6.0 --> Create

We created the layer for exposure of repository and services. Now we will create the contracts that are exposed to the customer. In the UserManager.Application project, create a new folder and rename it with “Contracts”.

Inside it, create the following structure of folders v1–> Users --> Response, and inside “Response” create a new class called “GetUsersResponse”, and replace the code generated in it with this:

public record GetUsersResponse
{
    public List<User> Users { get; set; } = new List<User>();

    public record User
    {
        public int id { get; set; }
        public string name { get; set; }
        public string username { get; set; }
        public string email { get; set; }
        public Address address { get; set; }
        public string phone { get; set; }
        public string website { get; set; }
        public Company company { get; set; }
    }

    public record Address
    {
        public string street { get; set; }
        public string suite { get; set; }
        public string city { get; set; }
        public string zipcode { get; set; }
        public Geo geo { get; set; }
    }

    public record Geo
    {
        public string lat { get; set; }
        public string lng { get; set; }
    }

    public record Company
    {
        public string name { get; set; }
        public string catchPhrase { get; set; }
        public string bs { get; set; }
    }
}

This class has a list of users, which will contain the data received in the response to the request.

Now let’s create the service class which will contain the microservice’s business rules.

Still in the UserManager.Application project, create a new folder and rename it with “Services”. Inside it, create a folder called “v1”. Inside v1, create a new interface called “IUserConfigService” and replace the code generated in it with this:

public interface IUserConfigService
{
    public Task<GetUsersResponse> GetAllUsersAsync();
    public Task<GetUsersResponse> GetUserByIdAsync(int id);
}

And create a class called “UserConfigService” and replace the code generated in it with this:

using Newtonsoft.Json;
using static GetUsersResponse;

public class UserConfigService : IUserConfigService
{
    private readonly HttpClient _httpClient;

    public UserConfigService(HttpClient httpClient)
    {
        _httpClient = httpClient;
    }

    public async Task<GetUsersResponse> GetAllUsersAsync()
    {
        var userResponse = new GetUsersResponse();
        var uri = "https://jsonplaceholder.typicode.com/users";
        var responseString = await _httpClient.GetStringAsync(uri);
        var users = JsonConvert.DeserializeObject<List<User>>(responseString);

        userResponse.Users = users;
        return userResponse;
    }

    public async Task<GetUsersResponse> GetUserByIdAsync(int id)
    {
        var userResponse = new GetUsersResponse();
        var uri = $"https://jsonplaceholder.typicode.com/users?id={id}";
        var responseString = await _httpClient.GetStringAsync(uri);
        var users = JsonConvert.DeserializeObject<List<User>>(responseString);

        userResponse.Users = users;
        return userResponse;
    }
}

You will need to install the “Newtonsoft.Json” library. You can do this through Visual Studio.

Explanation

First, we created an interface that will contain the main methods of the service. Next, we created the user service class, which will implement these methods.

In the method “GetAllUsersAsync” our service will fetch a list of users from the site “jsonplaceholder.typicode.com”, which provides a free fake API for testing and prototyping. It will return a list of users. This process will be done through a request with the “HttpClient” class that provides methods of communication between APIs.

And in the “GetUserByIdAsync” method it performs a parameterized search, sending the user id in the request and returning the user data correspondent.

In both cases, the return from the API is converted into a list of users compatible with the record User of the contract.

Creating the Endpoints

Now we need to create the endpoints that will use the service methods. In .NET 6 we don’t need a “controller” anymore so we’ll create a class that will implement the endpoints.

So in the project “UserManager.API.Default” create a new folder called “Endpoints”, and inside create a class called “UserEndpoints”. Then replace the code generated in it with this:

public static class UserEndpoints
{
    public static void MapUsersEndpoints(this WebApplication app)
    {
        app.MapGet("/v1/users", GetAllUsers);
        app.MapGet("/v1/users/{id}", GetUserById);
    }

    public static void AddUserServices(this IServiceCollection service)
    {
        service.AddHttpClient<IUserConfigService, UserConfigService>();
    }

    internal static IResult GetAllUsers(IUserConfigService service)
    {
        var users = service.GetAllUsersAsync().Result.Users;

        return users is not null ? Results.Ok(users) : Results.NotFound();
    }

    internal static IResult GetUserById(IUserConfigService service, int id)
    {
        var user = service.GetUserByIdAsync(id).Result.Users.SingleOrDefault();

        return user is not null ? Results.Ok(user) : Results.NotFound();
    }
}

You will need to add in the project “UserManager.API.Default” the dependency of the project “UserManager.Application”. This is easy, just right-click on the file “Dependencies” of the “UserManager.API.Default” project --> “Add Project Reference…” and choose the project “UserManager.Application”

Explanation

In the class above, we are creating the endpoints in the “MapUsersEndpoints” method.

The “AddUserServices” method will inject the dependency of the Service and its interface, and the other two methods using the service return the search result—if it is null, a “NotFound” status will be displayed in the response.

Now in the Program class, we will add the service and swagger settings. So, replace the code from the Program.cs file with the code below.

var builder = WebApplication.CreateBuilder(args);

builder.Services.AddUserServices();
builder.Services.AddEndpointsApiExplorer();
builder.Services.AddSwaggerGen();

var app = builder.Build();

app.MapUsersEndpoints();

if (app.Environment.IsDevelopment())
{
    app.UseSwagger();
    app.UseSwaggerUI();
}

app.UseHttpsRedirection();

app.Run();

You will need to install the “Swashbuckle.AspNetCore” library. You can do this through Visual Studio.

And in the file “launchSettings.json” under the setting "launchBrowser": true, add this:

"launchUrl": "swagger"

There are two places, inside “profiles” and “IIS Express”.

Finally, our microservice is ready to run. If you run it in Visual Studio using the “IIS Express” option, you will get the following result in your browser.

Swagger User Manager

Now if you access the addresses https://localhost:<port number>/v1/users and https://localhost:<port number>/v1/users/1, you will get the following results:

Get all users

Get user by id

Conclusion

In this article, we had an introduction to the topic “microservices” and we created a simple microservice in .NET 6 that communicates with another API and displays user data.

The possibilities when working with microservices are endless, so feel free to implement more functions in the project, such as creation and update methods, communication with a database, validations, unit tests and much more.

Angular on Desktop

$
0
0

Developers have the flexibility of several ways to bring Angular goodness to desktop apps.

Let’s talk Angular—one of the most popular modern web application development platforms. With a long history, matured tooling and rich developer ecosystem, it is not difficult to see why Angular is the SPA framework of choice for building modern web/mobile apps.

However, how does Angular work for desktop apps? The classic software answer applies—it depends. There are strategies for code sharing with web, but a lot also depends on the type of app being built and the desktop integrations desired.

PWAs and ElectronJS are established ways of bringing web code to desktop apps, and they are both good options for Angular. For .NET developers, .NET MAUI is the next-generation platform for building native cross-platform apps for mobile and desktop. And with Blazor hybrid apps, Blazor code for web apps is very welcome in .NET MAUI for mobile/desktop.

However, a lot of .NET shops in the past few years have been doing .NET in the backend and building SPA apps with JS on the frontend—can any of those investments come over to .NET MAUI land? Let’s talk about Angular, but the ways to enable desktop apps with web technologies should be about the same irrespective of the JS framework—so React, Vue and others should feel welcome too.

Angular goodness on desktop—let’s do this.

This post was written and published as part of the 2021 C# Advent.

Get Started Right

If you’re new to the Angular world, one of the best ways to get started is the Angular CLI. The prerequisites to building with Angular is an LTS Node.js version for the runtime and npm for dependencies. It’s easy to globally install the Angular CLI tool, like so:

npm install -g @angular/cli

We can then fire up a new Angular app—the template walks you through a few settings before creating the project.

ng new angularcli

The Angular CLI tool installs the necessary Angular npm packages and other dependencies—once done, we can navigate inside the project and see all the code/configurations.

cd angularcli

AngularProject Angular CLI > src > test.ts

Ready to run your Angular app locally? The Serve command compiles the app in memory, launches the server and watches local files for deploying changed components of the app.

ng serve --open

AngularCLI

Voilà. That’s how easy it is to start making modern web apps with Angular. And while you’re getting started, it may be worth getting some UI ammunition to deliver good UX and performance—Kendo UI for Angular can help.

KUIAngular
 

Kendo UI for Angular delivers components to meet app requirements for data handling, performance, UX, design, accessibility and so much more—100+ fully native components for building high-quality modern Angular UI in no time.

KUIComponents

Now that we have a basic Angular web app running, let’s talk about options to get that Angular goodness on desktop apps.

Angular as PWA

One of the easiest ways for a web app to work on desktop is PWA—web apps can be progressively better citizens on mobile/desktop platforms. PWAs are essentially web apps, but with hooks to have native-like features—be installable on desktop and have service workers bring in offline support, push notifications, hardware access and more. It is pretty easy to start turning a regular Angular web app into a PWA—just a simple command:

ng add @angular/pwa

This actually touches a few things in an existing Angular app—a new manifest file is dropped in that tells the browser how the app should behave when installed by the user. The starter set has a variety of app icons for pinning to home screen, Touchbar and more—the default icons are added to an Assets directory.

{
  "name": "angularpwa",
  "short_name": "angularpwa",
  "theme_color": "#1976d2",
  "background_color": "#fafafa",
  "display": "standalone",
  "scope": "./",
  "start_url": "./",
  "icons": [
    {
      "src": "assets/icons/icon-72x72.png",
      "sizes": "72x72",
      "type": "image/png",
      "purpose": "maskable any"
    },
    {
      "src": "assets/icons/icon-96x96.png",
      "sizes": "96x96",
      "type": "image/png",
      "purpose": "maskable any"
    },
    ...
    ...
  ]
}

The startup index.html page now has a reference to the new web manifest file.

<!doctype html>
<html lang="en">
<head>
  <meta charset="utf-8">
  <title>Angularpwa</title>
  <base href="https://www.telerik.com/">
  <meta name="viewport" content="width=device-width, initial-scale=1">
  <link rel="icon" type="image/x-icon" href="https://www.telerik.comfavicon.ico">
  <link rel="manifest" href="https://www.telerik.commanifest.webmanifest">
  <meta name="theme-color" content="#1976d2">
</head>
<body>
  <app-root></app-root>
  <noscript>Please enable JavaScript to continue using this application.</noscript>
</body>
</html>

A default caching service worker is dropped in as well, with configuration file namely ngsw-config.json—this indicates which types of assets can be cached.

{
  "$schema": "./node_modules/@angular/service-worker/config/schema.json",
  "index": "/index.html",
  "assetGroups": [
    {
      "name": "app",
      "installMode": "prefetch",
      "resources": {
        "files": [
          "/favicon.ico",
          "/index.html",
          "/manifest.webmanifest",
          "/*.css",
          "/*.js"
        ]
      }
    },
    {
      "name": "assets",
      "installMode": "lazy",
      "updateMode": "prefetch",
      "resources": {
        "files": [
          "/assets/**",
          "/*.(svg|cur|jpg|jpeg|png|apng|webp|avif|gif|otf|ttf|woff|woff2)"
        ]
      }
    }
  ]
}

The ServiceWorker config file needs to be referenced in the angular.json file—the ngswConfigPath links the ServiceWorker, enabling production configuration in build schematics.

{
  "$schema": "./node_modules/@angular/cli/lib/config/schema.json",
  "version": 1,
  "newProjectRoot": "projects",
  "projects": {
    "angularpwa": {
      "projectType": "application",
      "schematics": {
        "@schematics/angular:application": {
          "strict": true
        }
      },
      "root": "",
      "sourceRoot": "src",
      "prefix": "app",
      "architect": {
        "build": {
          "builder": "@angular-devkit/build-angular:browser",
          "options": {
            "outputPath": "dist/angularpwa",
            "index": "src/index.html",
            "main": "src/main.ts",
            "polyfills": "src/polyfills.ts",
            "tsConfig": "tsconfig.app.json",
            "assets": [
              "src/favicon.ico",
              "src/assets",
              "src/manifest.webmanifest"
            ],
            "styles": [
              "src/styles.css"
            ],
            "scripts": [],
            "serviceWorker": true,
            "ngswConfigPath": "ngsw-config.json"
          },
          "configurations": {
            "production": {
              "budgets": [
                {
                  "type": "initial",
                  "maximumWarning": "500kb",
                  "maximumError": "1mb"
                },
                {
                  "type": "anyComponentStyle",
                  "maximumWarning": "2kb",
                  "maximumError": "4kb"
                }
              ],
              "fileReplacements": [
                {
                  "replace": "src/environments/environment.ts",
                  "with": "src/environments/environment.prod.ts"
                }
              ],
              "outputHashing": "all",
              "serviceWorker": true,
              "ngswConfigPath": "ngsw-config.json"
            },
            ...
            ...
          }
        }
      }
    }
  }
}

And finally, the app.module.ts now imports in ServiceWorkerModule and registers the ServiceWorker.

import { NgModule } from '@angular/core';
import { BrowserModule } from '@angular/platform-browser';

import { AppRoutingModule } from './app-routing.module';
import { AppComponent } from './app.component';
import { ServiceWorkerModule } from '@angular/service-worker';
import { environment } from '../environments/environment';

@NgModule({
  declarations: [
    AppComponent
  ],
  imports: [
    BrowserModule,
    AppRoutingModule,
    ServiceWorkerModule.register('ngsw-worker.js', {
      enabled: environment.production,
      registrationStrategy: 'registerWhenStable:30000'
    })
  ],
  providers: [],
  bootstrap: [AppComponent]
})
export class AppModule { }

That’s a run-down of all the moving pieces that start transforming a regular Angular app into a PWA. However, we cannot just run the app with Angular Serve command—service workers do not work with in-memory compilations. We need a production build, like so:

ng build --prod

Once the build is done with Production configuration, we can see the artifacts in the Distribution directory—everything is compiled down to deployable plain HTML/JS/CSS.

cd dist/angularpwa
PWABuild
 

Next up, we need a small HTTP sever to expose the built files out to the browser as app and fire things up.

npm i -g http-server
http-server -p 8080 -c-1

Excelllent—we can navigate to local HTTP server IP and see our PWA in action! Notice the install option which indicates that the user can install and run this app on desktop without the browser chrome.

AngularPWA
 

If we open up Developer Tools on our browser, we can also see the default caching Service Worker being registered and running. This is just the start—developers can now start adding all the customizations to make a nice modern PWA with Angular.

ServiceWorker 


Angular in Electron

Another strong contender for bringing Angular apps to desktop is Electron—the popular open-source battle-tested way of hosting web apps on desktop.

Electron helps in building robust cross-platform desktop apps that are essentially HTML/CSS/JS, but with strong integrations with the host OS when running as a desktop app. Electron does pack two things to provide a consistent runtime and rendering canvas—Node.js and the Chromium engine.

Starting from a standard Angular CLI app, it is not difficult to add Electron support—let’s bring in the Electron package as a dev dependency.

npm install electron@latest --save-dev

Now, to configure all things Electron inside an Angular project, let’s add a simple App.js file. To bootstrap Electron to run on desktop, we essentially need to new-up a browser window with specified dimensions and load our Angular app’s URL. We also need listeners for when the app windows opens/closes—here’s the code:

const {
    app,
    BrowserWindow
    } = require('electron')
  const url = require("url");
  const path = require("path");

  let appWindow

  function initWindow() {
    appWindow = new BrowserWindow({
      width: 1000,
      height: 800,
      webPreferences: {
        nodeIntegration: true
      }
    })

    appWindow.loadURL(
      url.format({
        pathname: path.join(__dirname, `/dist/index.html`),
        protocol: "file:",
        slashes: true
      })
    );

    appWindow.on('closed', function () {
      appWindow = null
    })
  }

  app.on('ready', initWindow)

  app.on('window-all-closed', function () {
    if (process.platform !== 'darwin') {
      app.quit()
    }
  })

  app.on('activate', function () {
    if (win === null) {
      initWindow()
    }
  })

Next up, we need to configure our Angular app to build itself and Bootstrap from the App.js file—here is the setup in package.json with the main entry point and a build script to start Electron:

{
  "name": "angularelectron",
  "version": "0.0.0",
  "main": "app.js",
  "scripts": {
    "ng": "ng",
    "start": "ng serve",
    "build": "ng build",
    "watch": "ng build --watch --configuration development",
    "test": "ng test",
    "start:electron": "ng build --base-href ./ && electron ."
  },
  ...
  ...
}

That’s all—now we can fire up our app, and see Angular hosted within the Electron shell.

npm run start:electron

AngularElectron
 

We have a full Chromium engine embedded inside the app—so we could do things like opening up Chrome DevTools from code:

appWindow.webContents.openDevTools()

ElectronDevTools


Angular with .NET MAUI

.NET MAUI is the evolution of Xamarin.Forms and represents a modern cross-platform .NET solution to reach mobile and desktop platforms. Blazor is very welcome in .NET MAUI—essentially .NET MAUI bootstrapping the app and Blazor code rendering within the BlazorWebView. This is obviously a good story for app modernization—Blazor and .NET MAUI both run on .NET 6 and developers can now share code between web/desktop.

But what if you already had investments in JavaScript? What if you were already building modern web apps with JS SPA frameworks? Would any of that be brought over to .NET MAUI? Let’s take a look at the Angular story.

As we’ve seen getting started with the Angular CLI, Angular web apps do depend on Node.js and Node modules—which is not something we have with .NET MAUI running on .NET 6. However, let’s compile our Angular CLI app, like so:

ng build --prod

If we look in the dist folder, the artifacts of the build are pure web assets—all the TypeScript, Node dependencies and other things get compiled down to basic HTML/JS/CSS.

AngularBuild
 

If we take a look at the index.html file, it simply references all the JavaScript and knows how to display the root app component.

<!DOCTYPE html><html lang="en"><head>
  <meta charset="utf-8">
  <title>Angularcli</title>
  <base href="https://www.telerik.com/">
  <meta name="viewport" content="width=device-width, initial-scale=1">
  <link rel="icon" type="image/x-icon" href="https://www.telerik.comfavicon.ico">
<link rel="stylesheet" href="https://www.telerik.comstyles.ef46db3751d8e999.css"></head>
<body>
  <app-root></app-root>
<script src="https://www.telerik.comruntime.8711a0b48f514fd6.js" type="module"></script><script src="https://www.telerik.compolyfills.24f5ee6314fed4d1.js" type="module"></script><script src="https://www.telerik.commain.756852958de70a14.js" type="module"></script>

</body></html>

Let us start a .NET MAUI project with the Maui-Blazor template—essentially a hybrid app with full native capabilities, but with Blazor UI rendered through a modern WebView for mobile and desktop platforms.

However, could we swap out Blazor with Angular? They’re both modern web frameworks rendering UI for the browser, but with different runtimes—maybe the WebView will not care? Let’s bring in the compiled Angular CLI app files into our .NET MAUI-Blazor app and drop them in the wwwroot directory as static files, like so:

AngularInMaui
 

The index.html files acts as the starting point for the Blazor inside .NET MAUI app—what if we replace it with the one we get from the Angular app? Let’s go look in the MainPage.xaml file:

<ContentPage xmlns="http://schemas.microsoft.com/dotnet/2021/maui"
             xmlns:x="http://schemas.microsoft.com/winfx/2009/xaml"
             xmlns:b="clr-namespace:Microsoft.AspNetCore.Components.WebView.Maui;assembly=Microsoft.AspNetCore.Components.WebView.Maui"
             xmlns:local="clr-namespace:MauiAngular"
             x:Class="MauiAngular.MainPage"
             BackgroundColor="{DynamicResource PageBackgroundColor}">

    <b:BlazorWebView HostPage="wwwroot/index.html">
        <!-- <b:BlazorWebView.RootComponents>
            <b:RootComponent Selector="#app" ComponentType="{x:Type local:Main}" />
        </b:BlazorWebView.RootComponents> -->
    </b:BlazorWebView>

</ContentPage>

This is where the rubber meets the road—the .NET MAUI app throws up the big BlazorWebView component for Blazor to do its thing. BlazorWebView is essentially a wrapper—rendering Webiew2 on Windows, WKWebView on macOS or whichever is the latest relevant WebView component based on the platform where the app is running on.

Here in the MainPage.xaml, we can still point it to go render the wwwroot/index.html file, but we have it swapped with the Angular file now. And we stop Blazor from rendering its base Root component—so it should be all Angular driving the UI within the WebView. We hesitantly do a .NET MAUI build:

dotnet build -t:Run -f net6.0-ios

Voilà—we get the Angular CLI app now running inside of .NET MAUI on iOS!

MauiAngular

Let’s do a desktop build:

dotnet build -t:Run -f net6.0-maccatalyst

Works on macOS, and Windows should be no different.

MauiAngularMac

Since we fed the BlazorWebView with HTML/CSS/JS, it did not care that we did not render any Blazor UI—web UI is web UI. And now it is welcome inside .NET MAUI cross-platform apps. Angular code would need a JS Interop to talk to .NET code, but the promise to bring Angular to .NET desktop/mobile apps is just starting.

Conclusion

Angular is wonderful and enables developers to build modern web apps. But much of the Angular goodness—components, data-binding, routing and more, can be brought over to desktop apps. While PWAs and Electron are the present reality, .NET MAUI represents the promise of tomorrow to bring Angular to Windows/macOS desktop. Let’s reuse code!

Optimizing Build Times in the Jamstack With Netlify’s DPR and Next.js (and Game of Thrones)

$
0
0

This article will discuss how to reduce build times using Distributed Persistent Rendering, a concept created by the Netlify team. Using this concept, we’ll build a simple blog using Next.js, pre-generating only our most recent post at build time and deferring other posts until the initial request.

In this post, we’ll go through how to optimize build times using a new concept called Distributed Persistent Rendering, introduced by Netlify. This concept addresses some of the issues developers face while building large sites on the Jamstack by reducing build times.

Using this concept, we will build a simple blog using Next.js that displays some of our favorite characters from Game of Thrones.

This article assumes—or hopes is perhaps a better word—that you are familiar with the basics of React and Next.js; however, I’ll go ahead and explain some of the terminologies.

What Is Jamstack?

Jamstack is a way to architect your web projects where the UI is mostly pre-generated, the frontend is decoupled from backend services, and you can pull in data as you need it.

The Jamstack architecture also provides a performance advantage at scale because your content can be pre-generated beforehand and delivered through CDNs, ensuring your pages load fast while delivering exceptional user experiences.

What Is Next.js?

Next.js is an open-source framework built on React that enables several extra functionalities, such as extending React’s capability to include applications rendered on the server (server-side rendering) and static website generation. Traditional React apps render all their content in the client-side browser. Next.js follows the fundamental principles of Jamstack, which allows for the efficient use of CDN to serve web applications to consumers, significantly improving applications’ speed.

Distributed Persistent Rendering (DPR)

Distributed persistent rendering is a new concept introduced by the team at Netlify, and it is built on the core principles of Jamstack. Building an ecommerce site or an extremely large site may result in very lengthy build times due to the number of web pages that need to be built.

Netlify’s initial implementation of DPR is called On-demand Builders. This approach allows you to incrementally build your site by dividing your assets into two categories.

  • Critical content
  • Deferred content

It reduces the time it takes to build really large sites by providing developers with the ability to pre-build certain pages early (the critical content) and defer or postpone others until they are requested for the first time. Deferred pages are built and cached at the edge when requested for the first time.

This concept is designed to work with any framework, and, in this post, we will be testing it out with Next.js.

Next.js Setup

We’ll be using this Next.js Netlify starter created by Cassidy Williams at Netlify. First, head over to the repository and click the Deploy to Netlify button in the README.md file. You’ll be asked to connect Netlify to your GitHub account, where a repository called next-netlify-starter will be created for you. Click the Save and Deploy button, and you’ll be redirected to your site overview screen on your Netlify dashboard.

Click on the Plugins link on your Netlify dashboard, and you see that the Essential Next.js plugin has been automatically installed for you. This plugin configures your site on Netlify to enable key Next.js functionality, and it creates a Netlify function for every Next.js page that needs one. With this plugin installed, we’ll get automatic access to On-demand Builders out of the box when working with Next.js. Cool, isn’t it?!

Dashboard showing Netlify’s Essential Next.js plugin

Now, follow the steps below to clone the project locally:

  • Install the project and its dependencies with npm install.
  • Start your development server with npm run dev.
  • Head over to localhost:3000 on your browser, and you should see a screen that says Welcome to my app!

We’ll be fetching the data we need from this external API endpoint. Create a posts directory in the pages directory; then create an index.js file in the posts directory. The file path should look like this: pages/posts/index.js.

Add the following code to the index.js file:

import Link from "next/link";
import Footer from "@components/Footer";
import Image from "next/image";

export default function Home({ characters }) {
  return (
    <div className="container">
      <h1>Game of Thrones Casts</h1>
      <main className="index_post">
        {characters.map((character) => {
          const { id, imageUrl, fullName } = character;
          return (
            <div
              key={id}
              className="post"
              style={{
                display: "flex",
                justifyContent: "center",
                alignItems: "center",
              }}
            >
              <Link href={`/${id}`}>
                <a>
                  <div
                    style={{
                      display: "flex",
                      alignItems: "center",
                      flexDirection: "column",
                    }}
                  >
                    <Image
                      width="300px"
                      height="300px"
                      src={imageUrl}
                      alt="postImage"
                    />
                    <h3>{fullName}</h3>
                  </div>
                </a>
              </Link>
            </div>
          );
        })}
      </main>
      <Footer />
    </div>
  );
}
export async function getStaticProps() {
  const res = await fetch("https://thronesapi.com/api/v2/Characters");
  const characters = await res.json();
  return {
    props: {
      characters,
    },
  };
}

We return our characters inside the props object in the getStaticProps() function. This way, getStaticProps() will fetch our required external data, the list of characters in Game of Thrones, and they will be passed to the HomePage component as a prop. For each character, we are displaying an image and the character’s name. If you go to http://localhost:3000, you should see a list of all the characters returned from that API.

A list of characters of Game of Thrones

Now, let’s create a CharacterDetailPage component that returns paths with dynamic routes to individual pages. Create a page called [id].js under posts. This should be the path for each character /posts/<id>.

In the [id.js] file, add the following:

import Image from "next/image";

export default function CharacterDetailPage({ character }) {
  const { fullName, title, family, imageUrl } = character;
  
  return (
    <div className="id-post">
      <main>
        <h1>{fullName}</h1>
        <Image width="400px" height="400px" src={imageUrl} alt="postImage" />
        <h2>{title}</h2>
        <h4>{family}</h4>
      </main>
    </div>
  );
}
export async function getStaticPaths() {
  const res = await fetch("https://thronesapi.com/api/v2/Characters");
  const characters = await res.json();
  const stark = characters.filter(
    (character) => character.family === "House Stark"
  );
  const paths = stark.map((person) => ({
    params: { id: person.id.toString() },
  }));
  return { paths, fallback: false };
}
export async function getStaticProps({ params }) {
  const res = await fetch(
    `https://thronesapi.com/api/v2/Characters/${params.id}`
  );
  const character = await res.json();
  return {
    props: {
      character,
    },
  };
}

In the code snippet above, we define the path that we want to be generated at build time in the getStaticPaths() function. We are filtering through all the characters and pre-generating only the paths for characters from the family of House Stark at build time. The paths for characters from other families will be deferred and generated on the initial request. In our functions return statement, we are passing the paths, and we are also passing false as the value of fallback.

Try to access any of the characters of house Stark (e.g., Arya Stack or Jon Snow). You’ll have access to their details page because we pre-generated their paths in the getStaticPaths() function.

Because we set false as the value of fallback here, if we request for a character whose path hasn’t already been generated or that wasn’t part of what we defined in the getStaticPaths() function to be generated at build time (e.g., Daenerys Targaryen of House Targaryen), we will get a 404 page.

404 image

This is not the behavior we want. We still want to be able to access characters from other families whose paths were not pre-generated. To achieve that, we need to set the value of fallback to true or blocking in the getStaticPaths() function.

return { paths, fallback: true };

A screenshot of Daenerys Targaryen details page

When the value of fallback is set to true or blocking, if we try to access a character whose path we didn’t pre-generate, behind the scenes Next.js will generate the path for that character and cache it automatically on Netlify’s edge CDN. Now the character will be available to us as if it were part of the original build. When someone who visits our site tries to access the details of that same character, it will be provided from the cache and will not need to be generated again.

Summary

We’ve tested this concept on a simple site, but what if you’re working on a large site that has thousands of pages, as the case may be? Imagine the amount of time you’d spend on every build.

We’ve seen that using Netlify’s On-demand Builders to build only the critical pages and defer other pages that aren’t very important until a user first requests for them can significantly reduce our build times and result in faster development cycles and better productivity.

On-demand Builders are currently in its early access phase, and it is flexible enough to work across multiple frameworks, but I love the ease with which it integrates with Next.js.


Create a File Picker Using Xamarin.Essentials and Telerik UI for Xamarin

$
0
0

Want to pick files from the device and visualize them in your mobile and desktop applications? No problem! It’s more than easy with Xamarin.Essentials and Telerik UI for Xamarin controls.

In this blog post, we will go through how to use the FilePicker API. We will implement a sample UI for picking images, pdf documents, and selecting multiple images. But what’s next? We want to visualize these files in our application, so we need proper controls, right? And the Telerik UI for Xamarin suite comes in to help us!

Getting Started With Xamarin.Essentials FilePicker

The FilePicker allows us to pick a single or multiple file from the device more than easily. We need a single NuGet package installed to our existing project or new project—Xamarin.Essentials NuGet package.

Platform Settings

On Android

1. Make sure the Xamarin.Essentials is initialized inside the OnCreate() method of the MainActivity.cs file of the Android project:

Xamarin.Essentials.Platform.Init(this, savedInstanceState);

2. For handling runtime permissions on Android, inside the MainActivity.cs file—override the OnRequestPermissionsResult() method:

public override void OnRequestPermissionsResult(int requestCode, string[] permissions, [GeneratedEnum] Android.Content.PM.Permission[] grantResults)
{
Xamarin.Essentials.Platform.OnRequestPermissionsResult(requestCode, permissions, grantResults);
base.OnRequestPermissionsResult(requestCode, permissions, grantResults);
}

3. Grant permissions to read data from the external storage. We can use one of the following options:

  • Open the AssemblyInfo.cs file located inside the Properties folder and add the following code:

    [assembly: UsesPermission(Android.Manifest.Permission.ReadExternalStorage)]
  • Open the AndroidManifest.xml file inside the Properties folder and add the following inside of the manifest node:

    <uses-permission android:name="android.permission.READ_EXTERNAL_STORAGE" />

Android permissions popup:

android device storage permissions

✅ iOS and UWP

They don’t require additional setup.

FilePicker API

FilePicker class gives us two methods for picking file(s):

  • PickAsync() – gives us the option to pick a single file from the device.
  • PickMultipleAsync() – gives us the option to pick multiple files from the device.

Both methods have a parameter PickOptions for specifying additional information like:

  • PickerTitle – which is only used on Android platform
  • FileTypes with predefined types like Images, Png, Jpeg, Videos, Pdf
var seletedImage = await FilePicker.PickAsync(new PickOptions
{
FileTypes = FilePickerFileType.Images,
PickerTitle = "Select an image"
});

Of course, we can specify custom file types per platform. For example, if we want the user to be able to pick a .txt file on iOS, a .pdf file on Android, and .txt/.pdf/.docx files on UWP, we’d use the following simple code:

var customFileType =
new FilePickerFileType(new Dictionary<DevicePlatform, IEnumerable<string>>
{
{ DevicePlatform.iOS, new[] { ".txt" } },
{ DevicePlatform.Android, new[] { ".png" } },
{ DevicePlatform.UWP, new[] { ".docx", ".txt", ".pdf" } },
});
var options = new PickOptions
{
PickerTitle = "Please select a comic file",
FileTypes = customFileType,
};
var result = await FilePicker.PickAsync(options);

We will use PickAsync() and PickMultipleAsync() methods in our demo.

❗ We must add the following namespace where the FilePicker API is used:

using Xamarin.Essentials;

Demo Time

This is what the FilePicker demo looks like:

file picker xamarin demo

The demo uses the following Telerik UI for Xamarin controls:

  • RadTabView for switching between different options—single image, PDF file, and multiple image selection
  • RadButton for its Click event, which will open the file picker
  • RadPdfViewer for visualizing the selected PDF document
  • RadListView for visualizing multiple images

I have added the Telerik UI for Xamarin controls to the project using the Telerik NuGet Server.

Let’s Start With the XAML

<?xml version="1.0" encoding="utf-8" ?>
xmlns:telerikInput="clr-namespace:Telerik.XamarinForms.Input;assembly=Telerik.XamarinForms.Input"
xmlns:telerikPrimitives="clr-namespace:Telerik.XamarinForms.Primitives;assembly=Telerik.XamarinForms.Primitives"
xmlns:telerikPdfViewer="clr-namespace:Telerik.XamarinForms.PdfViewer;assembly=Telerik.XamarinForms.PdfViewer"
xmlns:telerikDataControls="clr-namespace:Telerik.XamarinForms.DataControls;assembly=Telerik.XamarinForms.DataControls"
xmlns:telerikListView="clr-namespace:Telerik.XamarinForms.DataControls.ListView;assembly=Telerik.XamarinForms.DataControls"
x:Class="FilePickerDemo.MainPage">
<ContentPage.Resources>
<ResourceDictionary>
<Style TargetType="telerikPrimitives:TabViewHeaderItem">
<Setter Property="TextColor" Value="Black"/>
<Setter Property="SelectedColor" Value="#0E88F2"/>
</Style>
<Style TargetType="telerikInput:RadButton">
<Setter Property="WidthRequest" Value="100"/>
<Setter Property="CornerRadius" Value="15"/>
<Setter Property="Margin" Value="10"/>
<Setter Property="TextColor" Value="White"/>
<Setter Property="BackgroundColor" Value="#0E88F2"/>
</Style>
</ResourceDictionary>
</ContentPage.Resources>
<Grid RowDefinitions="Auto,*">
<Label Text="Welcome to FilePicker Demo"
HorizontalTextAlignment="Center"
TextColor="Black"
FontSize="36"/>
<telerikPrimitives:RadTabView Grid.Row="1"
IsContentPreserved="True"
IsContentSwipingEnabled="False">
<telerikPrimitives:RadTabView.Items>
<telerikPrimitives:TabViewItem HeaderText="Pick Image">
<telerikPrimitives:TabViewItem.Content>
<StackLayout Margin="10">
<telerikInput:RadButton Text="Pick Image" Clicked="OnPickImageClicked"/>
<Label x:Name="PickedImageInfo" FontSize="16" Margin="10"/>
<Image x:Name="image" HeightRequest="200" WidthRequest="200"/>
</StackLayout>
</telerikPrimitives:TabViewItem.Content>
</telerikPrimitives:TabViewItem>
<telerikPrimitives:TabViewItem HeaderText="Pick Pdf">
<telerikPrimitives:TabViewItem.Content>
<Grid RowDefinitions="Auto,*" Margin="10">
<telerikInput:RadButton Text="Pick Pdf Document" Clicked="OnPickPdfClicked"/>
<telerikPdfViewer:RadPdfViewer x:Name="pdfViewer" Grid.Row="1" BackgroundColor="Transparent"/>
</Grid>
</telerikPrimitives:TabViewItem.Content>
</telerikPrimitives:TabViewItem>
<telerikPrimitives:TabViewItem HeaderText="Pick Multiple Images">
<telerikPrimitives:TabViewItem.Content>
<Grid RowDefinitions="Auto,*" Margin="10">
<telerikInput:RadButton Text="Pick Multiple Images" Clicked="OnPickMultipleImagesClicked"/>
<telerikDataControls:RadListView x:Name="listView" Grid.Row="1">
<telerikDataControls:RadListView.ItemTemplate>
<DataTemplate>
<telerikListView:ListViewTemplateCell>
<telerikListView:ListViewTemplateCell.View>
<StackLayout Margin="10">
<Image HeightRequest="100"
WidthRequest="100"
VerticalOptions="Center" Source="{Binding .}" />
</StackLayout>
</telerikListView:ListViewTemplateCell.View>
</telerikListView:ListViewTemplateCell>
</DataTemplate>
</telerikDataControls:RadListView.ItemTemplate>
</telerikDataControls:RadListView>
</Grid>
</telerikPrimitives:TabViewItem.Content>
</telerikPrimitives:TabViewItem>
</telerikPrimitives:RadTabView.Items>
</telerikPrimitives:RadTabView>
</Grid>
</ContentPage>

As you can see in the XAML, we have a TabView control with three different TabViewItems. Next, let me take you through what each TabViewItem does.

Pick Image

The first tab is for picking a single image from the device. When the Button is clicked, we can pick an image from the device and visualize it in the Image control. Here is the OnPickImageClicked() implemetation:

private async void OnPickImageClicked(object sender, System.EventArgs e)
{
try
{
var seletedImage = await FilePicker.PickAsync(new PickOptions
{
FileTypes = FilePickerFileType.Images,
PickerTitle = "Select an image"
});
if (seletedImage != null)
{
var data = await seletedImage.OpenReadAsync();
PickedImageInfo.Text = $"The filename: {seletedImage.FileName} and file type: {seletedImage.ContentType}";
image.Source = ImageSource.FromStream(() => data);
}
return;
}
catch (Exception)
{
}
}

Pick PDF File

The second tab is for picking a pdf document and visualizing it in the RadPdfViewer. Here is the OnPickPdfClicked() implementation.

private async void OnPickPdfClicked(object sender, System.EventArgs e)
{
try
{
var selectedFile = await FilePicker.PickAsync(new PickOptions
{
FileTypes = FilePickerFileType.Pdf,
PickerTitle = "Select a pdf"
});
if (selectedFile != null)
{
var data = await selectedFile.OpenReadAsync();
PdfFormatProvider provider =new PdfFormatProvider();
RadFixedDocument document = provider.Import(data);
pdfViewer.Source = document;
pdfViewer.IsVisible = true;
}
return;
}
catch (Exception)
{
}
}

Pick Multiple Images

The third tab is for multiple image selection. When the button is clicked, we can select multiple images from the device and visualize them in the RadListView control. Here is the OnPickMultipleImagesClicked() implementation:

private async void OnPickMultipleImagesClicked(object sender, EventArgs e)
{
try
{
var selectedImage = await FilePicker.PickMultipleAsync(new PickOptions
{
FileTypes = FilePickerFileType.Images,
PickerTitle = "Select images"
});
var imageList = new List<ImageSource>();
if (selectedImage != null)
{
foreach (var selected in selectedImage)
{
var data = await selected.OpenReadAsync();
imageList.Add(ImageSource.FromStream(()=>data));
}
listView.ItemsSource = imageList;
}
return;
}
catch (Exception)
{
}
}

Pick HTML Documents

You can easily pick HTML documents and then visualize them in your desktop and mobile apps using the Telerik RichTextEditor for Xamarin.

Tell Us What You Think

We would love to hear what you think, so should you have any questions and/or comments, please share them in our Telerik UI for Xamarin Feedback Portal.

If you are new to Telerik UI for Xamarin, you can learn more about it via the product page. It comes with a 30-day free trial, giving you some time to explore the toolkit and consider using it for your current or upcoming Xamarin development.

World of .NET Cross-Platform Application Development

We would also like to share with you our preview UI components for .NET MAUI—Telerik UI for .NET MAUI. You can review the available controls and their features in our Telerik UI for .NET MAUI Demo Application.

Happy coding with our controls!

Sands of MAUI: Issue #37

$
0
0

Welcome to the Sands of MAUI—newsletter-style issues dedicated to bringing together latest .NET MAUI content relevant to developers.

A particle of sand—tiny and innocuous. But put a lot of sand particles together and we have something big—a force to reckon with. It is the smallest grains of sand that often add up to form massive beaches, dunes and deserts.

Most .NET developers are looking forward to .NET Multi-platform App UI (MAUI)—the evolution of Xamarin.Forms with .NET 6. Going forward, developers should have much more confidence in the technology stack and tools as .NET MAUI empowers native cross-platform solutions on mobile and desktop.

While it is a long flight until we reach the sands of MAUI, developer excitement is palpable in all the news/content as we tinker and prepare for .NET MAUI. Like the grains of sand, every piece of news/article/video/tutorial/stream contributes towards developer knowledge and we grow a community/ecosystem willing to learn and help.

Sands of MAUI is a humble attempt to collect all the .NET MAUI awesomeness in one place. Here's what is noteworthy for the week of December 13, 2021:

.NET Podcast App

The .NET Podcast app was a cornerstone demo during .NET Conf—a unified app running on multiple platforms and showcasing the flexibility of code sharing across Blazor, .NET MAUI and ASP.NET Core. The source code for the .NET Podcast app was recently open sourced, but running it locally involved a few steps—who knew a real world app had some moving pieces and architectural dependencies.

James Montemagno produced a video showcasing local development walkthrough with the .NET Podcast app—a how-to guide on grabbing source code and running the app locally.

Aside from .NET MAUI and Blazor code, the .NET Podcast app has Azure Container Service dependencies, uses GitHub Actions and utilizes backend APIs powered by ASP.NET Core. This is a great real-world sample app perfect for developer exploration and James shows how to have the full end-to-end demo running on developer local machine.

DotNetPodcastApp

Hot Restart

Developers have always been told that one needs a Mac to build for iOS from Xamarin.Forms/.NET MAUI while on a Windows machine. Turns out, this is not entirely true thanks to a wonderful feature—Xamarin Hot Restart, which enables developers to quickly test code changes on an iOS device during app development. Armed with an iOS device and a connecting cable, developers can directly deploy apps to the device from Xamarin.Forms with Visual Studio while running on Windows.

Gerald Versluis produced a video exploring iOS development without a Mac and dived head first into Xamarin Hot Restart. As usual, Gerald makes the technology accessible to anyone—starting with the basics of Xamarin Hot Restart, developer setup, installing iTunes and connecting to physical iOS device.

With a paid Apple Developer Program subscription, developers can set up Visual Studio on Windows to directly deploy/test apps to iOS devices—and even publish apps to the App Store.

HotRestart

.NET FrontEnd Day

Building client apps with .NET? You could be building web/desktop/mobile apps across a variety of platforms with some solid tooling. And nothing else celebrates .NET on the client side like .NET FrontEnd Day—a full day virtual conference, with focus on building frontend apps using .NET.

With a successful first year under the belt, .NET FrontEnd Day is gearing up for the second edition on Feb 10, 2022 and just announced their list of speakers. Rest assured, there would be no dearth of .NET MAUI and Blazor love—developers should register and tune in.

DotNetFrontEnd

.NET Today & Tomorrow

.NET has come a long way and the future of the .NET developer ecosystem looks bright. There is, however, a lot to take in and the bigger picture story from experienced .NET developers help.

Ed Charbeneau produced a video on the .NET of Today and Tomorrow, recapping some historical perspective and looking ahead at the future with .NET 6.

Ed talks about the .NET unification story and how .NET UI tooling from Progress Telerik can help .NET developers be more successful. It did not take long for Ed to dive into modern web development with .NET 6 and Blazor and exploring the code-sharing future with Hybrid apps using Blazor on top of .NET MAUI—all backed by solid demos and code walkthroughs.

DotNetTodayTomorrow

.NET 6 Favorites

.NET 6 is out and there was a lot of .NET developer content shared at .NET Conf. While most developers are still taking it all in, Dave Brock wrote up an article on favorite things in .NET 6.

Dave correctly points out some of the major objectives with .NET 6—lower barrier to entry into .NET, improving app startup/performance metrics, elevated client app development experience and faster developer inner loop.

While most of Dave's favorites lean towards modern web development, many point to the core benefits of .NET 6 for .NET MAUI developers as well. Some of the .NET 6 excitement centers around Hot Reload, C# 10 features, Minimal APIs and Blazor improvements—the present unified reality of .NET is looking pretty good.

DotNet6Favs

That's it for now.

We'll see you next week with more awesome content relevant to .NET MAUI.

Cheers, developers!

Building a Design System with Kendo UI

$
0
0

Explore how to create a design system using the Progress Sass Theme Builder and KendoReact for consistent components, colors and theming across your project.

To ensure UI and component behavioral consistency across a project, any medium- to large-scale application should incorporate some kind of a design system. In this tutorial, we will cover what a design system is, why it’s useful, and how to incorporate one using Kendo UI.

What Is a Design System?

In simple terms, a design system is a set of principles, guidelines and rules with information about how different elements and components in your application should look and behave. For example, a design system could cover things like:

  • Font family and sizing for typography, such as headings, body paragraphs or labels
  • Brand and palette colors
  • Icons
  • Behavior and look of components, such as form fields
  • And more

The whole point of a design system is that, no matter how many developers or teams are working on a product, it will have a consistent UI and behavior, as all members are using the same guidelines and components. Questions like “What color should I use?” or “What font-size should this heading be?” are already answered, and developers only have to pick one from the design system.

If you would like to see some of the most popular design systems, you can check these out:

What Is Kendo UI?

Kendo UI is a comprehensive collection of JavaScript UI components that can help speed up the process of building web applications. It has ready-made and flexible components for many different use cases, such as forms, editors, charts, layout, popups and more. Kendo UI offers kit libraries for jQuery, Angular, React and Vue, so even if your teams use different frameworks, they can still create products with consistent looking UI and behavior.

How to customize and build a Kendo theme?

  • Default theme – available via the @progress/kendo-theme-default npm module
  • Boostrap theme – available via the @progress/kendo-theme-bootstrap npm module
  • Material theme – available via the @progress/kendo-theme-material npm module

All of them provide great-looking UI elements out of the box. However, if you would like to customize those themes or even create your own, Kendo UI allows you to do that. You can find respective theme styling documentation under these links:

The styling section describes how to install, use, customize the default themes or even create your own. First, we will have a look at how to create your own custom theme.

Progress also offers additional design-to-development tools: Figma kits and Unite UX. If you want to learn more about them, this blog post provides a nice introduction.

Progress Sass Theme Builder

One way to create your own theme is by using the Progress Sass Theme Builder.

Progress Sass Theme Builder page. We're in KendoReact, with options to Start Theming (select a Telerik them for a base) or to Import Theme (Upload your customized theme).

After choosing one of the available products, e.g. Kendo React, there are two options you can choose from: “Start Theming” or “Import Theme.” If you have a pre-existing Kendo theme, you can import an SCSS file with Kendo-specific variables. If it’s your first time, then you can go with the “Start Theming” option.

You will need to select the base theme, which will be used as the starting point. You can choose between “Default,” “Bootstrap” and “Material.” After that, you can specify which components you want to style. If you want your configuration to affect all components, just select all of them and then click on the “Create” button.

Select base theme and components to be styles. Default theme is selected, showing white, gray, a salmon color, a darker version of it, and a dark gray. Next we'll select what components to style - so far All are selected.
After creating the initial theme setup, you should see a page with all of the components, as well as the sidebar that contains a list of inputs for configuring brand and component colors. The big advantage of the theme builder is the fact that you can see how all components will look with the chosen theme colors.

Theme Builder UI has a side bar with a list of default brand colors, page colors, base, hover, selected, chart. The theme preview lists various components and shows a preview of them, including buttons, dropdowns, inputs.

What’s more, if you look closely on the left side, you will see that there is also a panel with predefined color swatches you can choose a theme from.

Color swatches panel shows sets of colors for Default (which is selected), Black, Blue Opal, Default Black, Default Blue, Default Green, Default Orange.

If you don’t like any of these, you can provide your own colors.

When you’re ready, you can click on the Download button, which you can find in the top-right corner of the page. It will download a Zip file containing two files:

  • YourThemeName.css
  • variables.scss

If you want to change your theme later on, you can modify the variables directly. However, if you want to use the same visual theme builder, you can do so by importing the variables.scss file that you downloaded previously. It’s as simple as that.

Modifying Kendo Theme via SCSS Variables

Kendo UI provides theme customization capabilities via SCSS variables. For this example, I am going to use the KendoReact kit. Below, you can find an interactive example showcasing customized headings, buttons and a form using KendoReact.

If you would like to try it out locally, you can clone this repository, or you can create a fresh React project.

You will need to install sass as well as one of the three themes provided by Kendo UI. To install the Default theme, you can run npm install sass @progress/kendo-theme-default or yarn add sass @progress/kendo-theme-default. If you prefer Bootstrap or Material, then just replace the @progress/kendo-theme-default with respective packages.

Other packages you can install are:

  • @progress/kendo-react-buttons
  • @progress/kendo-react-form
  • @progress/kendo-react-inputs
  • @progress/kendo-react-labels

In the App.js file, you can add this code:

src/App.js

import React from "react";
import { Button } from "@progress/kendo-react-buttons";
import { Form, Field, FormElement } from "@progress/kendo-react-form";
import { Error } from "@progress/kendo-react-labels";
import { Input } from "@progress/kendo-react-inputs";

const emailRegex = new RegExp(/\S+@\S+\.\S+/);
const emailValidator = value =>
  emailRegex.test(value) ? "" : "Please enter a valid email.";
const EmailInput = fieldRenderProps => {
  const { validationMessage, visited, ...others } = fieldRenderProps;
  return (
    <div>
      <Input {...others} />
      {visited && validationMessage && <Error>{validationMessage}</Error>}
    </div>
  );
};

export default function App() {
  const handleSubmit = dataItem => alert(JSON.stringify(dataItem, null, 2));
  return (
    <div>
      <fieldset className="k-mb-4">
        <legend>Headings</legend>
        <h1 className="k-h1">Typography</h1>
        <h2 className="k-h2">Typography</h2>
        <h3 className="k-h3">Typography</h3>
        <h4 className="k-h4">Typography</h4>
        <h5 className="k-h5">Typography</h5>
        <h6 className="k-h6">Typography</h6>
      </fieldset>
      <fieldset className="k-mb-4">
        <legend>Buttons</legend>
        <div className="k-mb-4">
          <Button className="k-mr-4">Default</Button>
          <Button className="k-mr-4" disabled>
            Default disabled
          </Button>
        </div>
        <div>
          <Button className="k-mr-4" primary>
            Primary
          </Button>
          <Button primary disabled>
            Primary disabled
          </Button>
        </div>
      </fieldset>
      <fieldset className="k-mb-4">
        <legend>Form</legend>
        <Form
          onSubmit={handleSubmit}
          render={formRenderProps => (
            <FormElement style={{ maxWidth: 650 }}>
              <fieldset className={"k-form-fieldset"}>
                <legend className={"k-form-legend"}>
                  Please fill in the fields:
                </legend>
                <div className="mb-3">
                  <Field
                    name={"firstName"}
                    component={Input}
                    label={"First name"}
                  />
                </div>

                <div className="mb-3">
                  <Field
                    name={"lastName"}
                    component={Input}
                    label={"Last name"}
                  />
                </div>

                <div className="mb-3">
                  <Field
                    name={"email"}
                    type={"email"}
                    component={EmailInput}
                    label={"Email"}
                    validator={emailValidator}
                  />
                </div>
              </fieldset>
              <div className="k-form-buttons">
                <button
                  type={"submit"}
                  className="k-button"
                  disabled={!formRenderProps.allowSubmit}
                >
                  Submit
                </button>
              </div>
            </FormElement>
          )}
        />
      </fieldset>
    </div>
  );
}

It will create three sections. The first one will contain headings, the middle one buttons, and the last one a form.

We also need to include the theme and add an .scss file, so we can add our own style overrides. For that, let’s create a new file called kendo-theme.scss.

src/styles/kendo-theme.scss

@import "~@progress/kendo-theme-default/dist/all.scss";

Besides that, we also need to import the kendo-theme.scss file in the index.js file.

src/index.js

import React from "react";
import ReactDOM from "react-dom";
import "./styles/kendo-theme.scss";
import App from "./App";

ReactDOM.render(<App />, document.getElementById("root"));

That’s it for the setup. The image below shows what you should see after running the project.

Default theme with headings at various levels, previewed; buttons with previews of default and primary, then both disabled; then form with with sample fields, instructions, and submit button.

Now, let’s add a few overrides. To customize Kendo UI, we can create SCSS variables with our own values. For that, let’s modify the kendo-theme.scss file.

src/styles/kendo-theme.scss

// Common
$font-size: 18px;
$primary: #44e713;
$border-radius: 5px;

// Headings
$h1-font-size: 30px;
$h2-font-size: 26px;
$h3-font-size: 22px;
$h4-font-size: 18px;
$h5-font-size: 18px;
$h6-font-size: 18px;

// Button

$button-border-width: 3px;
$button-font-size: 14px;
$button-padding-x: 12px;
$button-padding-y: 8px;

@import "~@progress/kendo-theme-default/dist/all.scss";

The variables need to be placed before importing the theme. As you can see, we provided our own values for the base font size of text and headings, and we changed primary color, base border radius, as well as a few button properties. Below is an image of how it should look now. You can also check the interactive example shown previously.

Custom theme shows the same items: Headings, buttons, form, but they are tweaked to match the code. For instance, the buttons are green.

You can find the list of available SCSS variables for Kendo React in the Customization section.

Wrap-up

We have covered what a design system is, and how to create and customize one using Sass Theme Builder and KendoReact. A really great thing about using a UI kit like Kendo UI is the fact that you can reuse the components, colors, theming, etc. across your projects. It also helps to maintain consistent design and behavior, and if you need more flexibility, you can easily customize the theme and even build more complex component on top of Kendo UI.

How Mindfulness Makes Savvy Software Developers More Powerful

$
0
0

The topic of self-care isn’t discussed that often in the world of software development. Our teams are always working to deliver the next big feature or focused on an upcoming release. While we are all cognizant self-care is important, it is time we become more mindful in our approach.

The mindfulness movement is gaining momentum with generations of all ages, and, in its simplest form, it is about how to shape your mindset. The way in which you perceive that around you and your reactions are tied directly to your mindset.

The good news is you can retrain your brain through a series of techniques to help you focus on the present moment, which can lead to improvements in both physical and mental health.

The first objection you might have to pause to be present is that you are too busy and don’t have the time. Yet, in a Ted Talk titled, “All it takes is 10 minutes,” Andy Puddicombe, describes how it only takes 10 minutes to harness that transformative power of mindfulness.

In your role, you rely on your mind for everything you do, and you are good at what you do because you are wired a certain way. Mindfulness isn’t out to change the way you are wired; it is there for you to learn how to remove distractions that are interfering with you enjoying life to its fullest. By taking care of yourself and your brain, you will find greater fulfillment each day.

Now that may sound cheesy to some of you, yet if you think about a life retrospective the same way you do a software dev cycle retrospective, what would your findings be? Think about the last joyful moment you experienced—did you catalog the emotion of gratitude?

Gratitude is an important quality and an attitude that can immediately change your outlook on your circumstances. Once you realize that not everything is in your control and that you can’t change the past, but what you can do is focus on the right now—your mind becomes clearer. Now, mindfulness isn’t a constant state of being, yet this mindset shift gives you an opportunity to experience gratitude more frequently and not only when it is forced, let’s say for the Thanksgiving holiday.

“How does this tie back into software development?” you ask. It gives you a new perspective on the work to be done and a heightened sense of empathy as you work to deliver solutions. With a clearer mind, you worry less about repeating past mistakes, you are more laser-focused and those productivity-busting distractions are minimized. You have become the best version of yourself, and the best version of yourself is capable of extraordinary things. Often, we don’t realize that our thoughts can be self-sabotaging, and gratitude is a powerful emotion that is manifested through mindfulness.

The other tie-in is how mindfulness impacts your happiness, and your level of happiness can be directly correlated to your job satisfaction. What does happiness have to do with anything? Well, when you are happy, you tend to be more creative in your role—and in software development, solving problems creatively is the name of the game.

Your happiness level also influences how you approach conflict or differences in opinions, and how you overcome obstacles. In the workplace, employees who can think outside of themselves, who are able to rethink their assumptions, and who are in control of their reactions are the most sought-after individuals.

To find the right approach for you to allow thoughts to come and go, there are many resources out there and even apps, like Calm, that offer guided meditations and other practices. The goal is to help you take a step back, rethink your opinions as not facts, and then step forward with a perspective that is open to possibilities. We are all on different journeys and we all have different experiences that make up who we are and that is ok. Yet, with the mind being the wonderland it is, you owe to yourself and the ones you love to explore mindfulness and unlock a whole new host of experiences.

5 Things To Try

As a fan of checklists, I have five things you can do right away to give mindfulness a shot.

  1. Get out a pen and a piece of paper. Take five minutes to doodle and see where it takes you. While you doodle, focus on the pen and the paper, and see what you produce without any direction.
  2. Grab a sticky note and write one thing you are thankful for today and put in on your monitor. Throughout the day you will be reminded of what you are thankful for, even when there are unsettling distractions around you.
  3. Breathe. This is one many of us struggle with, yet it is good advice for everyone. Consciously taking a series of deep breaths helps calm our nervous systems naturally.
  4. Move around. In our line of work and with the fact that fewer of us are in traditional offices, it is likely you are not moving your body during the workday as you had in the past. You do not have to run at lunch, but even some slow and steady movement can win the race when you need a pick-me-up.
  5. Take a Twitch break. Work-from-home life can be isolating, and establishing a community connection can help us reengage. Of course, I am biased if you need recommendations, but Code It Live offers enlightening commentary and fun banter on software development. Tune in live or watch episodes on demand.

If you are interested in more topics like mindfulness, please drop a comment below. We are interested in ways we can be impactful outside the walls of our software solutions, and hearing from you will help us deliver content that you find valuable.

What’s New With Visual Studio 2022

$
0
0

See what new features your favorite IDE has brought in this major release.

Visual Studio has had its first major release in about 18 months (depending on how you look at it). This release adds a ton of new features and capabilities to the IDE. Now, is a great time to start learning about them.

Updated User Interface

The user experience of the IDE has been updated to be more consistent and more user friendly. This includes new icons, new fonts, new personalization and more.

New Icons

The icons have been updated to be consistent across different icons while remaining legible and familiar to the user.

Visual Studio 2022 - Icon Refresh

Theme Support

You’ve probably noticed in the image above that there are icons for a light and dark theme. While themes are not new to Visual Studio, Visual Studio now offers you the ability to sync your Visual Studio theme with your operating system theme.

The dark theme has been updated also to better align with the Microsoft design guidelines and improve accessibility.

Visual Studio now includes a Theme Converter, which converts Visual Studio Code themes to Visual Studio themes.

Inlay Hints

Visual Studio now includes inlay hints for code completion, code lens and more. Inlay hints can display parameter name hints for literals, function calls and more.

Visual Studio 2022 - Inlay Hints

In this image, you can see that Visual Studio tells you that the type for variable imageUrl is string and contact is of type Contact. Further down the image, the RedirectToAction method has a parameter named actionName, which this sample is using the Details action.

Note, this feature is not on by default. You can enable it by going to the Tools > Options > Text Editor > C# or Basic > Advanced then select Inlay Hints.

Visual Studio 2022 - Inlay Options

Speeding Up Visual Studio

You might be saying that all these user interfaces are nice, but Visual Studio is slow enough already. Well, that might have been the case for earlier versions of Visual Studio, but that is not the case for Visual Studio 2022.

It’s faster in part now that Visual Studio 2022 is a 64-bit application. This means that the main process (devenv.exe) is no longer limited to 4GB of memory. Now Visual Studio can load larger projects and load more projects at once. You’ll also avoid the “out of memory” errors that Visual Studio was seeing before when opening large solutions, files or objects into memory.

Solution loading and file searching is now faster as well. Visual Studio now stores additional information about the solution in the .sln file. This information is used to speed up the loading of the solution. This information is also used to speed up the file searching.

To continue on the speeding-up Visual Studio theme, Microsoft also improved the Fast up to date feature to better check to see if a project or its dependencies are up to date or need to be rebuilt.

New Debugging Features

Visual Studio 2022 has added and enhanced the debugging features of Visual Studio.

Breakpoints

Let’s talk about breakpoints first. There are two new breakpoints that you can set in Visual Studio—temporary and dependent breakpoints—as shown in the image below.

Visual Studio 2022 - Debug Breakpoint Menu

The Temporary breakpoint is used to set a breakpoint that will only break once. Once Visual Studio hits that breakpoint, it deletes it. This is helpful if you want to set a breakpoint only to validate that something is working, and you aren’t debugging the code.

The Dependent breakpoint is used to set a breakpoint that will only break when another breakpoint is hit.

Force Run To Cursor

Previous versions of Visual Studio added a feature called “Run to Cursor.” This feature was used to execute code up to the code at the cursor.

Visual Studio 2022 - Run to Cursor

However, if you had any breakpoints between where you were and where you wanted to run to, Visual Studio would stop at all those breakpoints. Now with Force Run To Cursor, you can run to the cursor without hitting any breakpoints. If you hold the shift key down while hovering over the Run to Cursor glyph, Visual Studio will change the glyph to a Force Run To Cursor glyph and will run to the cursor without hitting any breakpoints.

Visual Studio 2022 - Force Run to Cursor

The Force Run to Cursor is also available in the Debug menu.

Other Debugging Features

For more on breakpoints or debugging tips and tricks in Visual Studio, check out this video:

IntelliCode

IntelliCode improves IntelliSense by using AI to help you find the right code completion. IntelliCode is context-aware and will help you find the right code completion when you are typing a method call, a property or a variable.

In the image below, I start to create a new method after the GetContactsAsync method. After I type public async, IntelliCode is inferring that I want to create a DeleteContactAsync method with a parameter of type contactId. If that is what I want, I can hit the Tab key twice to insert the suggestion.

Visual Studio 2022 - IntelliCode suggestion

Git Support

We now have multiple-repository support, which includes the ability to track changes across all the repositories in a project. If you open a solution that has multiple Git repositories in it, Visual Studio will connect/activate those repositories. Right now, this is limited to a max of 10 repositories.

You will be able to tell if Visual Studio has connected to or activated your different Git repositories by looking at the repository picker on the status bar (located at the lower right corner), which will tell you the number of active repositories you have.

The Git integration with Visual Studio has been improved and include support for multiple repositories, including improvements to both the Solution Explorer and Code Editors.

Hot Reload

Hot Reload is a feature of Visual Studio that allows you to modify your application’s managed code while that application is running without the need to hit a breakpoint or pause the application. This is a cool feature that will save you a lot of time without pausing or stopping your application to see how the source code changes you made changed your application.

However, the support for this feature is still in progress. There are some scenarios and products that are not yet supported.
Coming Soon to Mac

Visual Studio 2022 for Mac is coming. The Visual Studio team wants to make a modern .NET IDE tailored for the Mac that will look familiar to those using Visual Studio for Windows while using native macOS UI. For more on the Visual Studio 2022 for Mac and/or to join the private beta, please visit here.

Bye Bye .NET 5

While technically not released with Visual Studio 2022, Microsoft released .NET 6 at the same time and includes the .NET 6 SDK in the Visual Studio installation. So now is the time to start migrating your .NET 5, and earlier, projects to .NET 6. As Barry Dorrans @blowdart points out, .NET 5 moves to end of life in May of 2022.

Some more details on the support policy for .NET are below.

Supported Versions

Version Original Release Date Latest Patch Version Patch Release Date Support Level End of Support
.NET 6 November 08, 2021 6.0.0 November 08, 2021 LTS November 08, 2024
.NET 5 November 10, 2020 5.0.12 November 08, 2021 Current May 08, 2022
.NET Core 3.1 December 3, 2019 3.1.21 November 08, 2021 LTS December 3, 2022

Source: .NET Support Policy

Wrap-up

So, what’s stopping you from upgrading your IDE and version of .NET?

Viewing all 4336 articles
Browse latest View live


<script src="https://jsc.adskeeper.com/r/s/rssing.com.1596347.js" async> </script>